|

This tutorial is from Tshaka who I thank for
letting me translate their tutorials.

Original here

Tubes

Material

Plugins
Mehdi - FF Gallery A - Simple - Unlimited 2 -
Flaming Pear - AAA Frames
You can find these plugins on the websites of:
Renée
Cloclo
You can also find this tutorial translated into these languages:
(Click on the flag)


|
Notes:
> Open the material / Duplicate (shift+d) / Close the originals
> Change the blend mode of the layers to match their colors.
> In older versions of PSP, Mirror Horizontal=Mirror / Mirror Vertical=Flip /
Pick tool=deformation
> Open the masks in psp and
minimize
>Adjust the size of the tubes according to your images
|
SCRIPT
Images:
1 female tube
*
Material
*
Minhas imagens
*
Colors:
*
1
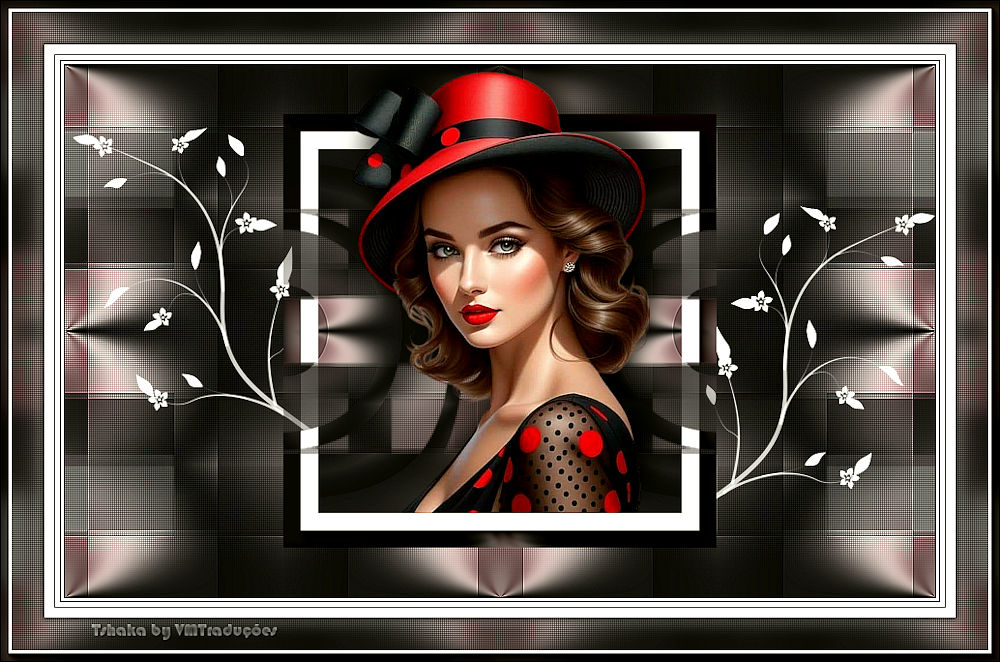
Open a new transparent image measuring 900x550px
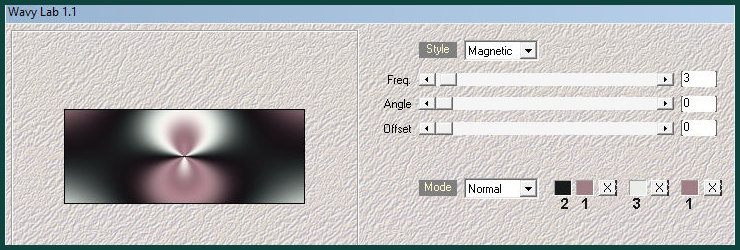
Effects/Plugins/Mehdi/Wavy Lab 1.1
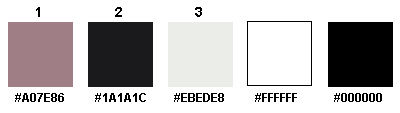
Colors: 2-1-3-1
2
Effects / Plugins / Unlimited 2 / FF Gallery A / Weave
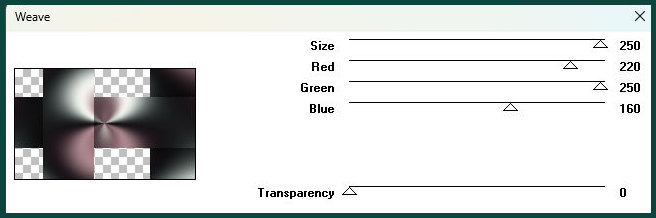
3
Effects / Plugins / Unlimited 2 / Simple / 4Way Average
4
Layers/Duplicate
Effects / Plugins / Unlimited 2 / Simple / Zoom Out and Flip
Effects / Edge Effects / Enhance
5
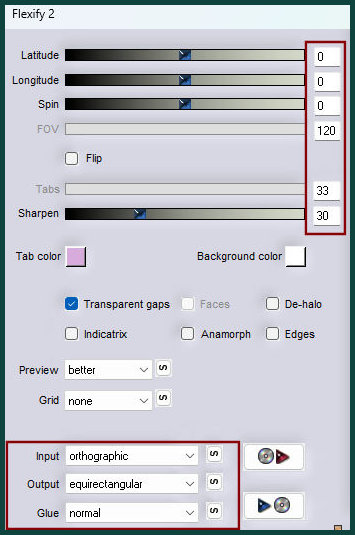
Layers/Duplicate
Effects / Plugins / Flaming Pear / Flexify 2
6
Selections / Select all
Selections / Float - selections / Defloat
Selections/Modify/Contract: 1
Selections/Invert
Press Delete
Selections / Invert
7.
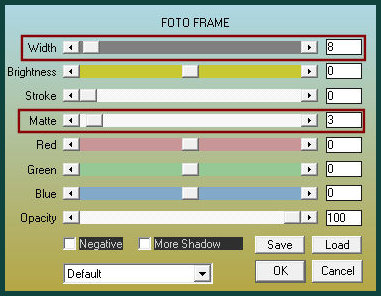
Effects / Plugins / AAA Frames /
Photo Frame
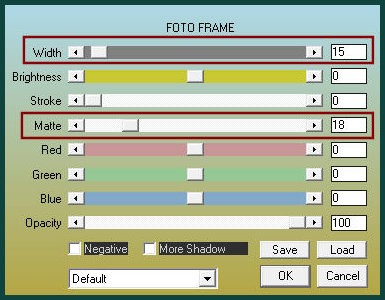
Select none
8.
Drop shadow: 0 0 80 40 white -
SHADOW ON NEW LAYER CHECKED
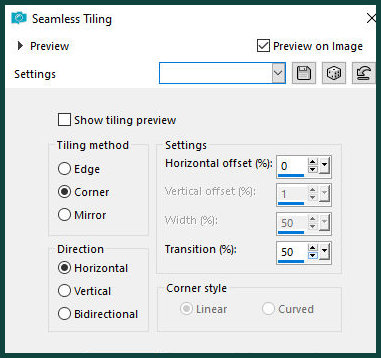
9.
Effects / Image Effects / Seamless
Tiling
10.
Effects / Texture Effects / Blinds
- background color
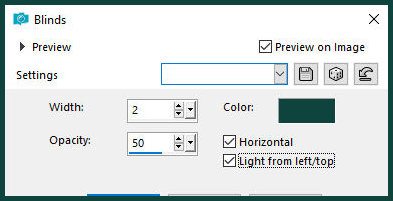
11.
Repeat the Blinds with Horizontal
unchecked.
Blend Mode: Overlay
12.
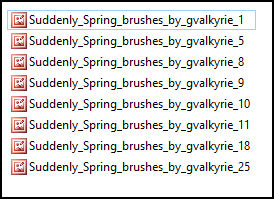
Now choose one of the brushes
provided in the material. For the model, number 9
[Suddenly_Spring_brushes_by_gvalkyrie_9] was chosen.
Open the brush in the PSP workspace.
13.
File / Export / Custom brush / Name
(Spring Brush) / OK
14.
Activate the second layer from the
top.
Activate the Paint Brush Tool.
Select the [Spring Brush].
Configure as shown in the
screenshot.

15.
Set the foreground color to white (or
a color of your choice). (Choose)
Add a new layer
Stamp the brush on the left side with the foreground color as per
the model
Now you can move or rotate the brush as you prefer
16.
Layers / Duplicate
Image / Mirror / Mirror Horizontal
Here you can also move and position as desired
17.
Activate the top layer
Copy your main tube
Paste as a new layer
Adjust the size
Position as per the model
18.
Drop shadow: -25 9 80 40,00 black
19.
Activate the second layer from the
bottom - Copy of Raster 1
Merge down
Copy (will be stored)
20.
Image / Add borders / 1px /
background color
Image / Add borders / 3px / white
Image / Add borders / 1px / background color
Image / Add borders / 5px / white
Image / Add borders / 1px / background color
Image / Add borders / 10px / White
Image / Add borders / 1px / background color
21
Selections / Select all
Image / Add borders / 45px / white
Selections / Invert
Paste the image from memory into the selection
22.
Adjust / Blur / Gaussian Blur: 10
23.
Effects / Texture effects / Blinds
- background color - same as before
24.
Effects / Texture Effects / Blinds
- same as before but with Horizontal unchecked
25.
Add new layer
Effects / 3D Effects / Cutout
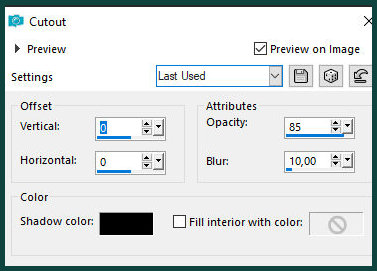
Select none
Merge all
26.
Effects / Plugins / AAA Frames /
Photo Frame
27.
Add credits
Merge all
Save as jpeg
*
Outra versão

|