|


This tutorial is from Lady Valella who I thank for
letting me translate their tutorials.

Original here

Tubes

Material

My images:
Here
Plugins
Mehdi - Graphic Plus
You can find these plugins on the websites of:
Renée
Cloclo
You can also find this tutorial translated into these languages:
(Click on the flag)


|
Notes:
> Open the material / Duplicate (shift+d) / Close the originals
> Change the blend mode of the layers to match their colors.
> In older versions of PSP, Mirror Horizontal=Mirror / Mirror Vertical=Flip /
Pick tool=deformation
> Open the masks in psp and
minimize
>Adjust the size of the tubes according to your images
|
SCRIPT
Required Images:
1 female tube
*
1. Open a new transparent image with 800x550px
2. Colors used: Foreground: #ae2421 - Background: #ffffff

3. Prepare a rectangular gradient
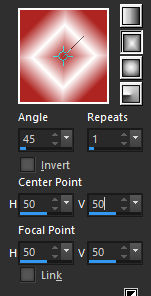
4. Paint the image with this
gradient
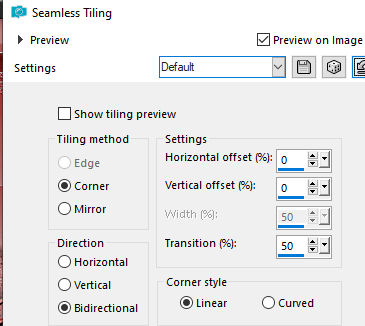
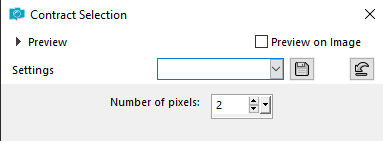
5. Effects / Image Effects / Seamless Tiling - default
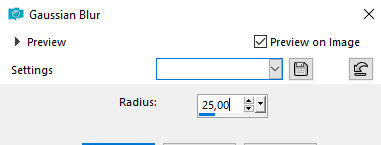
6. Adjust / Blur / Gaussian Blur:
25
7. Add a new layer
8. Prepare this Radial gradient
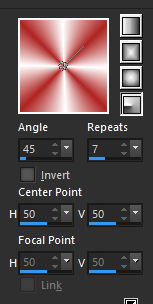
9. Paint the image with this
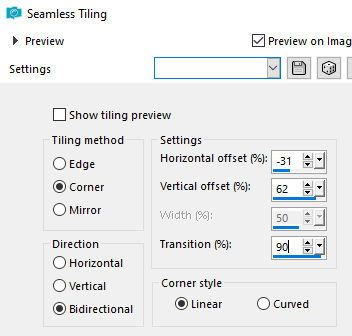
gradient
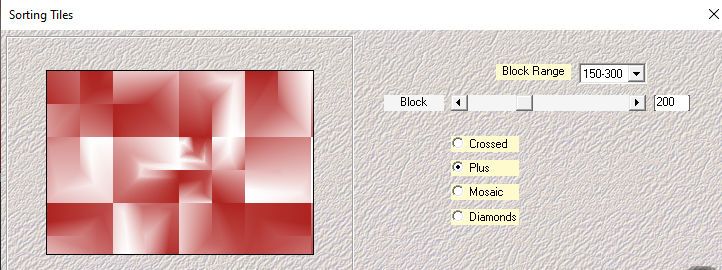
10. Effects / Plugins / Mehdi / Sorting Tiles
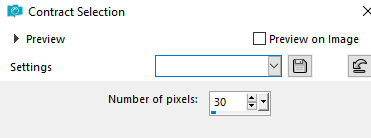
11. Selections / Select all
12. Selections / Modify / Contract: 30
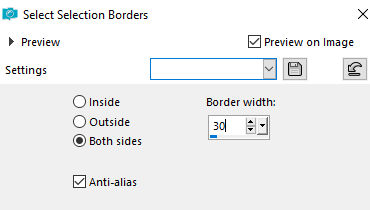
13. Selections / Invert
14. Selections / Modify / Selection select borders
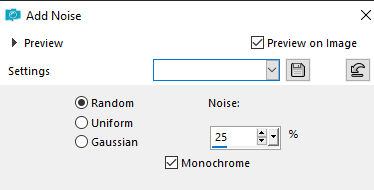
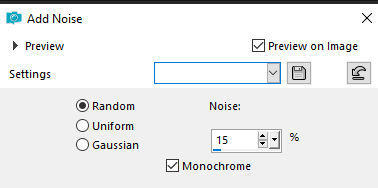
15. Adjust / Add / Remove noise/
Add Noise
16. Repeat Add Noise
17. Select none
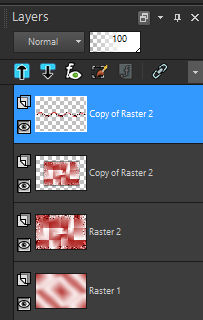
18. Layers/Duplicate
19. Effects / Geometric Effects / Horizontal Perspective
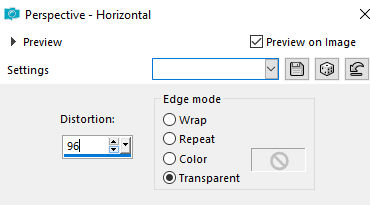
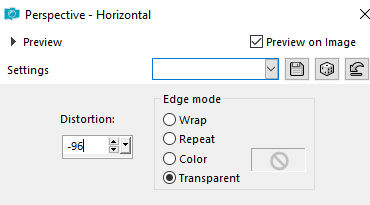
20. Repeat Perspective Horizontal
with this other configuration
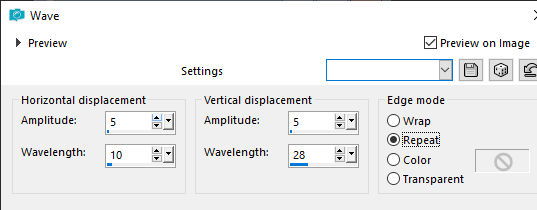
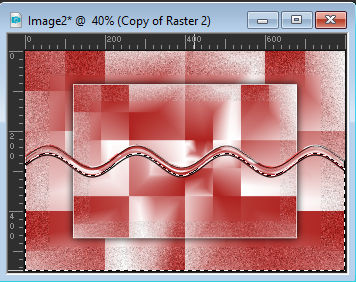
21. Effects / Distortion Effects /
Wave
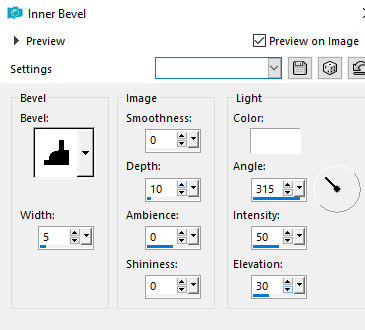
22. Effects / 3D Effects / Inner
Bevel
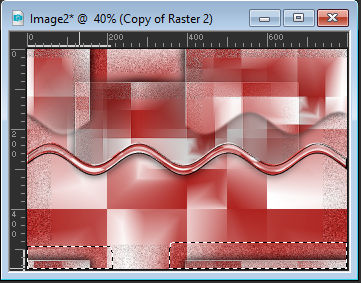
23. Activate the Raster 2 layer
24. Layers/Duplicate
25. Add new layer
26. Paint the layer with white color
27. selections / Select all
28. Selections / Modify / Contract:2
29. Press Delete
30. Select none
31. Merge Down
32. Image / Resize: 70% - all layers unchecked
33. Drop Shadow: 0 0 100 30,00 black
34. Activate the layer above (the wave effect)
35. Layers:
36. Activate the Magic Wand (tolerance/feather=0)
Select the area below the wave
37. Activate the Copy of Raster 2
layer
38. Press Delete
39. Select none
40. Effects / Image Effects / Seamless Tiling
41. Effects / Edge Effects /
Enhance
42. Drop shadow as before
43. Select with the Magic Wand or use the Eraser Tool and delete
these rectangles near the bottom edge
44. Activate the Wave effect layer
45. Drop shadow as before
46. Activate the Copy of Raster 2
47. Copy the tube [Fiore-LV]
48. Paste as a new layer
49. Place this layer below the wave effect layer
50. Layers / Duplicate - 2 times
51. Position below as desired
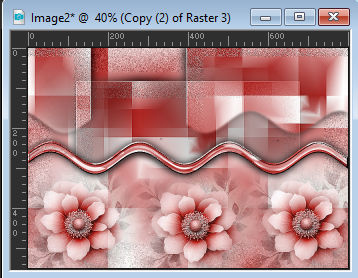
52. Select the signature and any
overlapping parts (unnecessary step if you deleted the signature
before copying)
53. Press Delete on each flower layer
54. Select none
55. If necessary, apply a blend mode of your choice to the flower
layer
56. Merge visible
57. Copy the tube [cuoricini]
58. Paste as a new layer
59. Position over the wave
60. If you want, you can change the colors of the [cuoricini] with [Adjust
/ Hue and Saturation / Colorize]
61. Border: 1px / white
62. Selections / Select all
63. Border: 20px / #ae2421
64. Selections / Invert
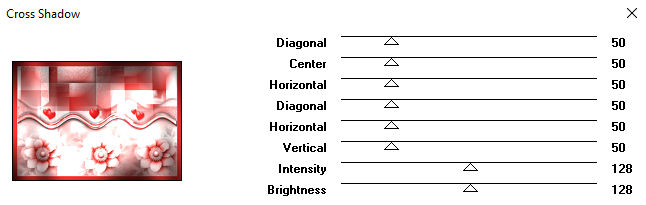
65. Effects / plugins / Graphic Plus / Cross Shadow - default
66. Adjust / Add/Remove Noise / Add
Noise

67. Border/1px/white
68. Selections / Select all
69. Border: 35px / white
70. Effects / Image Effects / Seamless Tiling - default
71. Selections / Invert
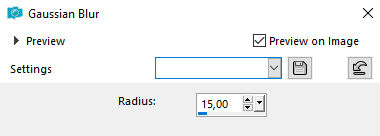
72.Adjust/Blur/Gaussian Blur: 15
73. Adjust / Add/Remove Noise / Add Noise
74. Selections / Invert
75. Drop shadow same as above
76. Select none
77. Copy tube [11Fe-AI-LV26]
78. Paste as new layer
79. Position to the left according to the model
80. Drop Shadow: 0 0 60 20.00 color foreground
81. Adjust / Sharpness / Sharpen
82. Copy [titoloVd]
83. Paste as a new layer
84. Position at the top right as per the model
85. Border: 1px / ae2421
86. Add signatures
87. Merge all
88. Save as jpeg

|