|

This tutorial is from STARDESIGNPSP who I thank for
letting me translate their tutorials.

Original here

Tubes

Material

My images: Here
Plugins
AAA Filters - Unlimited 2 - RCS
Filter Pak 1.0 - Xero - FM Tiles Tools
You can find these plugins on the websites of:
Renée
Cloclo
You can also find this tutorial translated into these languages:
(Click on the flag)


|
Notes:
> Open the material / Duplicate (shift+d) / Close the originals
> Change the blend mode of the layers to match their colors.
> In older versions of PSP, Mirror Horizontal=Mirror / Mirror Vertical=Flip /
Pick tool=deformation
> Open the masks in psp and
minimize
>Adjust the size of the tubes according to your images
|
SCRIPT
Required Images:
1 double tube
1 misted landscape tube
*
1.
Open a new transparent image with
900x650px
Selections / Select all
Copy your landscape image [SoniaTubes_4755]
Paste into the selection
Select none
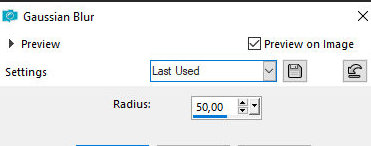
Adjust / Blur / Gaussian Blur: 50
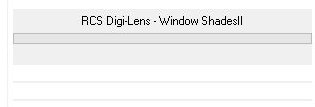
Effects / Plugins / Unlimited 2 / RCS Filter Pak.1 / RCS Digi-Lens -
Window ShadesII
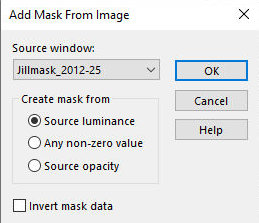
2. Layers / New Mask Layer / From Image / Mask [Jillmask_2012-25]
Merge group
Drop Shadow: 1 -1 100 1 black
Merge all
3. Click on the left side of the image, the white area, with the
Magic Wand (Tolerance=7 /Feather=0)
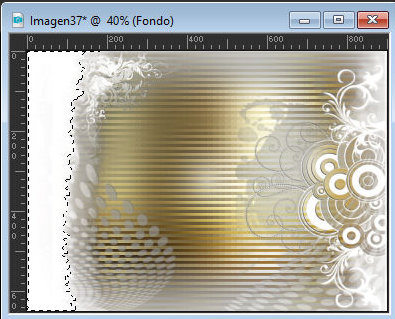
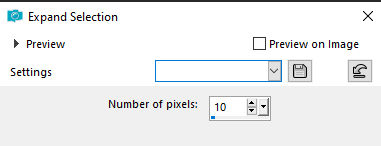
Selections / Modify / Expand: 10
Selections / Promote selection to layer
Select none
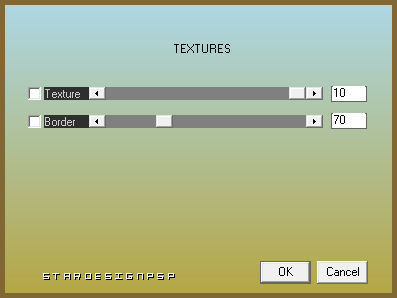
Effects / Plugins / AAA Filters / Textures
4. Copy your tube character
Paste as a new layer
Adjust / Blur / Gaussian Blur: 50
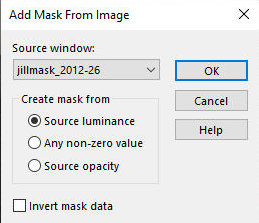
Layers / New mask layer / From image / Mask [jillmask-2012-26]
Merge group
Drop shadow: 1 -1 100 1
Apply Drop Shadow again
Note: If your image is too large, place it below the layer with the
Texture effect. In this case, we are placed back on the top layer of
the layer stack.
5. Copy the character tube again.
Paste as a new layer.
Do not move.
Adjust / Blur / Gaussian Blur: 50
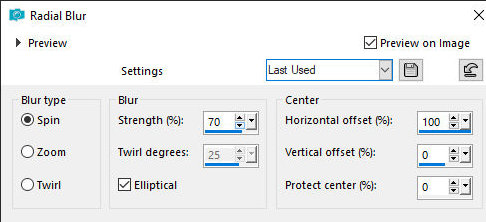
Adjust / Blur / Radial Blur
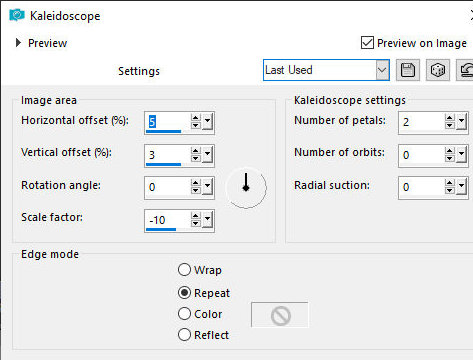
Effects / Reflection Effects / Kaleidoscope
Blend mode: Overlay
6. Copy the character tube again.
Paste as a new layer.
Position on the top layer.
Adjust / Blur / Gaussian Blur: 50
Adjust / blur / Radial Blur - same as before
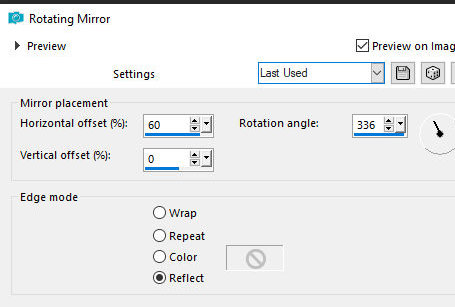
Effects / Reflection Effects / Rotating Mirror
Blend mode: Overlay
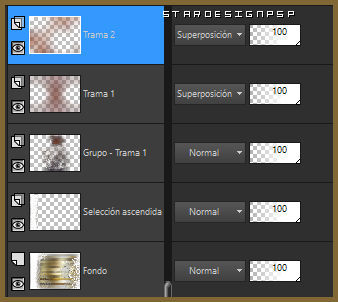
7. The layers will look like this:
8. Copy the character tube again.
Paste as a new layer.
Objects / Align / Bottom
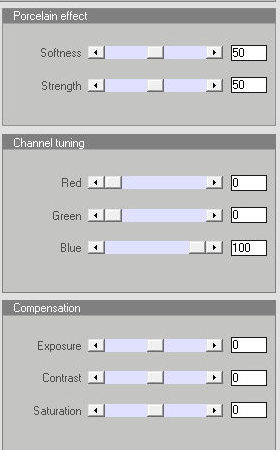
Effects / Plugins / Xero / Porcelain - default
(Note: This step depends on the image you use. This may not be
necessary)
Layers / Duplicate
Layers / Arrange / Move Down
Adjust / Blur / Gaussian Blur: 50
Blend mode: Multiply
Effects / Plugins / AAA Filters / Textures - same as before
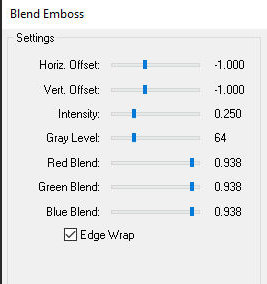
Effects / Plugins / FM Tile Tools / blend emboss
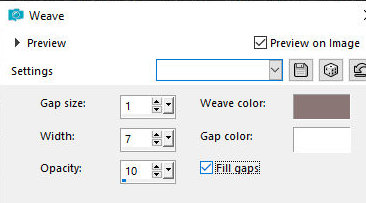
Effects / Texture Effects / Weave
Adjust / Sharpness / Sharpen
9. Activate the top layer
Image / Resize: 85% - all layers unchecked
Objects / Align / bottom
Move slightly to the left or as you prefer
10. Copy the image [Genisis_Brushes_by_Axeraider70-52]
Paste as new layer
Image / Resize: 50% - all layers unchecked
Selections / Select all
Selections / Float / Selections / Defloat
Add new layer
Copy your landscape tube
Paste into selection
Select none
Merge Down
Position as per the model or as preferred
11. Layers / Duplicate
Image / Resize: 120% - all layers unchecked
Position as preferred
12. Activate text
You can perform the same operation as step 10 using either of the
two images
that we covered in the tutorial (landscape or character)
Or, in any case, color according to your needs
Position as preferred, or as in the original, superimposed
13. Border: 2px / background color (#920000)
Selections / Select all
Border: 70px / white
Selections / Invert
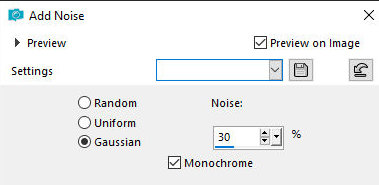
Adjust / Add/Remove Noise / add Noise
Select none
14. Copy the image [marco_youandme_S]
Paste as a new layer
Effects / Plugins / AAA Filters / Texture - same as before
Drop shadow: 0 0 50 20 34110a-
Border: 2px / background color
15. Add the signatures
Merge all
Save as jpeg

|