|

This tutorial is from who I thank for
letting me translate their tutorials.

Original here
Tubes

Material

My images: Here
Plugins
You can find these plugins on the websites of:
Renée
Cloclo
You can also find this tutorial translated into these languages:
(Click on the flag)


|
Notes:
> Open the material / Duplicate (shift+d) / Close the originals
> Change the blend mode of the layers to match their colors.
> In older versions of PSP, Mirror Horizontal=Mirror / Mirror Vertical=Flip /
Pick tool=deformation
> Open the masks in psp and
minimize
>Adjust the size of the tubes according to your images
|
SCRIPT
Required Images:
1 female tube
1 landscape
*
Place the selection in the PSP
Selections folder
Place the [fur_donkey] texture in the PSP Textures folder
*
Open a new transparent image with
900x600px
Selections / Select all
Copy the landscape
(Note: the final result will vary greatly depending on the landscape
chosen. It is preferable to use an image with dark tones and good
contrast)
Paste into the selection
Select none
Adjust / Blur / Gaussian Blur: 20
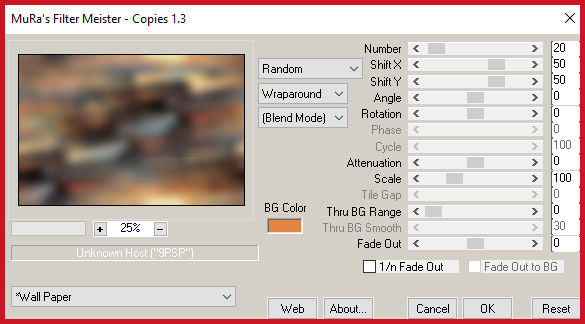
Effects / Plugins / Mura's Meister / Copies
Effects / plugins /Unlimited 2 / Sapphire Filters 6/
SapphirePlugin_0624 - default
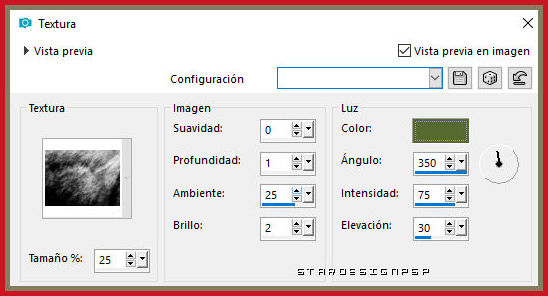
Effects / Texture Effects / Texture - Texture [fur_donkey] - color:
#566931 (or another according to your work)
Copy (it will be in (memory)
Add new layer
Selections / Load selection from disk / Selection [sel_1.3.5.18_S]
Paste the image from memory into the selection
Select none
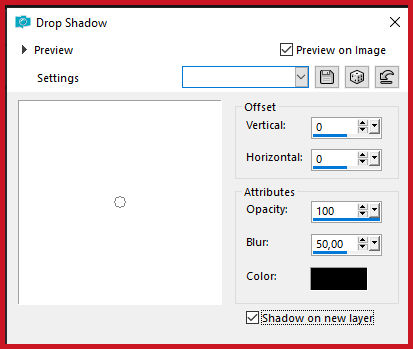
Drop shadow: 0 0 100 50,00 black - SHADOW ON NEW LAYER
Effects / Image Effects / Offset [100/0]
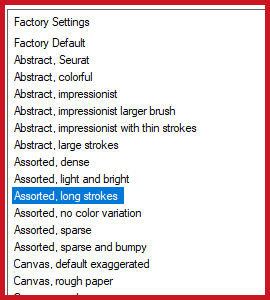
Effects / Plugins / Snap Art / Pointillism - preset [Assorted, long
strokes]
Note: some values may be different
Blend mode: Soft Light
Note: You may need to lower the layer opacity
Activate the top layer
Selections / Load selection from disk / Selection [sel_1.3.5.18_S]
Selections / Modify / Contract: 30
Selections / Invert
Adjust / Blur / Gaussian Blur: 20
Selections / Promote selection to Layer
Adjust / Add/Remove Noise / Add Noise [gaussian 50 monochromatic
checked]
Select none
Add new layer
Paint with color #37031b or another color that matches your work,
contrasting slightly
Layers / New mask layer / From image / Mask
[©BluefayMask_aethiopien2]
Merge group
Drop shadow: 1 -1 100 1 black
Or if you prefer, Blend Mode: Multiply
Layers / Duplicate
Image / Mirror / Mirror horizontal
Merge down
Select the interior part of the image with the Magic Wand
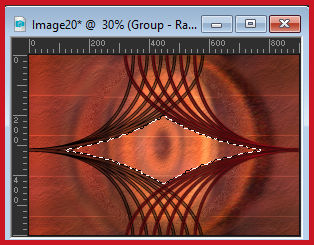
Add new layer
Copy the landscape
Paste into the selection
Select none
Layers / Duplicate
Effects / Plugins / Alien Skin Snap Art / Pen and Ink - Preset [Coverage,
Medium]
Note: You can change the setting according to your colors
Blend mode: Soft Light
Adjust / Sharpness / Sharpen
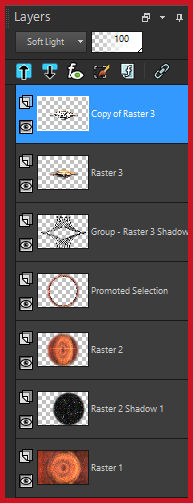
The layers will be as follows:
Copy the tube [Adorno]
Paste as a new layer
You can color it according to your image Image / Add borders / 2px /
#bb25b6
Image / Add borders / 50 px / black
Copy the tube [Adorno 2]
Paste as a new layer
Adjust / Hue and Saturation / Colorize [255/211] or colorize with
the color you want
Copy the tube [marcos,frame,grunge (9)]
Paste as a new layer
Do not move
Copy the main tube [tubtatie_1l4Bmj1qht]
Paste as a new layer
Image / Resize: 55% - all layers unchecked
Position to the left as per the model
Layers / Duplicate
Activate the layer below (original)
Adjust / Blur / Gaussian Blur: 40
Effects / Plugins / DSB Flux / Bright Noise [50 mix]
Apply twice
Effects / User Defined filter / Emboss 3
Activate the layer above (copy)
Drop shadow: 0 0 100 15 black
Add signatures
Merge all
Save as jpeg

|