|

This tutorial is from Lady Valella who I thank for
letting me translate their tutorials.

Original here

Tubes

Material

My images:
Here
Plugins
Unlimited 2 - DSB Flux - Ap [Lines]
You can find these plugins on the websites of:
Renée
Cloclo
You can also find this tutorial translated into these languages:
(Click on the flag)


|
Notes:
> Open the material / Duplicate (shift+d) / Close the originals
> Change the blend mode of the layers to match their colors.
> In older versions of PSP, Mirror Horizontal=Mirror / Mirror Vertical=Flip /
Pick tool=deformation
> Open the masks in psp and
minimize
>Adjust the size of the tubes according to your images
|
SCRIPT
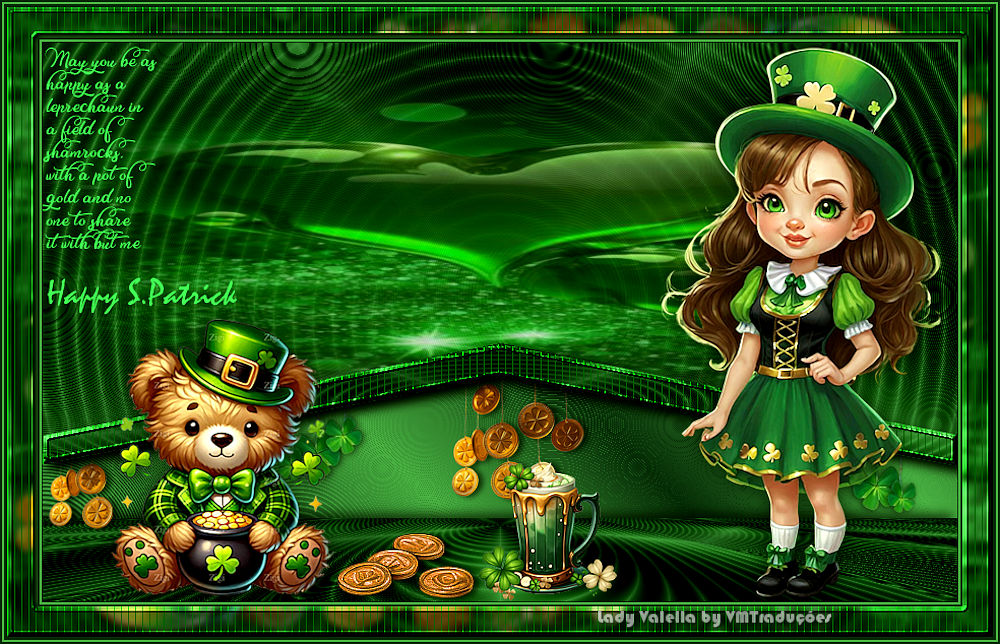
Required Images:
1 character tube
Decorative tubes aligned with the theme
*
1. Colors: foreground #50af53 - background #11311a

2. Open the alpha channel file /
Duplicate / Shift+d) / Close the original
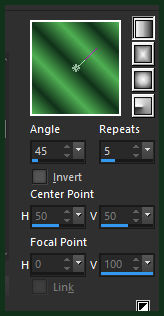
3. Prepare a linear gradient
4. Paint the image with the
gradient
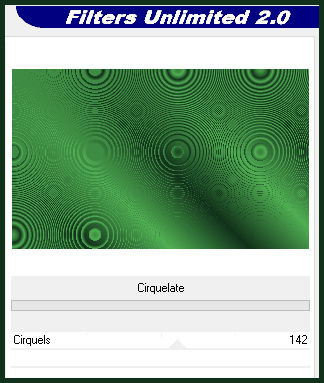
5. Effects / Plugins / Unlimited 2 / BKG Designer sf10 I /
cirquelate
6. Layers / Duplicate
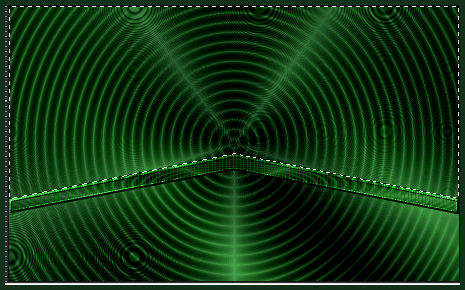
7. Effects / Plugins / DSB Flux / Spider Web

8. Copy (will be stored in memory)
9. Add a new layer
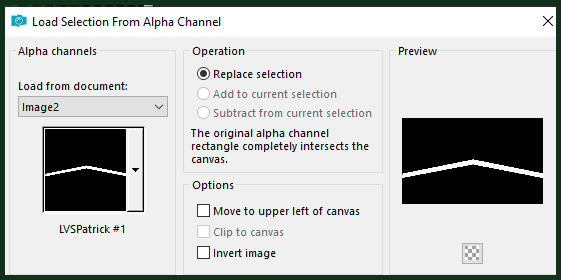
10. Selections / Load selection from disk / Selection [LVPatrick#1]
11. Paste the image stored in
memory into the selection
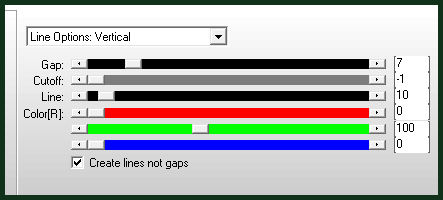
12. Effects / Plugins / AP[Lines] / SilverLining (adapt to your
colors)
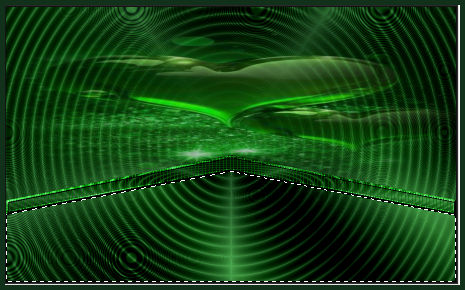
13. Effects / 3D Effects / Inner
Bevel
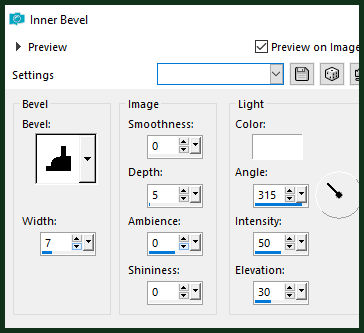
14. Repeat the inner Bevel
15. Select none
16. Activate the Pick Tool and configure: X=0 - Y=296 - Press M
17. Activate the Copy of Raster 1 layer
18. Layers / Duplicate
19. Close the original layer (Copy of Raster 1) by clicking on the
eye icon
20. Activate the top layer
21. Select the empty area above using the Magic Wand (tolerance/feather=0)
22. Add a new layer
23. Copy the tube [Misted-quadrifogli]
24. Paste it into the selection
25. Select none
26. Layers / Arrange / Move down
27. Opacity=81%
28. Activate the top layer
29. Select the empty area below with the Magic Wand
30. Activate the Copy (2) of Raster
1 layer (third from top to bottom)
31. Select none
32. Activate the top layer
33. Drop Shadow: 7 7 100 15.00 black
34. Activate and open the Copy of Raster 1 layer by clicking on the
eye icon
35. Effects / plugins / Mura's Meister / Perspective Tiling
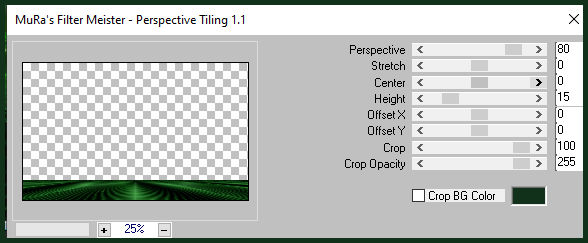
36. Drop shadow: -5 -5 60 15.00
black
37. Activate the top layer
38. Merge down - 2 times
39. Copy the tube [decoro monete]
40. Paste as a new layer
41. Activate the Pick Tool and configure: X=5 - Y=327 - Press M
42. Layers / Arrange / Move down
43. Activate the top layer
44. Copy your main tube
45. Paste as a new layer
46. Adjust the size
47. Position according to the model or as you prefer
48. Drop Shadow of your choice
49. Copy the tube [Monete]
50. Paste as a new layer
51. Position as per model or as preferred
52. Copy the tube [Chalice]
53. Paste as a new layer
54. Position as preferred
55. Drop Shadow: 1 5 60 8.00 black
56. Copy the tube [Text]
57. Paste as a new layer
58. Position to the left
59. Merge visible
60. Image / Add borders / 1px / dark color
61. Copy (will be in memory)
62. Image / Add borders / 2px / light color
63. Image / Add borders / 2px / dark color
64. Selections / Select all
65. Image / Add borders / 30px / light color
66. Selections / Invert
67. Add a new layer
68. Paste the image from memory into the selection
69. Select none
70. Layers / Duplicate
71. Image / Mirror /Mirror Vertical
72. Image / Mirror / Mirror Horizontal
73. Selections / Select all
74. Selections / Float / Selections / Defloat
75. Opacity: 50%
76. Merge down
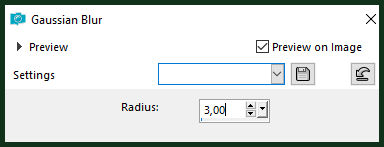
77.Adjust/blur/Gaussian Blur: 3
78. Effects / Plugins / Ap[Lines] /
SilverLining - same as above
79. Effects / 3D Effects / Inner
Bevel - same as above
80. Repeat the Inner Bevel
81. Select none
82. Image / Add borders / 3px / dark color
83. Image / Add borders / 2px / light color
84. Image / Add borders / 2px / dark color
85. Put signatures
86. Merge all
87. Save as jpeg

|