|

This tutorial is from Kniri who I thank for
letting me translate their tutorials.

Original here

Tubes

Material

My images:
Here
Plugins
Mehdi - AP [Lines]
You can find these plugins on the websites of:
Renée
Cloclo
You can also find this tutorial translated into these languages:
(Click on the flag)


|
Notes:
> Open the material / Duplicate (shift+d) / Close the originals
> Change the blend mode of the layers to match their colors.
> In older versions of PSP, Mirror Horizontal=Mirror / Mirror Vertical=Flip /
Pick tool=deformation
> Open the masks in psp and
minimize
>Adjust the size of the tubes according to your images
|
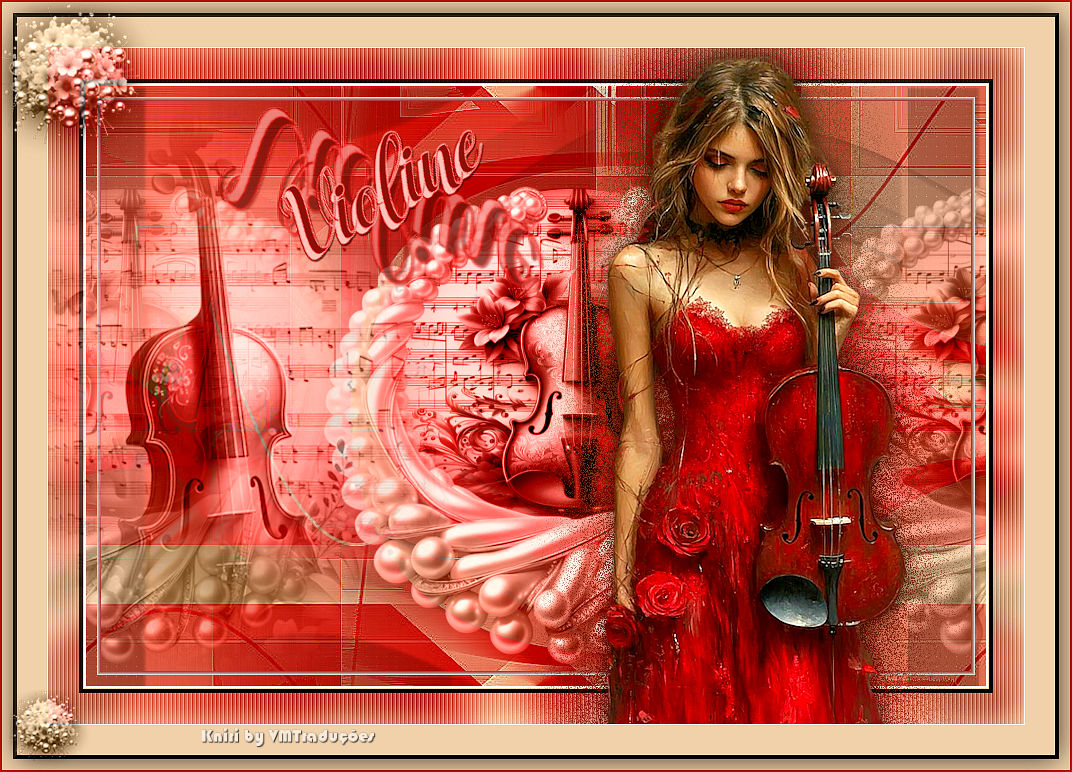
SCRIPT
Required images:
1 female tube
2 mixed violin tubes (optional)
*
ave the selection in the PSP
Selections folder
*
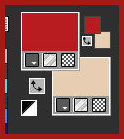
1. Colors: foreground: a dark
color - background: a light color
2. Open a new transparent image with 900x600px
3. Paint with the foreground color
4. Add a new layer
5. Paint with the background color
6. Layers / New Mask Layer / From Image / Mask [0_7e0e0_886ea730_XL]

7. Merge Group
8. Effects / Edge Effects / Enhance
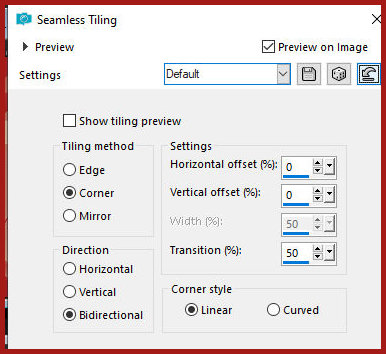
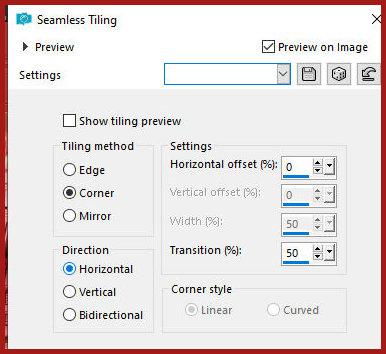
9. Effects / Image Effects / Seamless Tiling - default
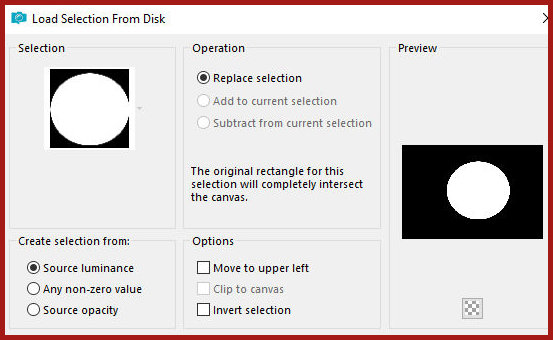
10. Selections / Load selection
from disk / Selection [Knirikreis]
11. Press Delete
12. Add a new layer
13. Copy the tube [misted violinekniri]
14. Paste it into Selection
15. Select none
16. Blend Mode: Luminance (L)
17. Copy [knirikette]
18. Paste as a new layer
19. Position in the circle as per the model
Activate the misted layer and adjust the size slightly with the Pick
Tool
Activate the paste layer
20. Blend Mode: Luminance (L) / opacity: 88%
21. Merge Down
22. Activate the Group Raster 2 layer (from the mask)
23. Merge down
24. Layers / Duplicate
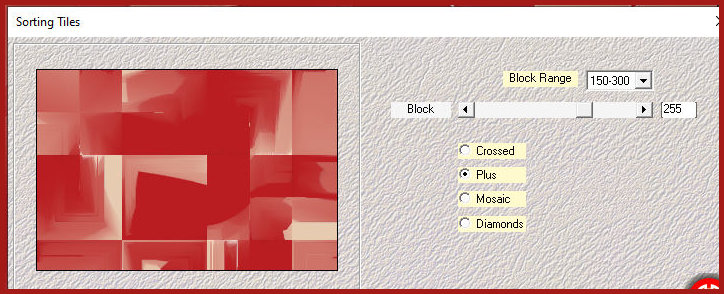
25. Effects / Plugins / Mehdi / Sorting Tiles
26. Blend Mode: Soft Light
27. Image / Mirror / Mirror Vertical
28. Effects / Edge Effects / Enhance More
29. Continue on the same layer
30. Add a new layer
31. Paint with the color white
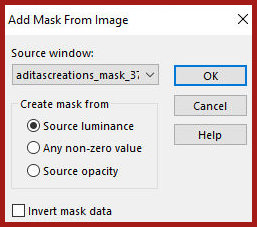
32.Layers / New Mask layer / From image / Mask
[aditascreations_mask_37]
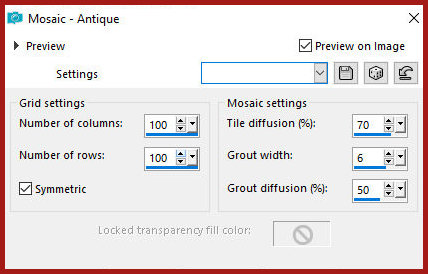
33.Merge group
34.Image /Mirror /Mirror Vertical
35.Blend Mode: Multiply
36.Drop Shadow: 2 -7 70 4 black
37.Effects / Plugins / AP[Lines] / SilverLining
38.Activate the top layer
39.Layers/Duplicate
40.Effects / Image Effects / Seamless Tiling - default - with
Direction=Horizontal
41.Layers / Arrange / Move down
42.Opacity: 66%
43.Merge visible
44.Selections / Select all
45.Selections/Modify/Contract: 15

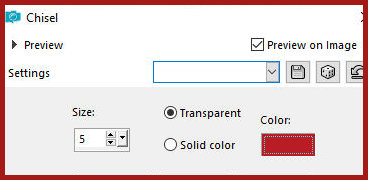
46.Effects / 3D Effects / Chisel -
color: foreground
Select none
47.Image / Add borders / 2px / white
48.Image / Add borders / 1px / background color
49.Copy
50.Selections / Select all
51.Image / Add borders / 35px / white
52.Selections/Invert
53.Paste the image copied above into the selection
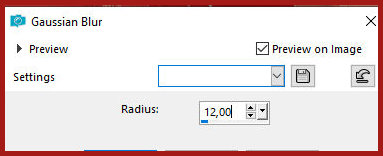
54.Adjust/Blur/Gaussian Blur: 12
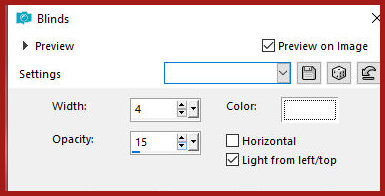
55.Effects / Texture Effects /
Blinds
56.Effects / Edge Effects / Enhance
57.Selections/Invert
58.Effects / 3D Effects / Chisel - same as above
59.Select none
60.Copy the tube [mixed violinekniri2]
61.Stick it like new layer
62. Image / Resize: 85% - all layers unchecked
63. Position according to the model
64. Blend Mode: Luminance (L) / Opacity: 80%
65. Copy your tube character
66. Paste as a new layer
67. Adjust the size
68. Position to the right
69. Layers / Duplicate
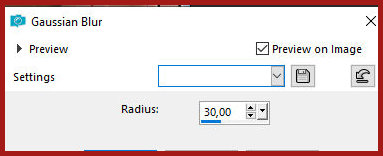
70. Adjust / Blur / Gaussian Blur: 30
71. Effects / Texture Effects /
Mosaic antique
72. Layers / Arrange / Move down
73. Activate the top layer
74. Drop shadow of your choice
75. Image / Add borders / 1px / white
76. Image / Add borders / 45px background color
77. Selections / Select all
78. Selections / Modify / Contract: 15
79. Effects / 3D Effects / Chisel -
same as before
80. Select none
81. Copy the tube [dekok]
82. Paste as a new layer
83. Position to the left as per the model
84. Blend mode: Luminance (L)
85. Image / Add borders / 2px / foreground color
86. Selections / Select all
87. Selections / Modify / Contract: 15
88. Drop shadow: 2 2 70 40 black
89. Select none
90. Copy the text [text]
91. Paste as a new layer
92. Position at the top left
93. Image / Add borders / 2px / black
94. Image / Resize: 900px (width)
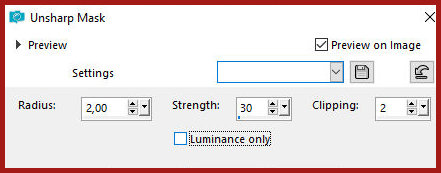
95. Adjust / Sharpness / Unsharp Mask
Add signatures
97. Merge all
98. Save as jpeg

|