|

This tutorial is from Kniri who I thank for
letting me translate their tutorials.

Original here

Tubes

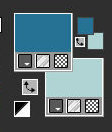
Material

My images: Here
Plugins
Eye Candy 5: Impact / Extrude
-Mura's Meister - AAA Frames - Toadies
Unlimited 2 - BKG Designers sf10 I
You can find these plugins on the websites of:
Renée
Cloclo
You can also find this tutorial translated into these languages:
(Click on the flag)


|
Notes:
> Open the material / Duplicate (shift+d) / Close the originals
> Change the blend mode of the layers to match their colors.
> In older versions of PSP, Mirror Horizontal=Mirror / Mirror Vertical=Flip /
Pick tool=deformation
> Open the masks in psp and
minimize
>Adjust the size of the tubes according to your images
|
SCRIPT
Required Images:
1 female tube
*
Place the selection in the PSP
Selections folder
Double-click the Eye Candy 5: Impact preset to install it in the
plugin
*
01.
Original Colors: Foreground:
#267295 - Background: B0D4D3
Open image [bg1] / Duplicate (shift+d)
/ Close the original
Colorize according to your colors
Layers / Promote Background Layer
Layers / Duplicate
Image / Mirror / Mirror Horizontal
Layers / Properties / Blend Mode: Overlay
Effects / Edge Effects / Enhance
Copy the tube [Deco1]
Paste as a new layer
Activate the Pick Tool and configure: X=169 - Y=-36 - Press M
Layers / Duplicate
Effects / Image Effects / Seamless Tiling
Merge Down
Layers / Properties / Blend Mode: Overlay / Opacity: 78%
Drop shadow: 0 0 80 40 black
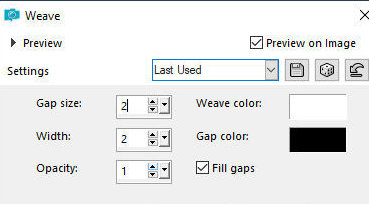
Effects / Texture Effects / Weave
2
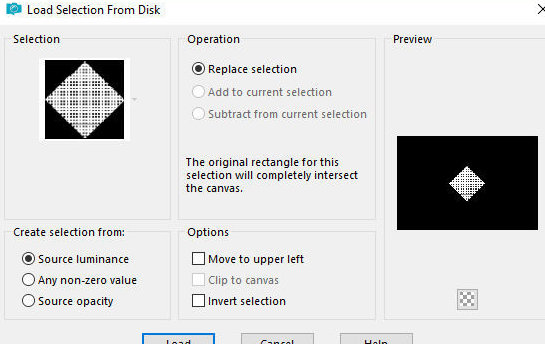
Selections / Load selection from disk / Selection [Kniri1]
Press Delete
Keep selection
Activate the Copy of Raster 1 layer
Selections / Promote selection to layer
Layers / Arrange / Bring to top
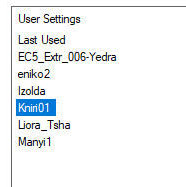
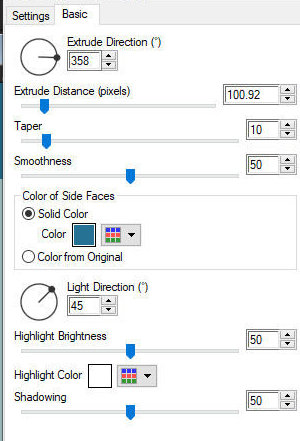
Effects / Plugins / Eye Candy 5: Impact / Extrude - preset [kniri1]
Select none
Activate the Pick Tool and set: X=291 - Y=192 - Press M
Layers/Properties/Opacity: 60%
3
Copy the tube [deco2]
Paste as new layer
Activate the pick Tool and configure: X=19 - Y=38 - Press M
Activate the Copy of Raster 1 layer
Layers/Duplicate
Layers / Arrange / Bring to top
Effects/Plugins/ MUra's Meister / Perspective Tiling
Drop shadow: 0 0 60 40 black
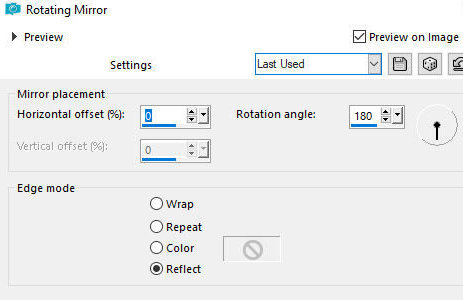
Effects / Reflect Effects / Rotating Mirror
4
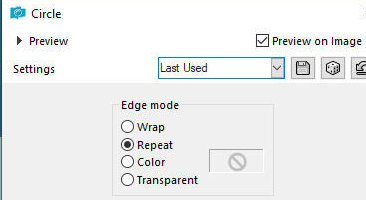
Effects / Geometric Effects / Circle - repeat
Activate the Pick Tool and configure: X=-4 - Y=-77 - Press M
Image / MIrror / Mirror Vertical
Layers/Duplicate
Image / Mirror / MIrror Vertical
Merge down
Layers/Properties/Opacity: 50%
Drop Shadow same as above
5
Activate Layer Raster 1
Copy the tube [deco-3]
Paste as new layer
Layers/Properties/Opacity: 62%
Stay on the layer
Copy the image [AIbgKniri]
Paste as new layer
Layers / Properties / Blend Mode: Darken / opacity: 55
Activate the Copy (2) of Raster 1 layer
Copy the tube [schmetterling]
Paste as a new layer
Position as shown in the template
Copy the text [text]
Paste as a new layer
Position as shown in the template
6.
Border: 2px / black
Selections / Select all
Copy (will be stored in memory)
Border: 45px / white
Selections / Invert
Paste the image stored in memory onto the selection
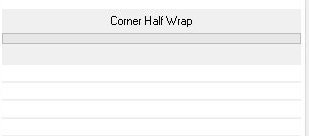
Effects / Plugins / Unlimited 2 / BKG Designers sf10 I / Corner half
wrap
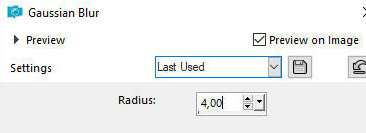
Adjust / Blur / Gaussian Blur: 4
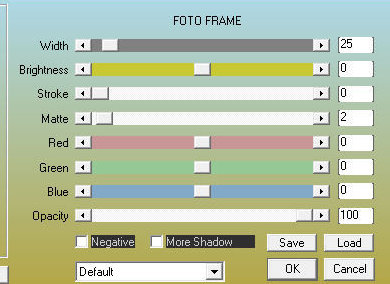
Effects / Plugins / AAA Frames /Photo Frame
Selections / Invert
7.
Effects / Image Effects / Seamless
Tiling - default
Selections / invert
Effects / Reflection Effects / Rotating Mirror - same as before
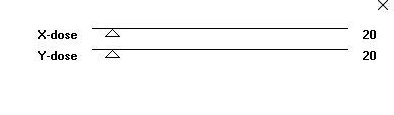
Effects / Plugins / Toadies / What are you? - default
Adjust / Sharpness / Sharpen More
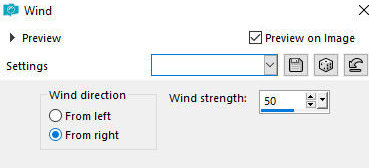
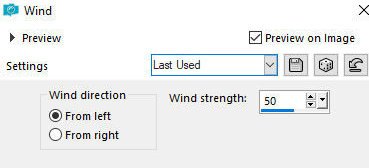
Effects / Distortion Effects / Wind - right 50
Effects / Distortion Effects / Wind - left 50
Selections / Invert
Drop Shadow: 0 0 80 40 black
Select none
8.
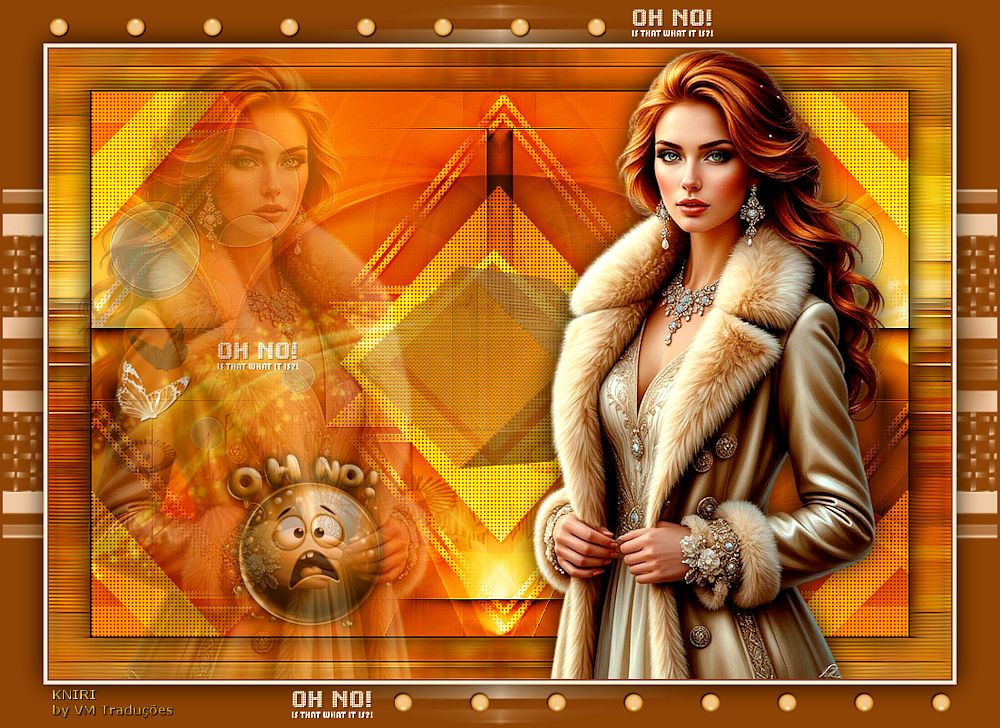
Copy the main tube
Paste as a new layer
Resize if necessary
Position as per model
Layers / Duplicate
Image / Mirror / Mirror horizontal
Position as per model
Layers / Properties / Opacity: 30%
Activate the layer below the right tube
Drop Shadow of your choice
Copy the tube [AIkugelK] or another of those provided
Paste as a new layer
Position as per model
9.
Borders:
2px / foreground color
2px / white
2px / background color
Selections / Select all
Border: 45px / background color foreground
Selections/Invert
Add new layer
Paint with the background color
Layers / New Mask Layer / From Image / Mask [roa_mask-2024 S07-006]
Merge Group
Selections/Invert
Drop Shadow: 0 0 80 40 black
Select none
Merge Visible
Copy the tube [deco4]
Paste as new layer
Border: 3px / white
10
Put signatures
Merge all
Image/Resize: 900px
Adjust/Sharpness/Unsharp Mask

|