|

This tutorial is from Esmakole who I thank for
letting me translate their tutorials.

Original here
Tubes

Material

My images:
Here
Plugins
Filter Unlimited 2.0.
Filter &<Bkg Designer sf10 lll> (in Unlimited)
, Filter MuRa's Meister,
Filter Toadies (in Unlimited)
You can find these plugins on the websites of:
Renée
Cloclo
You can also find this tutorial translated into these languages:
(Click on the flag)


|
Notes:
> Open the material / Duplicate (shift+d) / Close the originals
> Change the blend mode of the layers to match their colors.
> In older versions of PSP, Mirror Horizontal=Mirror / Mirror Vertical=Flip /
Pick tool=deformation
> Open the masks in psp and
minimize
>Adjust the size of the tubes according to your images
|
SCRIPT
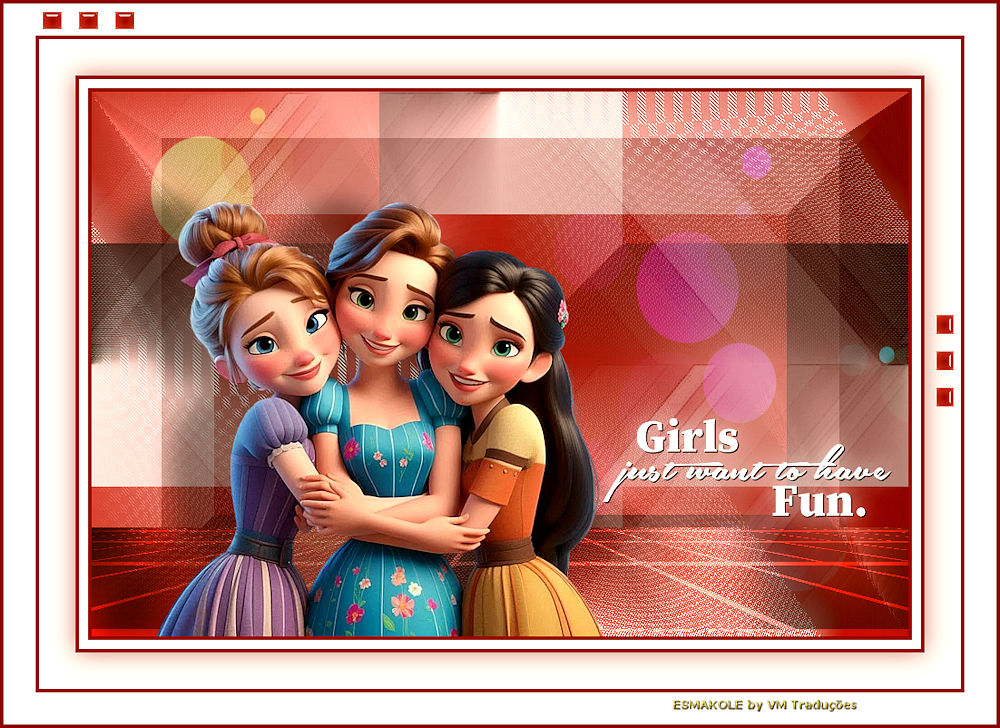
Required Images:
1 female tube according to the theme
*
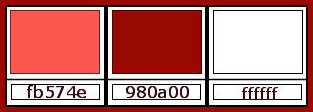
1. Colors: Foreground: #fb574e - Background: 980a00
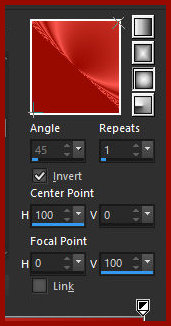
2. Prepare a Sunburst gradient
3. Open the alpha file [alfa] / Duplicate (shift+d) / Close the
original
4. Paint the image with the gradient
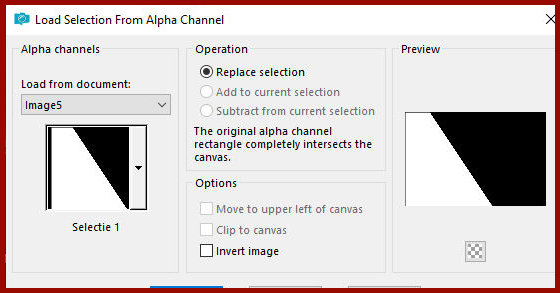
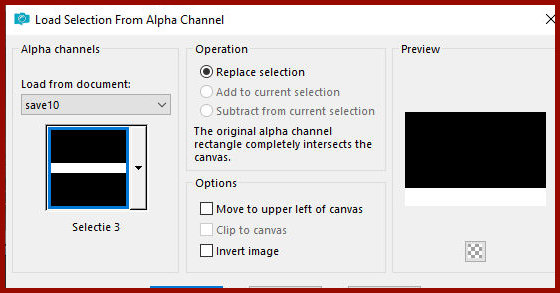
5. Selections / Load selection from alpha channel / Selection #1
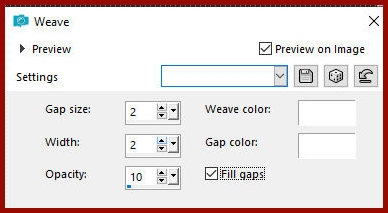
6. Effects / Texture Effects / Weave
7. Select none
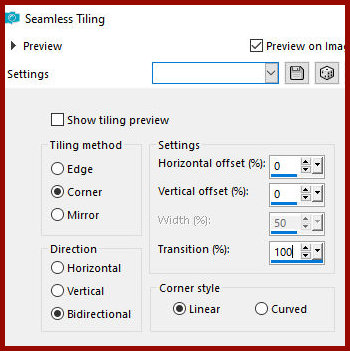
8. Effects / Image Effects / Seamless Tiling
9. Effects / Plugins / Unlimited 2 / Bkg Designers sf10 III / Radial
Rings 01 - default

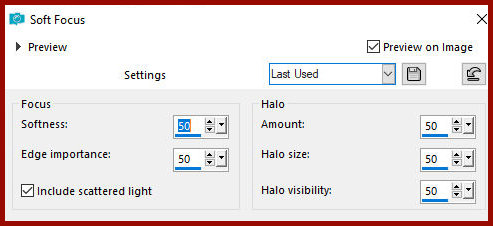
10. Adjust / Softness / Soft Focus
11. Adjust / Sharpness / Sharpen
12. Layers / Duplicate
13. Add new layer
14. Paint with white
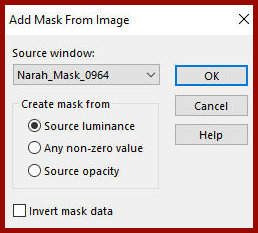
15. Layers / New mask layer / From Image/Mask [Narah-Mask-0964]
16.Merge Group
17.Effects / Image Effects / Seamless Tiling - same as above
18.Effects / Edge Effects / Enhance more
19.Opacity: 42
20.Activate the middle layer
21.Add new layer
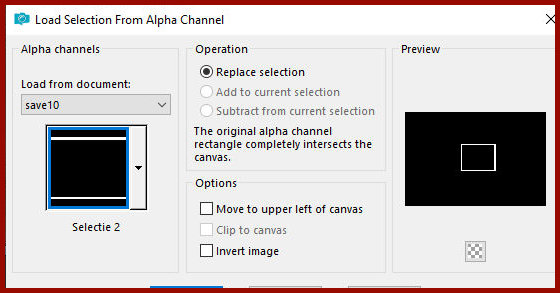
22.Selections / Load selection from alpha channel / Selection 2
23.Color the selection with white color
24.Select none
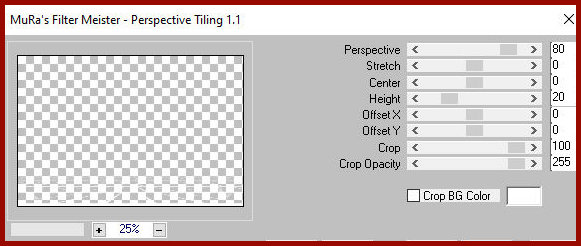
25.Effects / plugins / Mura's meister / Perspective Tiling
26.Blend mode: Overlay
27.Activate the Raster 1 layer
Layers/Duplicate
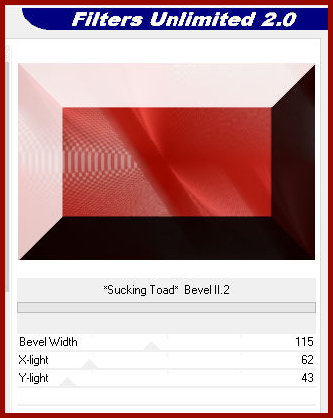
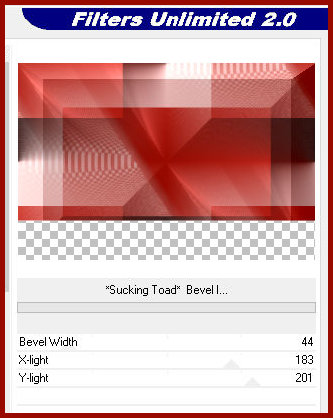
28.Effects / Plugins / Unlimited 2 / Toadies / Sucking Toad Bevel
II.2 - default
29.Effects / Image Effects / Seamless Tiling - same as above
30.Stay in it Layer
31. Selections / Load selection from alpha channel / Selection 3
32. Press Delete
33. Keep the selection active
34. Activate the bottom layer
34b. Effectd / Plugins / Graphic Plus / Cross Shadow
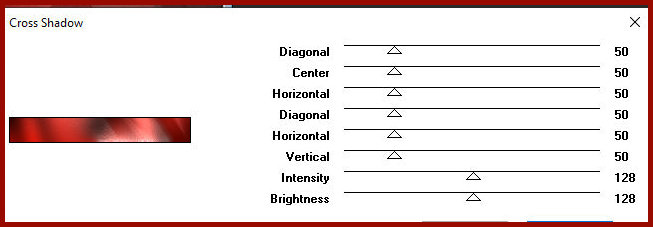
Note: If you use different colors, you may need to decrease or
increase the intensity.
See what looks best in your creation.
35.Select none
36.Activate the top layer
37.Add new layer
38.Paint the layer with white color
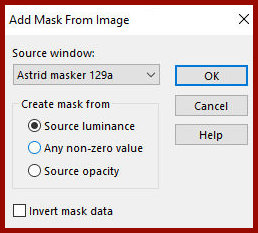
39.Layers / New Mask Layer / From Image / Mask [Astrid Mask 129a]
40.Merge Group
41.Image/MIrror/Mirror Vertical
42.Blend Mode: Screen/Opacity: 70%
43.Effects / Plugins / Unlimited 2 / Toadies / Living Sine [linear]
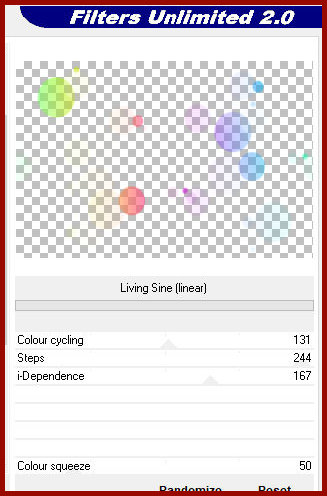
44.Repeat Living Sine [linear]
45.Activate the Copy of Raster 1 layer
46.Effects / Plugins / Unlimited 2 / Toadies / Sucking Toad Bevel I
Activate the top layer
47.Copy the tube [leny-vrouw1125a]
48.Paste as new layer
49.Drop shadow: -4 -66 35 35 black
50.Effects / Image Effects / Offset -70/0

51.Copy the tube [leny-wordart114]
52.Paste as new layer
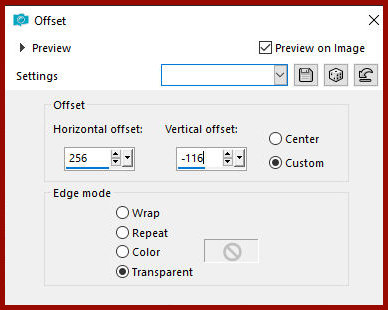
53.Effects / Image Effects / Offset 256/-116
54.Merge all
55.Image / Add Borders / 4px / background color
56.Image / Add Borders / 10px / white
57.Image / Add Borders / 4px / background color
58.Selections / Select all
59.Image / Add borders / 40px / white
60.Drop Shadow: 0 0 50 40 #980a00
61.Select none
62.Image / Add borders / 4px / background color
63.Image / Add borders / 35px / white
64.Image / Add borders / 4px / background color
65.Copy [leny-deco]
66. Paste as a new layer
67. Position at the top left as per the model
68. Layers / Duplicate
69. Image / Free Rotate - right 90

70. Position as desired
71. Merge visible
72. Image / resize: 900px (width)
73. Add signatures
74. Merge all
75. Save as jpeg

|