|
A. Save the
selections to the Selections folder on your PSP
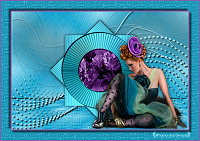
B. You will need 1 main tube, 1 floral tube and a
wordart. If you want to use my tubes, download them
here
1. Choose two colors from your tube: a dark color for
the foreground and a light color for the background
2. Prepare a Radial gradient
3. Open a new transparent image
measuring 900x600px
4. Color the image with the gradient
5. Adjust - Blur - Gaussian Blur: 30
6. Add a new layer
7. Color the layer with the foreground color
8. Layers - New Mask Layer - From Image - Mask
[OBG_MASK_88]
9. Merge Group
10. Activate the Raster 1 layer
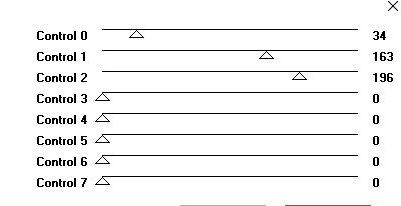
11. Effects - Artistic Effects - Balls and Bubbles
12. Selections - Load selection from
disk - Selection [sel-tete-woman]
13. Add new layer
14. Color with the gradient
15. Effects - Plugins - Gittes plugins - Circle
16. Select none
17. Effects - Reflection Effects - Rotating Mirror
18. Effects - Plugins - Carolaine and
Sensibility - CS_LDots
19. Effects - Plugins - Toadies - What
are you?
20. Effects - User Defined Filter -
Emboss 3
21. Activate the background layer -
Raster 1
22. Adjust - Add/Remove Noise - Add Noise
23. Activate the top layer (from the
mask)
24. Selections - Load selection from disk - Selection [sel-tete-woman_1]
25. Selections - Promote selection to
layer
26. Select none
27. Effects - Plugins - AP [Lines] - SilverLining
28. Layers - Duplicate
29. Image - Mirror - Mirror Horizontal
30. Merge Down
31. Layers - Duplicate
32. Image - Mirror - Mirror Vertical
33. Merge Down
34. Copy the floral tube and paste as a new layer
35. Adjust the size
36. Drop Shadow of your choice
37. Position according to the model
38. (optional) Reduce the opacity as you prefer
39. Copy the main tube and paste as a new layer
40. Adjust the Size
41. Drop Shadow of your choice
42. Position as you prefer
43. Copy the wordart and paste as a new layer
44. Position according to the model or as you prefer
45. Image - Add borders - 2px - black
46. Image - Add borders - 40px - white
47. Select this 40px border with the Magic Wand
48. Add a new layer
49. Paint with the foreground color
50. Effects - Plugins - AFS IMPORT - sqborder
51. Select none
52. Image - Add borders - 2px - black
53. Place the signatures
54. Merge all
55. Save as jpeg |