|


This tutorial is from Romana who I thank for
letting me translate their tutorials.

Original here
Tubes

Material

Many thanks to the creators of
these materials
Plugins
Flaming Pear - Flexify 2
Penta com - Jeans
VM Instant Art - Tripolis
You can find these plugins on the websites of:
Renée
Cloclo
You can also find this tutorial translated into these languages:
(Click on the flag)


SCRIPT
Notes:
> Open the material / Duplicate (shift+d) / Close the originals
> Change the blend mode of the layers to match their colors.
> In older versions of PSP, Mirror Horizontal=Mirror / Mirror Vertical=Flip /
Pick tool=deformation
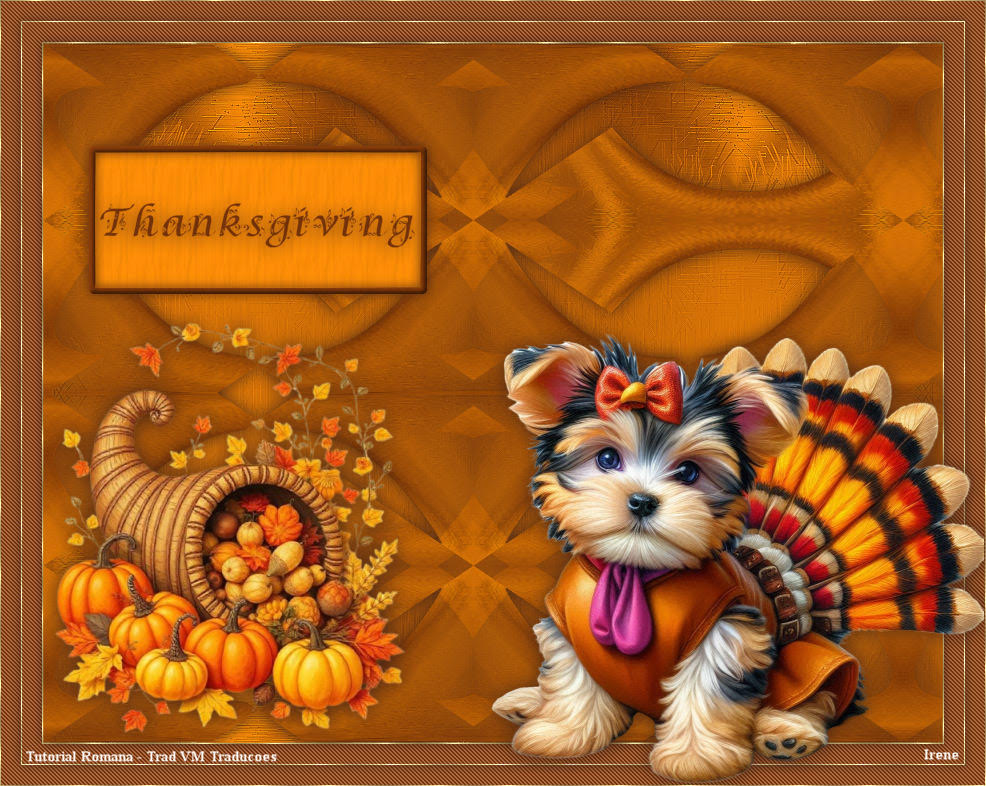
Step 1
>> Place the selections in the PSP Selections folder
>> Place the texture [Misc8] in the PSP Textures folder
Open a new transparent image measuring 900x700px
Colors:
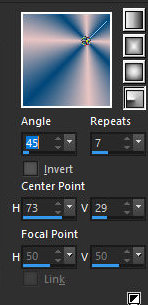
Prepare a Radial gradient
Paint the image with this gradient
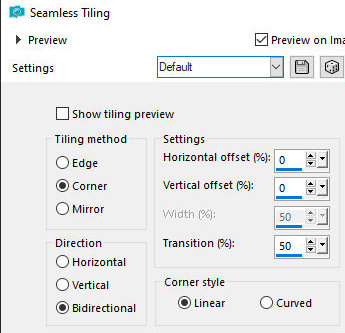
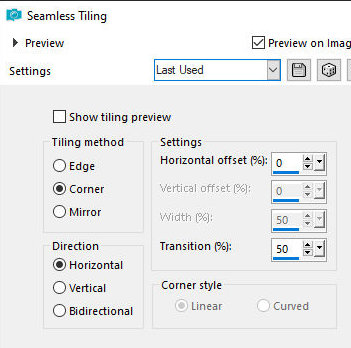
Effects / Image Effects / Seamless Tiling
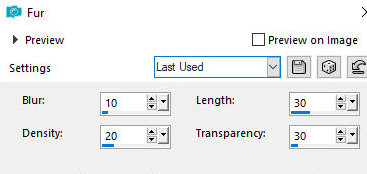
Effects / Texture Effects / Fur
Effects / Edge Effects / Enhance
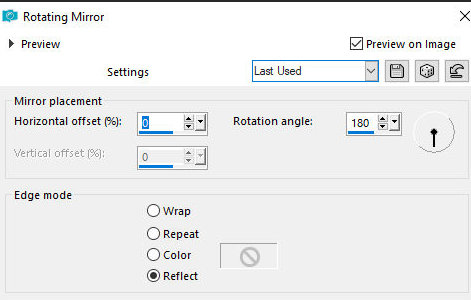
Effects / Reflection Effects / Rotating Mirror
Layers / Duplicate
Image / Mirror / Mirror Vertical
Step 2
Layers / properties / Opacity=50%
Merge Down
Copy (it will stay in memory)
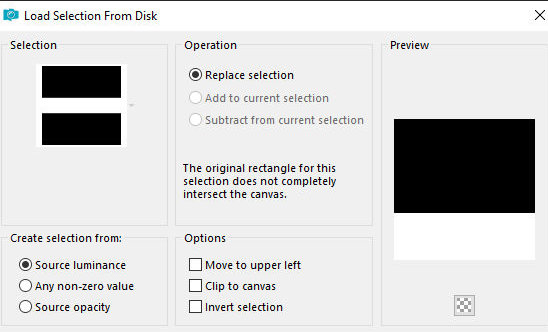
Add new layer
Selections / Load selection from disk / Selection
[01ornament52-romana1]
Paste the image copied above into the selection
Select none
Effects / Plugins / Flaming Pear / Flexify 2
Effects / Image Effects / Seamless Tiling
Step 3
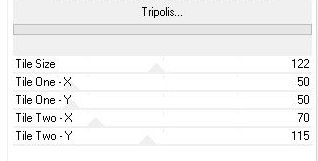
Effects / Plugins / Unlimited 2 / VM Instant Art / Tripolis
Stay on the layer
Selections / Load selection from disk / Selection
[01ornament53-romana1]
Press the delete key on the keyboard
Select none
Objects / Align / Bottom (adjust the position, touching the image to
the edge)
Activate the Pick Tool / Click on the top center slider and drag
down to the height of 350px
Layers / Duplicate
Image / Mirror / Mirror Vertical
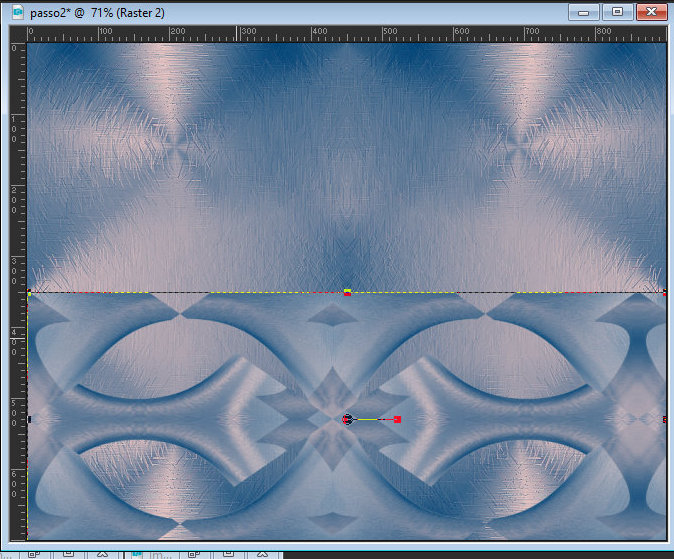
The image will look like this (if there is a small gap in the center,
adjust with the pick tool)
Merge down
Step 4
Drop shadow: 0 0 100 25 black
Add new layer
Selections / Load selection from disk / Selection
[01ornament54-romana1]
Paint the selection with the background color
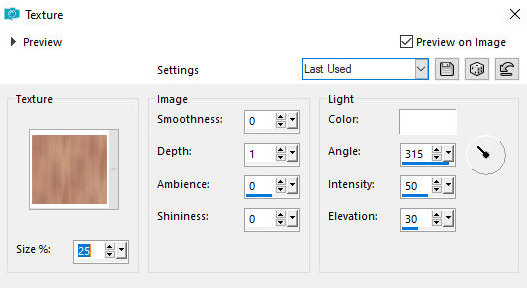
Effects / Texture Effects / Textures [misc8]
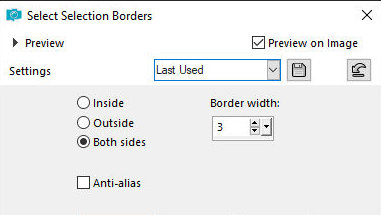
Selections / Modify / Select selection borders
Paint the selection with the foreground color
Drop Shadow: 0 0 100 15 black
Effects / 3D Effects / Inner Bevel
Select none
Step 5
Activate the Text Tool
Write "Thanksgiving" / Use a font and settings of your choice
Right-click on the layer and select Convert to Raster Layer
Position in the small frame as per the template
Drop shadow: 2 -2 100 30 black
Copy the decorative tube and paste as a new layer
Adjust the size and position on the left as per the template
Drop Shadow: 0 0 100 30 black
Image / Add borders / 1px / #68204c
Selections / Select all
Step 6
Image / Add borders / 20px / background color
Image / Add borders / 1px / background color foreground
Image / Add borders / 20px / background color
Selections / Invert
Effects / Plugins / Penta.com / Jeans
Selections / invert
Drop shadow: 0 0 100 15 black
Select none
Selections / Select all
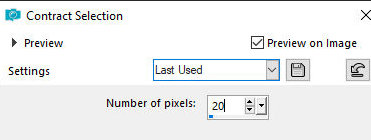
Selections / Modify / Contract=20
Step 7
Drop shadow: 0 0 100 15 black
Select none
Copy the main tube and paste it as a new layer
Adjust the size and position it to the right according to the model
Adjust / sharpness / Sharpen
Drop Shadow: 0 0 100 30 black
Place the signatures
Image / Add borders / 1px / foreground color
Save as jpeg
*
Thank you Irene for testing my translations

|