|

This tutorial is by Romana, whom I thank for letting me translate her tutorials.

Original here
Tubes

Material

Many thanks to the creators of these materials

Plugins
Flaming Pear - Flexify 2
Filter Mehdi - Wavy Lab 1.1
Muras Meister - Pole Transform 2.1
Simple - Centre Tile
Muras Seamless - Tiling with Shrink
Bkg Kaleidoscope - 4QFlip Upper R
You can find these plugins on the websites of:
Renée
Cloclo
You can also find this tutorial translated into these
languages:
(Click on the flag)


SCRIPT
Notes:
> Open the material / Duplicate (shift+d) / Close the originals
> Change the blend mode of the layers to match their colors.
> In old versions of PSP Mirror Horizontal=Mirror / Mirror Vertical=Flip
/ Pick tool=deformation
1. Place the selection in the Selections folder of the psp
2. Open the mask on the psp and minimize
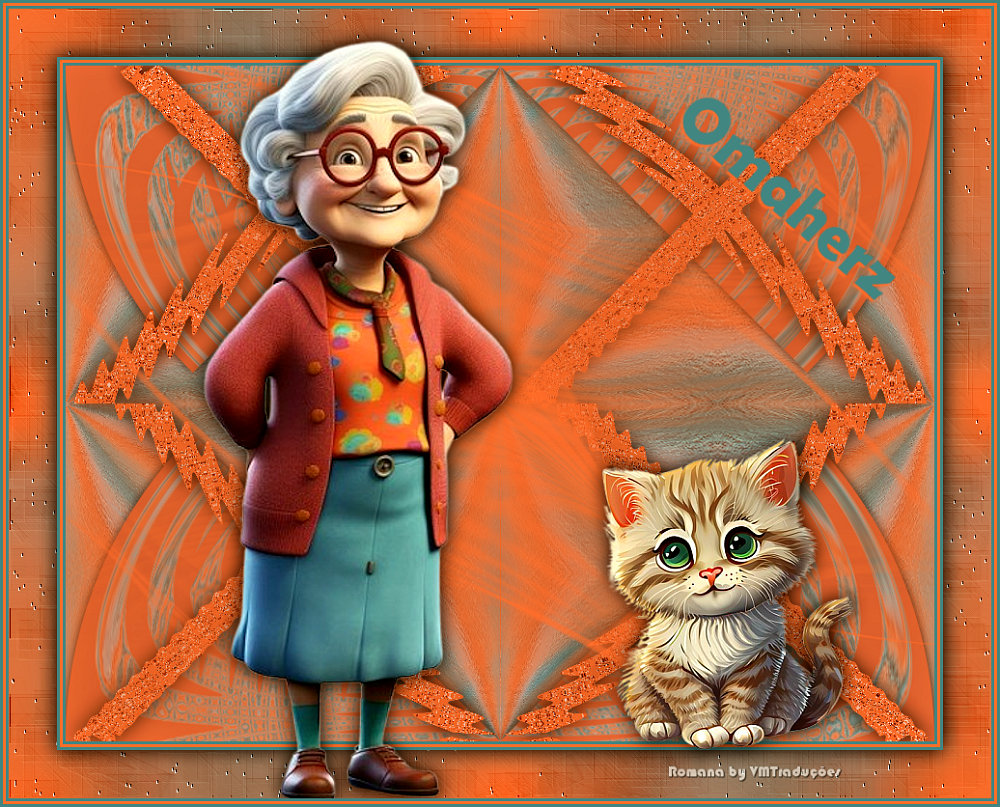
3. For this tutorial you will need a character tube and a decorative
tube.
4. Open a new transparent image with 900x700px
5. Colors: Foreground: #602e1e / Background #eab441

6. Effects / Plugins / Mehdi / Wavy Lab 1.1
Colors: 1.background / 2.foreground/ 3 and 4 your choice

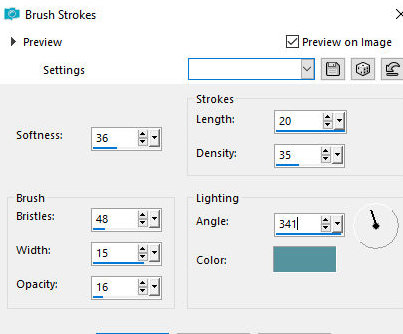
7. Effects / Art Media Effects / Brush Strokes
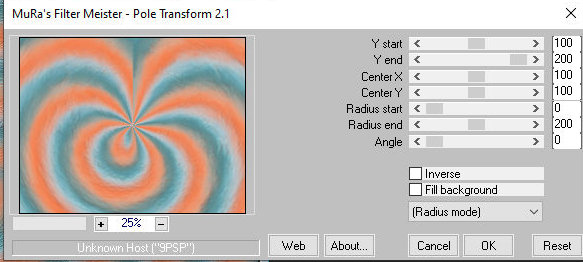
8. Effects / plugins / Mura's meister / Pole transform
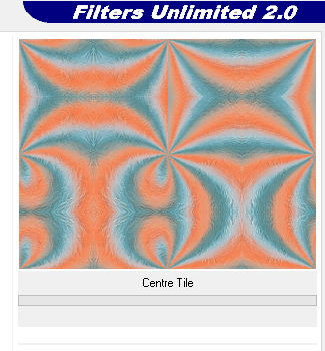
9. Effects / Plugins / Unlimited 2 / Simple / Center Tile
10. Effects / plugins / BKG Kaleidoscope / 4 QFlip UpperR

11. Effects / Reflection Effects / Rotating Mirror - default

12. Layers / Duplicate
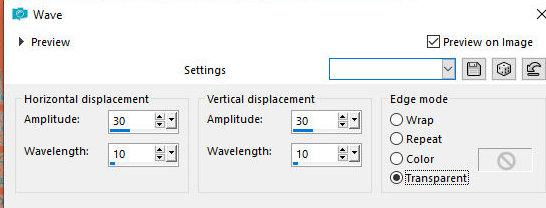
13. Effects / Distortion Effects / Wave
14. Effects / Plugins / Flaming Pear / Flexify2

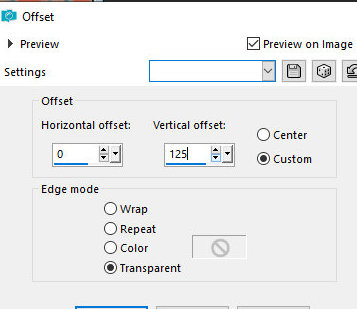
15. Effects / Image Effects / Offset [0/125]
16. Layers / Duplicate
17. Image / Mirror / Mirror Vertical
18. Merge down
19. Drop shadow: 0 0 100 15 black
20. Add new layer
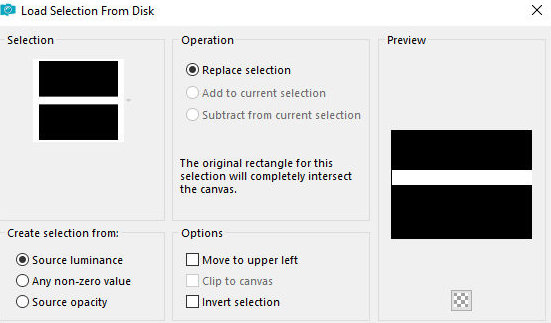
21. Selections / Load selection from disk / Selection
[01ornament49-romana1]
22. Paint the selection with the background color. Keep the
selection
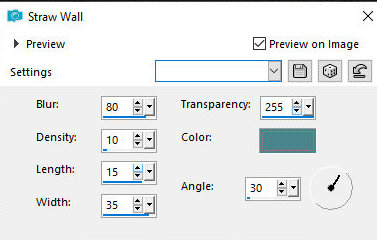
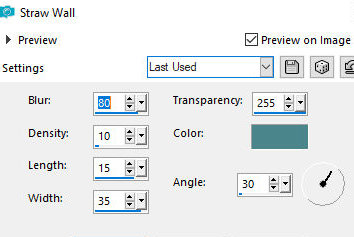
23. Effects / Texture Effects / Straw Wall
24. Select none
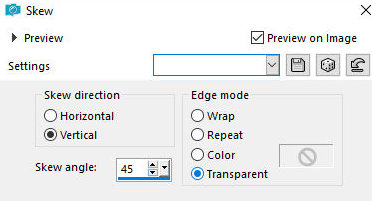
25. Effects / Geometric Effects / Skew
26. Layers / Duplicate
27. Image / Mirror / Mirror Horizontal
28. Merge down
29. Effects / Plugins / Mura's Seamless / Tiling with Shrink

30. Effects / Distortion Effects / Ripple

31. Drop Shadow: 0 0 100 30 black
32. Add a new layer
33. Paint with the background color
34. Layers / New Mask Layer / From Image / Mask
[Silvie_Mask_Deco00W]

35. Merge Group
36. Layers / Duplicate
37. Image / Mirror / Mirror Horizontal
38. Image / Mirror / Mirror Vertical
39. Merge Down
40. Drop shadow: 0 0 40 50 black
41. Image/ Add borders / 3px / color #602e1e
42. Image / Add borders / 3px / color #eab441
43. Image/ Add borders / 3px / color #602e1e
44. Selections / Select all
45. Image / Add borders / 50px / color #eab441
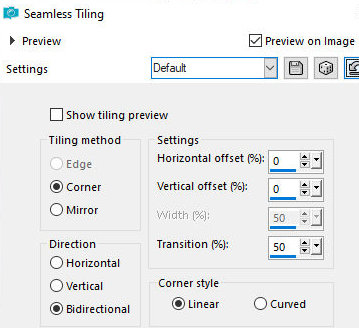
46. Effects / Image Effects / Seamless Tiling - default
47. Selections / Invert
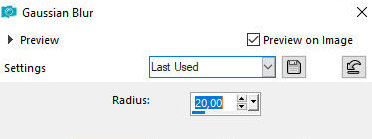
48. Adjust / Blur / Gaussian Blur=20
49. Effects / Texture Effects / Straw Wall - same as above
50. Selections / Invert
51. Drop Shadow: 0 0 100 30 black
51b. Select none
52. Copy your decorative tube and paste it as a new layer
53. Position bottom right as per model
54. Drop Shadow: 0 0 100 30 black
55. Copy your tube character and paste it as a new layer
56. Position on the left according to the model
57. Adjust the size
58.Adjust/Sharpness/Sharpen
59. Drop shadow: 0 0 100 30 black
60. Enter text using the font and settings of your choice
61. Drop shadow: 2 -2 100 3 black
62. Place the signatures
63. Image/Add borders/3px/color #602e1e
64. Image / Add borders / 3px / color #eab441
65. Image/Add borders/3px/color #602e1e
66. Save as jpeg
*
Thank you Irene for testing my translations


|