|


This tutorial is from Manyi who I thank for
letting me translate their tutorials.

Original here

Tubes

Material

Many thanks to the creators of
these materials

Plugins
Gmic Plugins-X86, 3,2,0 verzió
Mehdi-Sorting Tiles
BKG Designer sf 10 II-Fan Blades
PLUGIN GMIC
INFORMATION
GMIC
You can find these plugins on the websites of:
Renée
Cloclo
You can also find this tutorial translated into these languages:
(Click on the flag)


SCRIPT
Notes:
> Open the material / Duplicate (shift+d) / Close the originals
> Change the blend mode of the layers to match their colors.
> In older versions of PSP, Mirror Horizontal=Mirror / Mirror Vertical=Flip /
Pick tool=deformation
> Open the masks in psp and
minimize
>Adjust the size of the tubes according to your images
*
Place the selections in the Selections folder of
the psp
Open a folder and name it gmic-ikrek
Colors: Foreground: #a65b7a / Background: #ffffff
Open a new transparent image measuring 800x500px
Paint with this Rectangular gradient
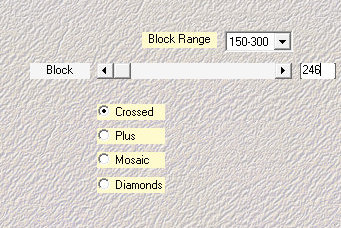
Effects - Plugins - Mehdi - Sorting tiles
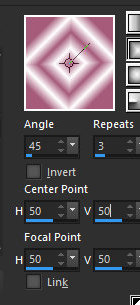
Effects - Reflection Effects - Rotating Mirror
Layers - Duplicate
Activate the Pick Tool and reduce the image as follows: Drag the top
part down to the height of 200px and the bottom part up to the
height of 250px
Continue on this layer
Effects -Plugins - GMIC_QT - Deformations - Polar Transform
Image - Mirror - Mirror Vertical
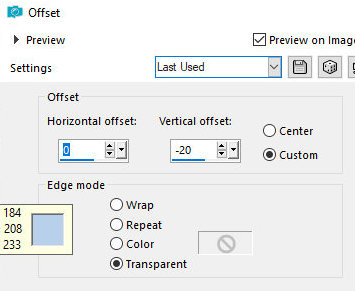
Effects - Image Effects - offset [0/-20]
Drop Shadow: 17 -17 55 20 #442431 - SHADOW ON NEW
LAYER MARKED
Drop shadow: -17 17 55 20 #442431 - SHADOW ON NEW
LAYER MARKED
Merge down (the two middle layers)
Stay on the unified shadow layer
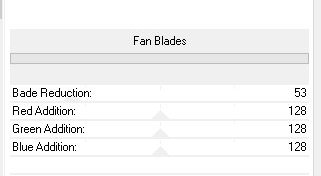
Effects - Plugins - Unlimited 2 - BKG Designer sf10 II - Fan Blades
Activate the background layer
Selections - Load selection from disk - Selection [2024-ikrek
selections]
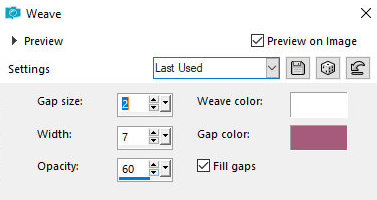
Effects - Texture Effects - Weave colors:background
/ foreground
Select none
Merge down (the two upper layers)
Activate the background layer
Copy the twins' tube - paste as a new layer
Image - Resize: 345x505px
Activate the Pick Tool and position: X=227 - Y=110 (or according to
your tubes)
Activate the layer Raster 2
Selections - Load selection from disk - [2024-ikrek-1 - selections]
Press Delete on the keyboard
Select none
Activate the top layer
Copy the tube [dize] - paste as a new layer
Activate the pick tool and set: X=354 - Y=15
You can colorize according to your colors if you
want
Merge down (the two top layers)
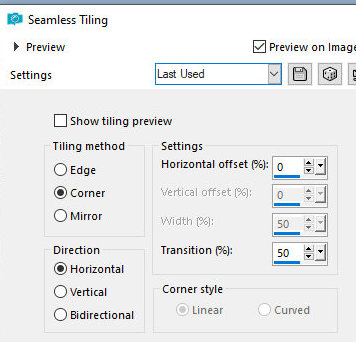
Effects - Image Effects - Seamless Tiling
Copy the flower [viragom] - Paste as a new layer
Activate the Pick Tool and set: x=-10 - Y=0 (or according to your
image)
Layers - Duplicate
Image - Mirror - Mirror Horizontal
Activate the main tube layer (twins)
Drop shadow: of your choice
Merge All
Effects - Plugins - GMIC_QT - Frames - Frame (Blur)
Return to psp
Save the image in the folder gmic-ikrek - name it with the number 1
Reserve the image you were editing to delete later
Open the image 1 saved in the folder and continue editing it
Layers - duplicate
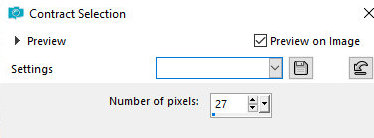
Selections - select all
Selections - Modify - Contract:27
Press Delete on the keyboard
Selections - Invert
Effects - Plugins - Unlimited 2 - VM Instant Art - Lightlines
Layers - Properties - Blend Mode: Screen
Select none
Merge all
Effects - Plugins - GMIC_QT - Frames - Frame(Blur)
Note the foreground color code and set it to balance color2
Return to the PSP
Save the image in the gmic-ikrek folder with the number 2
Reserve the image you were editing to delete later
Open the image 2 saved in the folder
Copy the deco [say 1] - Paste as a new layer
Activate the pick Tool and configure: X=236 - Y=275
Merge all
Image - Resize: 900x602px (optional)
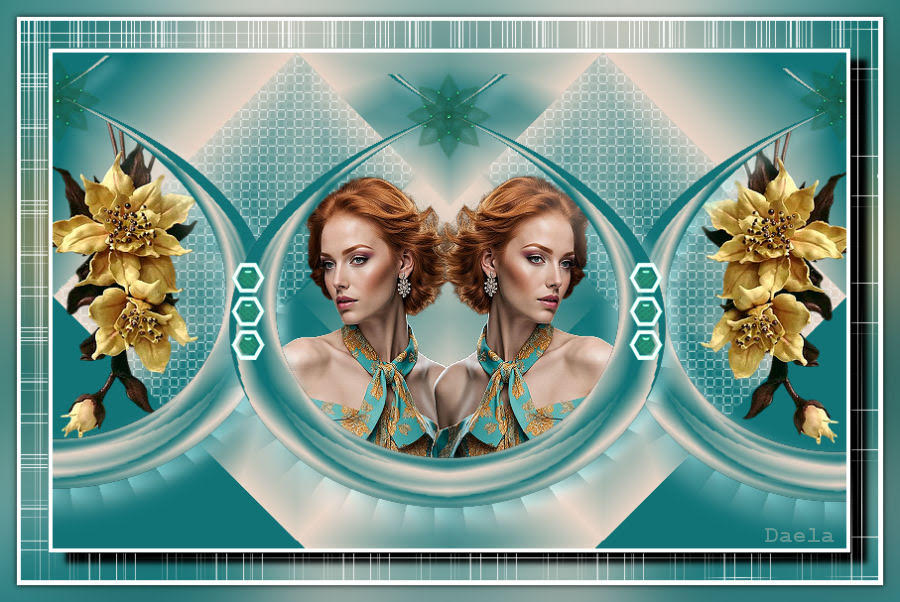
Place manyi's watermark
Place your signature
Merge all
Save as jpeg
*
Thank you Irene for testing my translations

|