|

This tutorial is from Mamiely who I thank for
letting me translate their tutorials.

Original here

Tubes

Mamiely
Material

Many thanks to the creators of
these materials
Plugins
Unlimited 2 - BKG Designers sf10
III - AAA Frames - BKG Designer sf10 II - Tramages - GMIC - Eye
Candy 5: impact


You can find these plugins on the websites of:
Renée
Cloclo
You can also find this tutorial translated into these languages:
(Click on the flag)


SCRIPT
Notes:
> Open the material / Duplicate (shift+d) / Close the originals
> Change the blend mode of the layers to match their colors.
> In older versions of PSP, Mirror Horizontal=Mirror / Mirror Vertical=Flip /
Pick tool=deformation
> Open the masks in psp and
minimize
>Adjust the size of the tubes according to your images
*
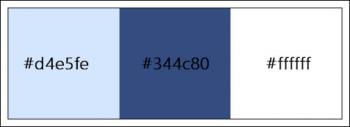
>> Colors: Foreground d4e5fc -
Background: #344c80
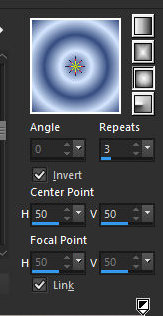
Prepare a Sunburst gradient
Open a new transparent image
measuring 950x600px
Paint with the gradient
Add new layer
Selections- Select all
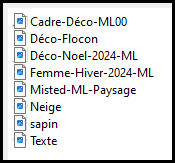
Copy the tube [Deco-noel-2024ML] and paste it into the selection
Select none
Adjust - Blur - Gaussian Blur: 25
Layers - Properties - opacity:65%
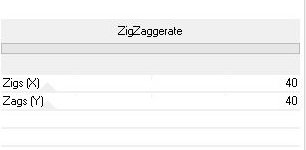
Merge all> Effects - Plugins - Unlimited 2 - BKG Designers sf10 III
- ZigZaggerate
Layers - Duplicate
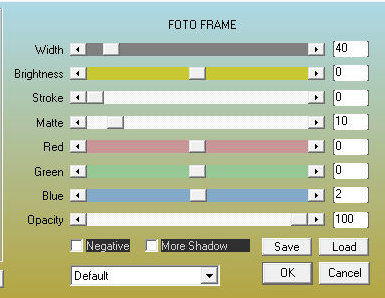
Effects - plugins - AAA Frames- Foto Frame
Image - Resize: 80% - all layers
unchecked
Effects - Plugins - Unlimited 2 - BKG Designers sf10 II - Moiré
Blocks
Drop shadow: 0 0 55 10 black
Layers - Properties - Blend mode: Luminance
Merge down
Layers - Duplicate
Effects - plugins - Tramages - Tow The Line
Layers - Properties - blend Mode:
Multiply
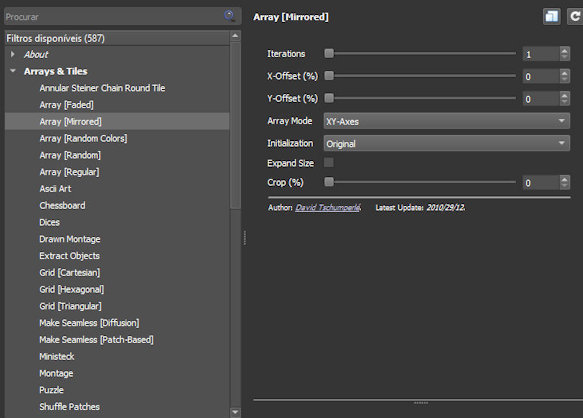
Effects - Plugins - GMIC-QT - Arrays & Tiles - Array(mirrored)
Merge all
Add new layer
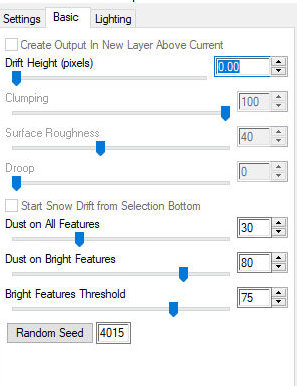
Effects - Plugins - Eye Candy 5: Nature - Snow Drift - Preset [Dusting
Heavy]
Copy the tube [Misted-ML.Paysage]
and paste as a new layer
Copy the tube [Neige] and paste as a new layer
Position according to the model
Copy the tube [sapin] and paste as a new layer
Position according to the model
Layers - Arrange - Move Down (should be below the tube neige)
Activate the Top layer
Copy the main tube and paste as a new layer
Adjust the size if necessary
Position on the left according to the model
Drop Shadow of your choice
Copy the tube [Deco-Flocon] and paste as a new layer
Position according to the model
Copy the tube [texte] and paste as a new layer
Position according to the model or as you prefer
Merge all
Copy (it will stay in memory)
Image - Add borders - 2px - #344c80
Image - Add borders - 10px - white
Image - Add borders - 2px - #344c80
Image - Add borders - 20px - white
Image - Add borders -2px - #c34480
Selections - Select all
Image - Add borders - 15px - white
Selections - Invert
Paste the image that is in memory into the selection
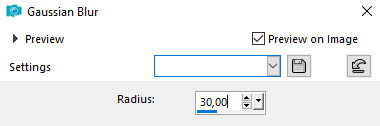
Adjust - Blur - Gaussian Blur: 30
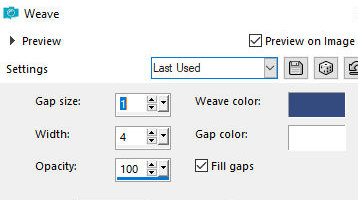
Effects - Texture Effects - Weave -
color #c34480
Effects - 3D Effects - Cutout
Select none
Image - Add borders - 2px - #c34480
Image - Add borders - 10px - white
Image - Add borders - 2p - #c34480
Selections - Select all
Image - Add borders - 45px - white
Drop shadow: 0 0 100 40 #c34480
Select none
Image - Add borders - 1px - #c34480
Copy the tube [cadre_deco.ML00] and paste it as a new layer
Merge all
Image - Resize: 950px(width) - (optional)
Put signatures
Merge all
Save as jpeg
*

|