|


This tutorial is from Mamiely who I thank for
letting me translate their tutorials.

Original here

Tubes

Tubes que usei: aqui
Material

Many thanks to the creators of
these materials

Plugins
Mehdi - Unlimited 2 - BKG
Kaleidoscope
You can find these plugins on the websites of:
Renée
Cloclo
You can also find this tutorial translated into these languages:
(Click on the flag)


SCRIPT
Notes:
> Open the material / Duplicate (shift+d) / Close the originals
> Change the blend mode of the layers to match their colors.
> In older versions of PSP, Mirror Horizontal=Mirror / Mirror Vertical=Flip /
Pick tool=deformation
> Open the masks in psp and
minimize
>Adjust the size of the tubes according to your images
*
1. Copy the [background] image (it will remain in
memory)
2. Open a new transparent image measuring 950x600px
3. Selections - Select all
4. Paste the image that is in memory into the selection. 5. Select
none
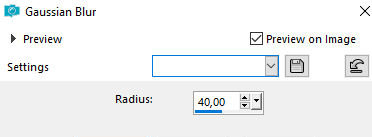
6. Adjust - Blur - Gaussian Blur: 40
7. Effects - Plugins - Mehdi - Sorting Tiles
8. Effects - Edge Effects - Enhance
9. Layers - Duplicate
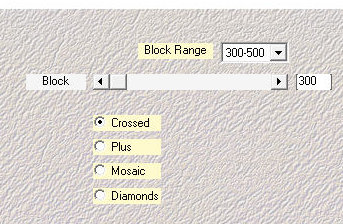
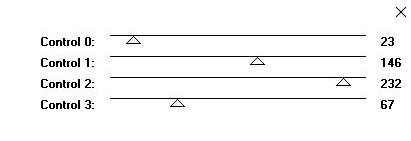
10. Effects - Plugins - Plots - Tow The Line
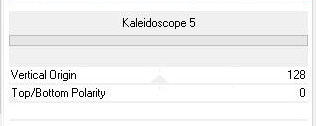
11. Effects - Plugins - Unlimited 2 - BKG
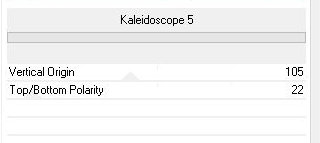
Kaleidoscope - Kaleidoscope 5
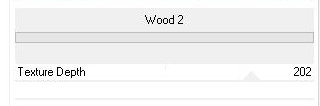
12. Effects - Plugins - Unlimited 2 - Texturize -
Wood 2
13. Effects - Edge Effects - Erode
14.Layers - Properties - Blend Mode: Soft Light
15. Merge visible
16. Add a new layer
17. Paint it white
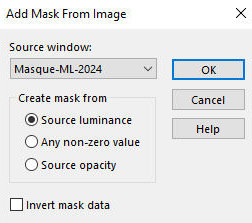
18. Layers - New Mask Layer - From Image - Mask [Masque-ML-2024]
19. Merge Group
20.Adjust - Sharpness - Sharpen
21. Merge all
22. Layers - Duplicate
23. Effects - Plugins - Unlimited 2 - BKG Kaleidoscope -
Kaleidoscope 5
24. Layers - Properties - Blend Mode: Luminance or
another that matches your colors
25. Merge visible
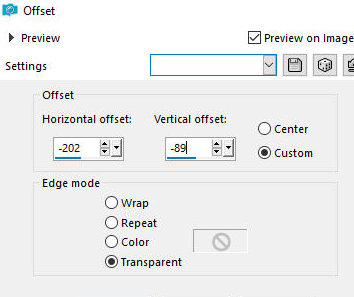
26. Copy the tube [Misted-ML-2024] and paste as a new layer
27. Effects - Image Effects - Offset [-202/-89]
28. Layers - Duplicate
29. Activate the layer below (original)
30. Effects - Texture Effects - Emboss
31. Layers - Properties - Opacity-50
32. Activate the top layer
33. Merge down
34. Adjust - Sharpness - Sharpen
35. Copy the tube [femme-ML-2024] and paste as a new layer
36. Position according to the model
37. Drop shadow of your choice
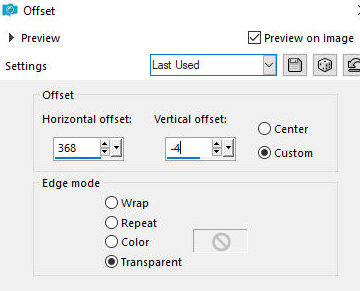
38. Copy the tube [Deco-ML-Papillons] and paste as a new layer
39. Effects - Image Effects - offset [368/-4]
40. Drop shadow of your choice
41. Copy the tube [Text] and paste as a new layer
41b. Position according to the model
42. Merge all
43. Copy and paste as a new image. Minimize
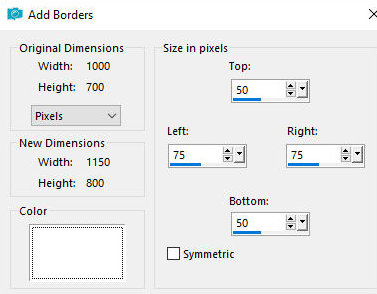
44. Selections - Select all
45. Image - Add borders - SYMMETRIC UNCHECKED - white color
46. Selections - invert
47. Copy the minimized image and paste it into the selection
48. Adjust - Blur - Gaussian Blur: 45
49. Effects - Plugins - Unlimited 2 - BKG
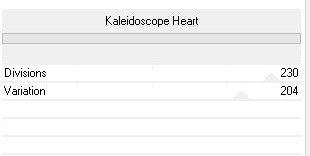
Kaleidoscope - Kaleidoscope Heart
50. Select none
51. Copy the tube [Cadre-Dentelle-ML] and paste it as a new layer
52. Image - Add borders - 2px - #5a3b76
53. Selections - Select all
54. Image - Add borders - 35px - white
55. Selections - Invert
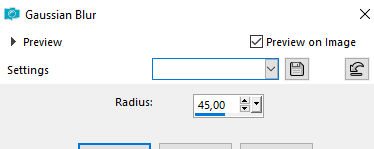
56. Copy the minimized image and paste it into the selection
57. Adjust - Blur - Gaussian Blur: 45
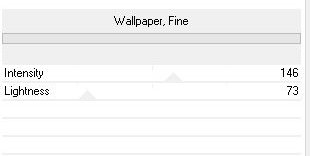
58. Effects - Plugins - Unlimited 2 - Paper
Texture - Wallpaper, Fine
59. Select none
60. Copy [Deco-Cadre-2] and paste as new layer
61. Image - Add borders - 1px - #5a3b76
62. Image - Resize: 950px(width)
63. Place signatures
64. Merge all
65. Save as jpeg
*

|