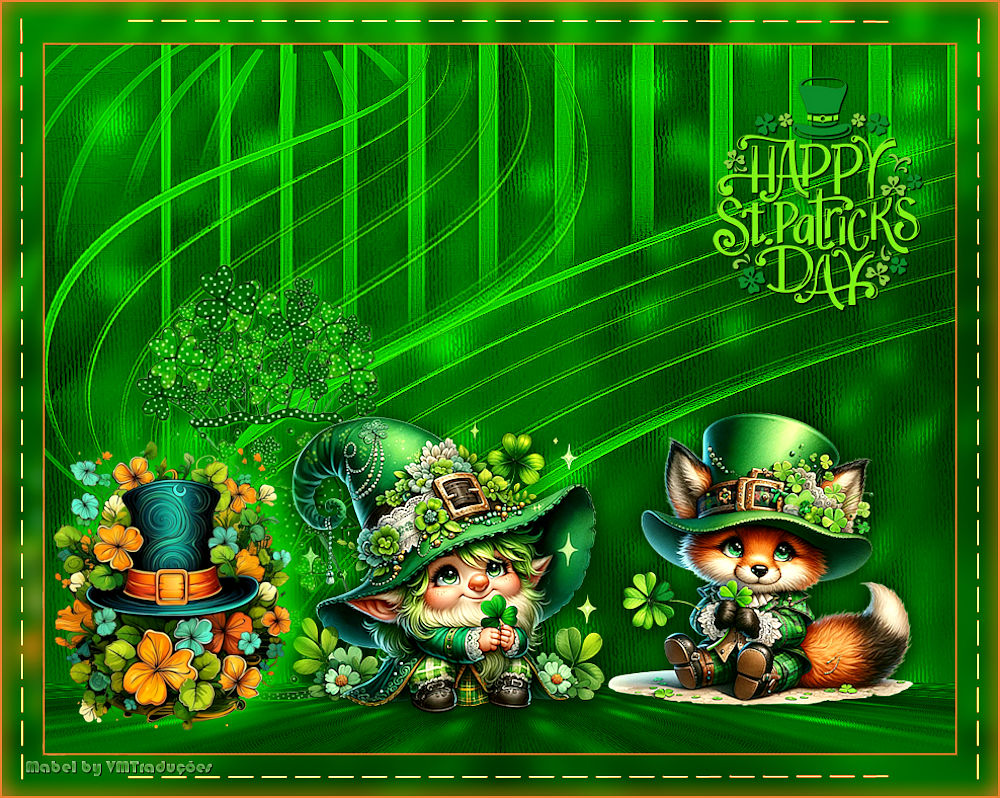
|

This tutorial is from Mabel who I thank for
letting me translate their tutorials.

Original here

Tubes

Material

My images:
Here
Plugins
Artistiques
Flamingo Pearl
Muras Meister
You can find these plugins on the websites of:
Renée
Cloclo
You can also find this tutorial translated into these languages:
(Click on the flag)


|
Notes:
> Open the material / Duplicate (shift+d) / Close the originals
> Change the blend mode of the layers to match their colors.
> In older versions of PSP, Mirror Horizontal=Mirror / Mirror Vertical=Flip /
Pick tool=deformation
> Open the masks in psp and
minimize
>Adjust the size of the tubes according to your images
|
SCRIPT
Required Images
1 tube character
Decorative tubes
*
Open a new transparent image with
900x700px
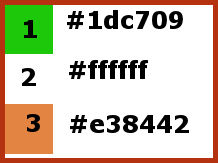
Colors: foreground: #1dc709(1) - background: #ffffff (2)
Selections / Select all
Copy the image [CP 4]
Paste it into the selection
Select none
Adjust / Blur / Gaussian Blur: 10
Effects / Image Effects / Seamless Tiling - Default
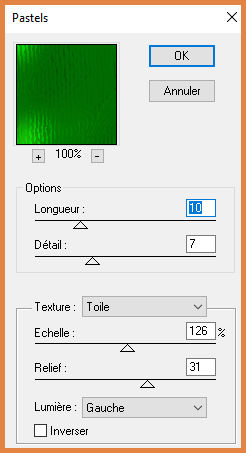
Effects / Plugins / Artistic / Pastels
Add a new layer
Paint with the foreground color
Layers / New Mask Layer / From image / Mask
[Silvie_Mask_Abstract66I]
Merge group
Layers / Duplicate
Merge down
Effects / Edge Effects / Enhance More
Layers / Duplicate
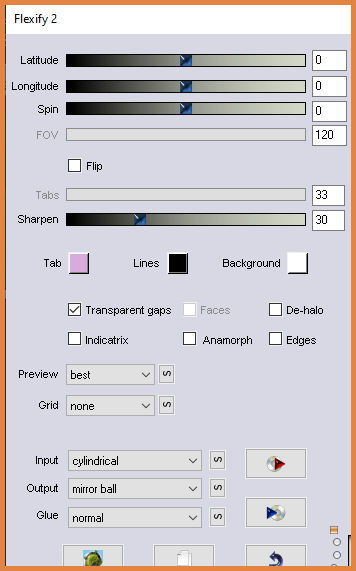
Effects / Plugins / Flamingo Pear / Flexify 2
Effects / Image Effects / Offset -200/135
Drop shadow: -4 20 100 40 color 1
Activate layer Raster 1
Layers / Duplicate
Layers / Arrange / Bring to top
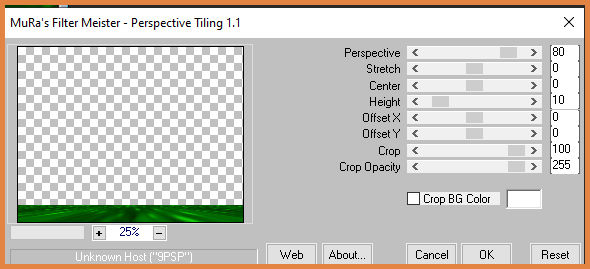
Effects / Plugins / Mura's meister / Perspective Tiling
Effects / Reflection Effects / Rotating Mirror: 0-180-reflect
Copy the tube [Charm_2]
Paste as a new layer
Image / Resize: 50% - all layers unchecked
Position to the right as per the model
Drop shadow: -4 20 100 40 color 1
Copy the tube [charm 38]
Paste as a new layer
Image / Resize: 50% - all layers unchecked
Position below left as per the model
Drop Shadow same as before
Copy the tube [Charm 33]
Paste as a new layer
Image / Resize: 30% - all Uncheck layers
Position to the right as per the model
Drop Shadow as before
Copy the text
Paste as a new layer
Position as per the model
Image / Add borders / 2px / color 3
Copy (will be stored in memory)
Image / Add borders / 40px / any color
Select this border with the Magic Wand
Paste the image stored in memory onto the selection
Adjust / Blur / Gaussian Blur: 10
Select none
Image / Add borders / 2px / color 3
Copy [adono-marco]
Paste as a new layer
Add signatures
Merge all
Save as jpeg

|