|

This tutorial is Lady Valella who I thank for
letting me translate their tutorials.

Original here

Tubes

Material

Many thanks to the creators of
these materials
Plugins
Mura's Meister
Sybia
AP (Lines) Silverlining
Alien Skin Eyecandy5 Impact
You can find these plugins on the websites of:
Renée
Cloclo
You can also find this tutorial translated into these languages:
(Click on the flag)


SCRIPT
Notes:
> Open the material / Duplicate (shift+d) / Close the originals
> Change the blend mode of the layers to match their colors.
> In older versions of PSP, Mirror Horizontal=Mirror / Mirror Vertical=Flip /
Pick tool=deformation
1. Open the mask [MaschText09_LValella20] on the
psp and minimize
2. Open the alpha channel [BaseAlphaRoseLV] / Duplicate (shift+d) /
Close the original
3. Colors used: Foreground: B62003 / Background: #EEDFCA (choose a
color that is not too dark for the foreground)

4. Prepare a Radial gradient

5. Paint the image with the gradient
6. Adjust / blur / Gaussian Blur=15

7. Add a new layer
8. Set the background color to #000000
9. Prepare a Linear Gradient

10. Paint the layer with the gradient
11. Effects / plugins / Sybia / SIERPENS

12. Effects / Edge Effects / Enhance
13. Layers / Properties / blend Mode: Multiply / Opacity=65
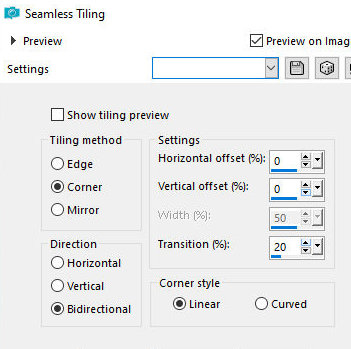
14. Effects / Image Effects / Seamless Tiling - default with
transition=20
15.Adjust/sharpness/sharpen
16. Merge Visible
17. Selections / Load selection from alpha channel / Selection [
selezLVtut1]

18. Selections / Promote selection to layer
19. Effects / plugins / AP[Lines]/ Lines-SilverLining - Diamond Bill
preset

20. Select none
21. Drop Shadow: 0 0 100 25 black
22. Layers / Duplicate
23. Image / Mirror / Mirror Horizontal
24. Merge down
25. Layers / Duplicate
26. Image / Mirror / Mirror Vertical
27. Merge down
28. The image will look like this:

29. Effects / Image Effects / Seamlss tiling - same as above

30. Layers / Duplicate
31. Image / Free Rotate [Left/90]

32. Image / Resize: 80% - all layers unchecked
33. Close the background layer (click on the eye)
34. Merge visible
35. Open and activate the background layer (click on the eye)
36. Layers / Duplicate
37. Layers / Arrange / Bring to top
38. Effects / Plugins / Mura's meister / Perspective Tiling

39. Drop shadow equal
40. Activate the background layer
41. Add new layer
42. Paint with black color
43. Layers / New mask Layer / From Image / Mask
[MaschText09_LValella20]

44. Merge Group
45. Layers / Properties / Blend Mode: Luminance (L) / Opacity=90%
46. The layers will look like this:

47. Activate the bottom layer
48. Copy the tube [LValellaTF2023-0538] and paste it as a new layer
49. Do not move
50. Drop shadow same as above
51. Activate the top layer
52. Copy the tube [+tube48-lv18] and paste it as a new layer
53. Colorize according to your colors
54. Drop Shadow same as above
55. Image/Flip/Flip Horizontal
56. Activate the pick Tool and configure: X=119 / Y=517

57. Copy the tube [2230-TD(LValella24)] and paste it as a new layer
58. Image / Resize: 65% - all layers unchecked (adjust the size
according to your tube)
59. Position according to the model
60. Drop Shadow same as above or as you prefer]
61. Duplicate this image: shift+d or Windows /Duplicate
62. Minimize the work image. Keep working on that new image
63. Merge all
64. Image / Resize: 12%
65.Adjust/sharpness/Sharpen
66. Effects / Plugins / Eye Candy 5: Impact / Glass - Preset [Clear]

67. Image / Add borders / 1px / black
68. Selections / Select all
69. Image / Add borders / 10px / #EEDFCA
70. Drop Shadow same as above
71. Select none
72. Copy (it will stay in memory)
73. Activate the other image
74. Paste as new layer
75. Activate the Pick Tool and configure: X=52 / Y=40

76. Drop Shadow same as above
77. Layers / Duplicate
78. Image/Mirror/Mirror Horizontal
79. Merge down
80. Copy deco [decoro2] and paste as a new layer
81. Place below the small frame on the top left
82. Layers / Duplicate
83. Image / Mirror / Mirror Horizontal
84. Merge down
85. Drop Shadow: 1 1 100 1 black
86. Copy the title [titolo] and paste it as a new layer
87. Position according to the model
88. Image / Add borders / 1px / black
89. Selections / Select all
90. Image/ Add borders / 20px / #EEDFCA
91. Drop shadow: 0 0 100 25 black
92. Select none
93. Image / Add borders / 1px / black
94. Image / Add borders / 51px / #B6200E
95. Image / Add borders / 1px / black
96. Place the signatures
97. Merge all
98. Save as jpeg
*
Irene thank you very much for
testing my translations

|