| Place the selections in the
PSP Selections folder.
Place the Texture in the PSP Textures folder.
Open a new transparent image measuring 900x600px.
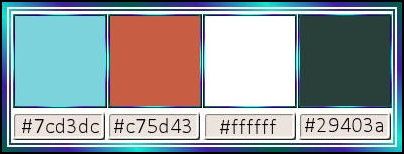
Set the color #7cd3dc to the foreground and the color
#c75d43 to the background.
Prepare a Radial gradient.
[90/3 des 50/50]
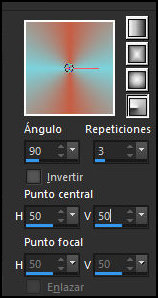
Paint the image with this gradient.
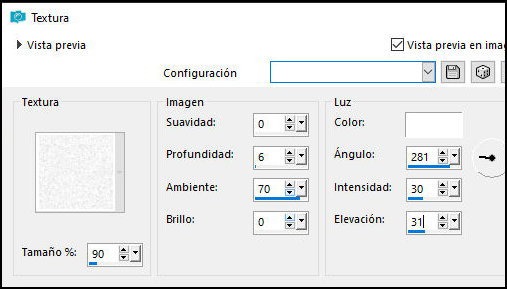
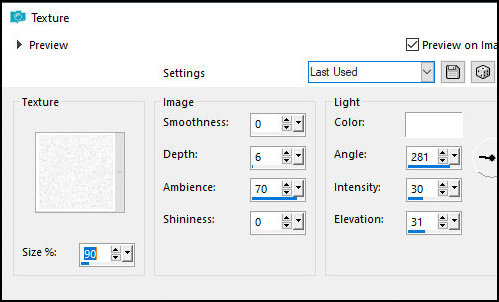
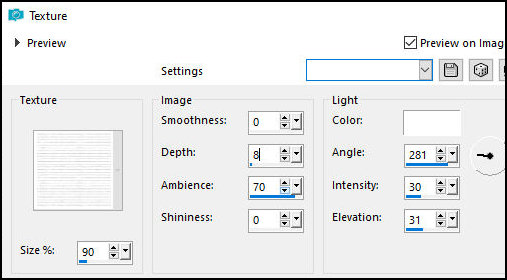
Effects / Texture - texture [letter]
[90 0 6 70 0 br 281 30 31]
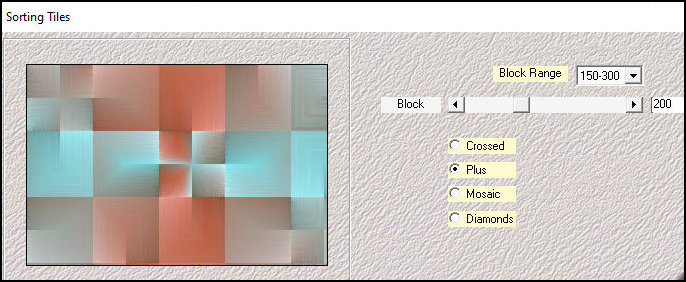
Effects / Plugins / Mehdi / Sorting Tiles
[150/300-200-plus]
Effects / Edge Effects / Enhance
Effects / Texture - same as above.
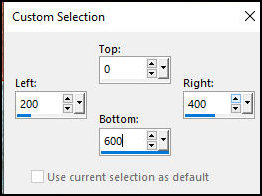
Activate the Selection Tool / Custom Selection and set:
[0 200 400 600]
Selections / Promote selection to layer
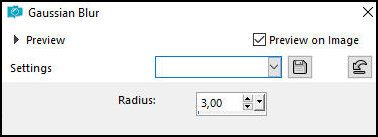
Adjust / Blur/Gaussian Blur: 3
Select none
Drop shadow: 0 0 100 25 black
Effects / Edge Effects / Enhance
Effects / Plugins / It@alia Editors Effects / Effetto
Fantasma
[35 35]
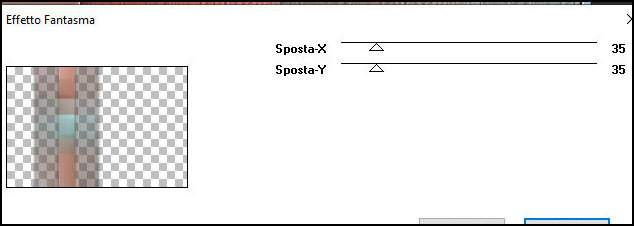
Image / Mirror / Mirror Vertical
Layers / Properties / Blend Mode: hard Light
Adjust/Sharpness/Sharpen
Copy
Paste as new image
Image / Rotate Right
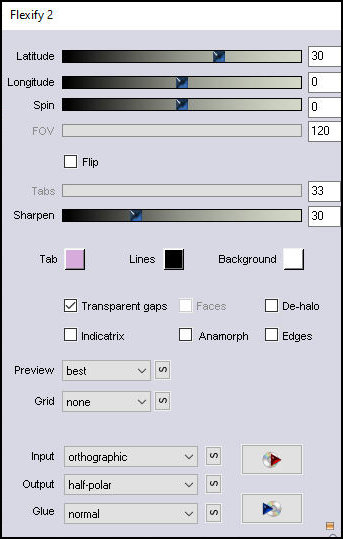
Effects / plugins / Flaming Pear / Flexify 2
[30 0 0 120 33 30 orthographic hall-polar]
Copy
Return to your work and paste it as a new layer
Layers / Properties / Blend Mode: Normal
Objects/Align/Bottom
Layers/Duplicate
Image / Mirror / Mirror Vertical
Merge Down
Adjust/Sharpness/Sharpen
Effects / Texture Effects / Texture - Texture [25-cmv]
[90 0 8 70 0 br 281 30 31]
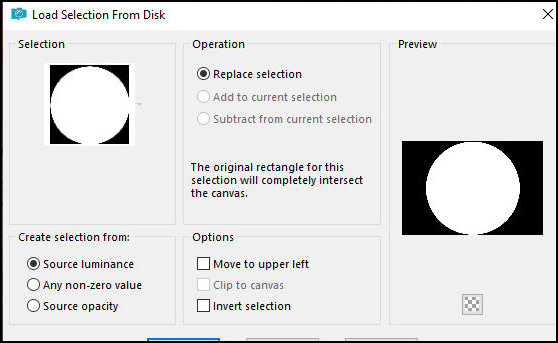
Selections / Load selection from disk / Selection
[#SelectGondola1]
Drop Shadow same as above
Select none
Close this layer
Activate the Promoted Selection layer
Selections / Load selection from disk / Selection [#Select.Gondola2]

Drop Shadow same as above
Select none
Layers/Duplicate
Image / Mirror / Mirror Horizontal
Activate and open the top layer
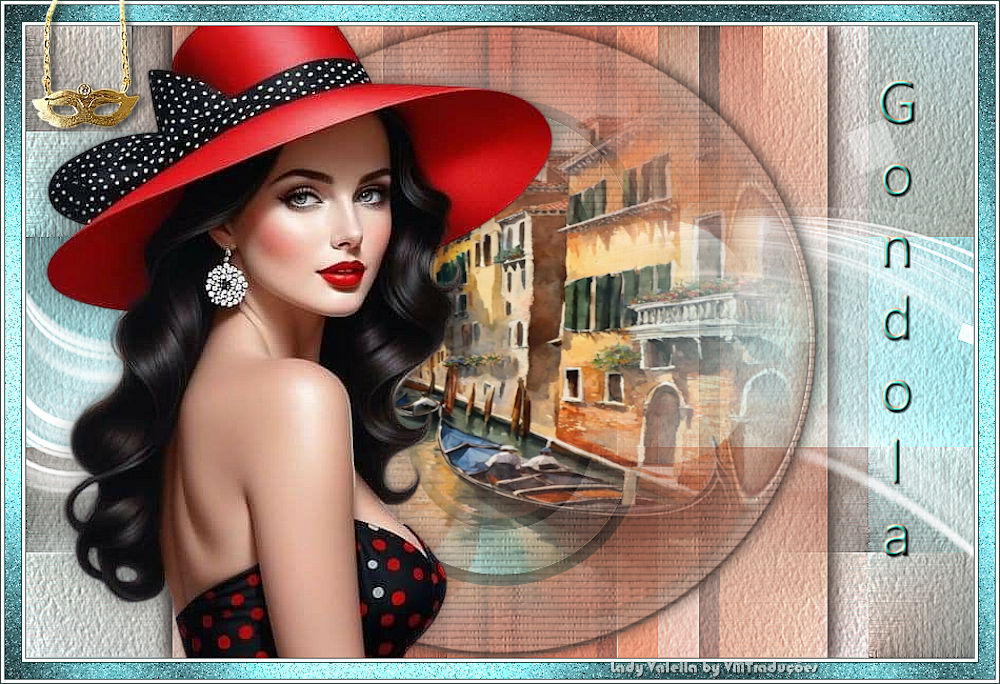
Copy the tube [0002-MP(AI@LValella24]
Paste as new layer
Image / Resize: 60% - all layers unchecked
Merge Down
Add new layer
Paint with white color
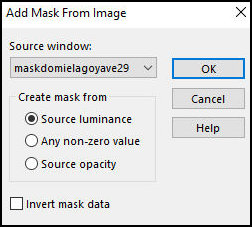
Layers / New Mask Layer / From Image / Mask
[maskdomielagoyave29]
Merge Group
Layers/Duplicate
Merge Down
Layers / Properties / blend Mode: Luminance
Adjust / Sharpness / Sharpen
Layers / Arrange / Move Down
Activate the top layer
Copy the tube [0146-TD(AILValella25)]
Paste as a new layer
Position bottom left as per the template
Drop shadow: 0 0 40 30 black
Copy the title [titolo]
Paste as a new layer
Position right as per the template (you can also write
your own title)
Borders:
1px / #29403a
3px / #ffffff
1px / #29403a
Selections / Select all
Border
15px / #7cd3dc
Selections / Invert
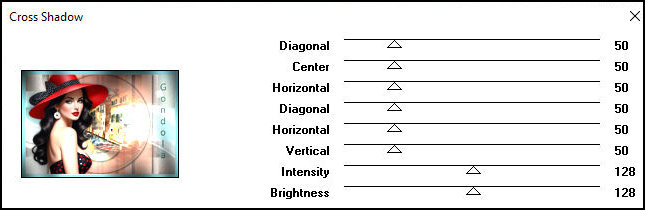
Effects / Plugins / Graphic Plus / Cross Shadow -
default
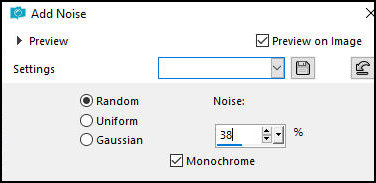
Adjust / Add/Remove Noise / Add Noise
[gaussian 38 x]
Select none
Borders:
1px / #29403a
3px / #ffffff
1px / #29403a
Copy the image [Mascherina01]
Paste as a new layer
Position top left as per the template
Merge visible
Place the signatures
Merge all
Save as a jpeg |