|

This tutorial is from Lady Valella who I thank for
letting me translate their tutorials.

Original here

Tubes

Material

Many thanks to the creators of
these materials
Plugins
Mehdi - Mura's Meister
You can find these plugins on the websites of:
Renée
Cloclo
You can also find this tutorial translated into these languages:
(Click on the flag)


SCRIPT
Notes:
> Open the material / Duplicate (shift+d) / Close the originals
> Change the blend mode of the layers to match their colors.
> In older versions of PSP, Mirror Horizontal=Mirror / Mirror Vertical=Flip /
Pick tool=deformation
> Open the masks in psp and
minimize
>Adjust the size of the tubes according to your images
*
Open a new transparent image measuring 850x600px
Colors: Foreground: #d3c9e1 - Background: #42b5e2
>>>
Selections - select all
Copy the image [Fractal01] (in the material there is a folder with
several fractals provided by the author)
Paste in the selection
Keep the selection
Adjust - Blur - Radial Blur:
>>>spin 30 nl des 0 0 0
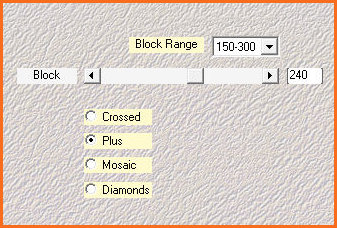
Effects - Plugins - Mehdi - Sorting Tiles
>>>150/300-240-plus
Effects - Edge Effects - Enhance
Image - Add borders - 25px - background color
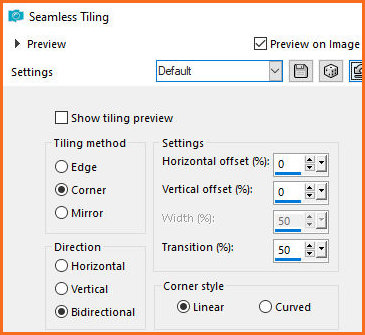
Effects - Image Effects - Seamless Tiling - default
>>>
Drop shadow: 0 0 100 25 black
Select none
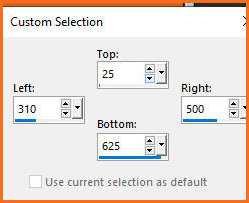
Activate the Selection Tool - Custom selection and configure
>>>25 310 500 625
Selections - Promote selection to layer
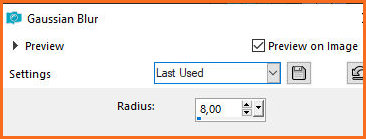
Adjust - Blur - Gaussian Blur: 8
>>>
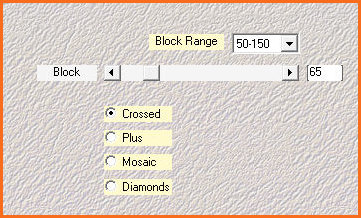
Effects - Plugins - Mehdi - Sorting tiles
>>>50/150 65 crossed
Effects - Edge Effects - Enhance
Drop shadow same as above
Selections - invert
Drop Shadow same as above
Select none
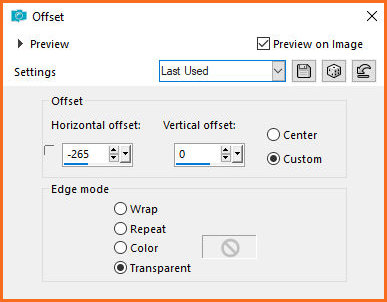
Effects - Image Effects - Offset
>>> -265 0
Layers - Duplicate
Image - Mirror - Mirror Horizontal
Merge down
Add new layer
Paint with the foreground color
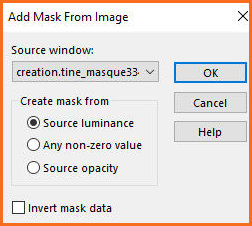
Layers - New Mask Layer - From Image - Mask [creation.tine_masque334]
>>>
Merge Group
Layers - Properties - Blend Mode: overlay - opacity: 60%
Layers - Arrange - Move Down
Merge visible
Copy the tube [elementoRettGlass]
Paste as a new layer
Don't move
Layers - Properties - blend Mode: Multiply - Opacity:80%
Merge Visible
Copy the layer (Edit/Copy)
Paste as a new image
Continue on this new image and minimize the previous one
Image - Resize: 25% - all layers checked
Image - Add borders - 2px - foreground color
Image - Add borders - 5px - background color
Image - Add borders - 2px - foreground color
Adjust - Sharpness - Sharpen - apply twice
Copy this image
Maximize and activate the previous image
Paste as a new layer
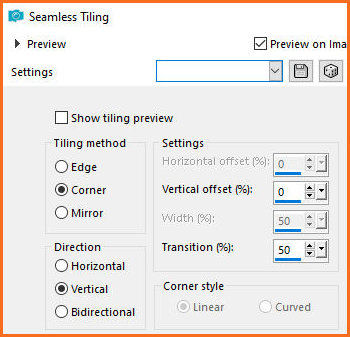
Effects - Image Effects - Seamless Tiling
>>>corner vertical 1 0 50 50
Drop Shadow same as previous
Merge visible
Layers - Duplicate
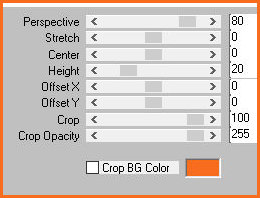
Effects - plugins - Mura's meister - Perspective Tiling
>>>80 0 0 20 0 0 100 255
Copy [LValellaTF2023-1031]
Paste as new layer
Image - Resize: 65% - all layers unchecked
Drop shadow: 0 0 60 25 black
Position a little below and to the right
Copy the tube [Grisi_woman_940]
Paste as new layer
Image - Resize: 60% - all layers unchecked
Position to the left according to the model
Drop Shadow: 0 0 60 25 black
Adjust - Sharpness - Sharpen
Use the color black and a font of your choice (preferably cursive),
or use the ready-made text that is in the material (copy and paste),
text [scritta]
Write the text (you can translate the text into your language):
"Quando troverò un colore
più darker than black,
I will become
More Fine at that moment,
I will dress in black!"
(Coco Chanel)
*
"When I find a color
darker than black,
I will wear it
But until then,
"I will dress in black!"
(Coco Chanel)
Layers - Convert to Raster layer
Copy and paste as new layer
Position at top right
Image - Add Borders - 3px - black
Image - Add Borders - 13px - background color
Image - Add Borders - 1px - black
Image - Add Borders - 2px - foreground color
Image - Add Borders - 1px - black
Image - Add Borders - 3px - background color
Image - Add Borders - 3px - black
Place signatures
Merge all
Save as jpeg
*

|