|
You will need:
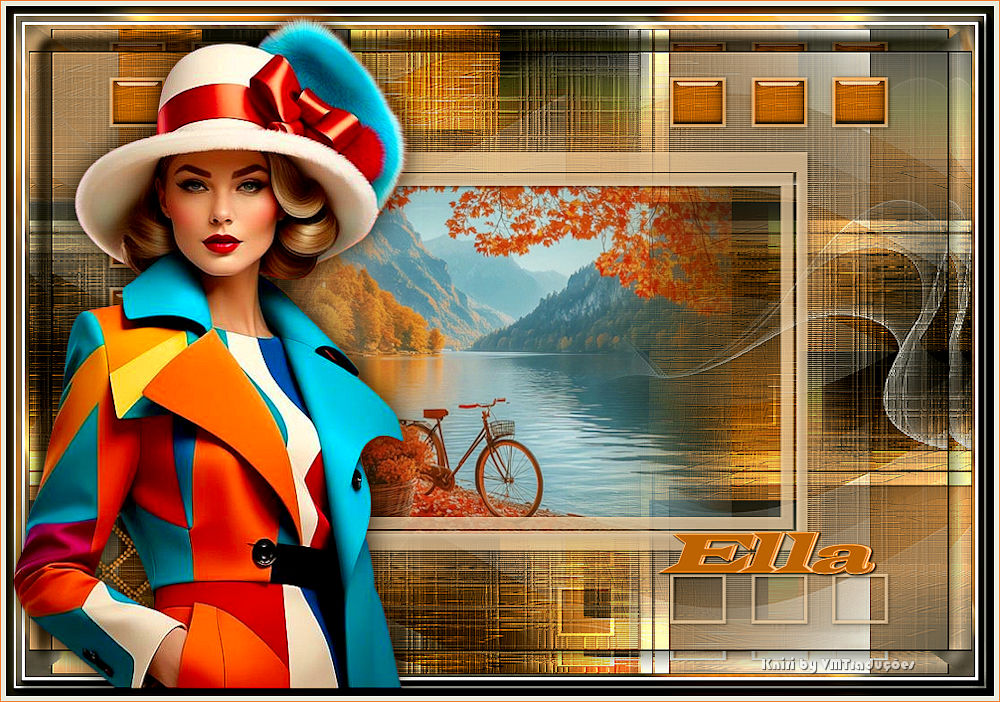
1 main tube
1 landscape tube
1 background tube if you don't want to use the one
provided in the material
*
1. Original colors: foreground:
#683c26 - Background: #e1e1df
2. Open the alpha channel [Alphak] /
Duplicate (shift+d) / Close the original
3. Rename to Raster 1
4. Selections / Select all
5. Copy the image [BKG]
6. Paste into the selection (you can colorize or use
another image)
7. Select none
8. Layers / Duplicate
9. Image / Mirror / Mirror Horizontal
10. Layers / Properties / blend mode: Darken
11. Adjust / Sharpness / Sharpen
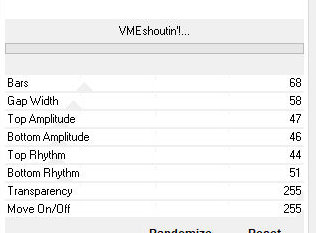
12. Effects / Plugins / Unlimited 2 / BKG Designer sf10
III / VMEshoutin'!
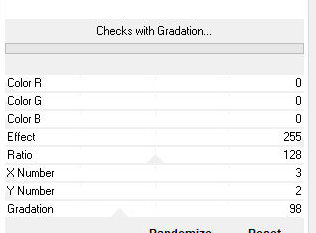
13. Effects / Plugins / Unlimited 2 /
Mura's Seamless - Checks with Gradation
14. Add a new layer
15. Paint with the background color or white
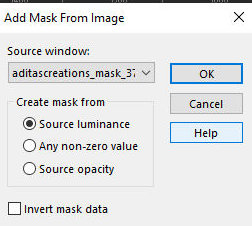
16. Layers / New Mask layer / From Image / Mask
[aditascreations_mask_37]
17. Merge Group
18. Drop Shadow: 1 1 80 1 black
19. Copy the tube [Deko]
20. Paste as a new layer
21. Layers / Properties / Blend Mode: Overlay
22. Activate the Copy of Raster 1 layer
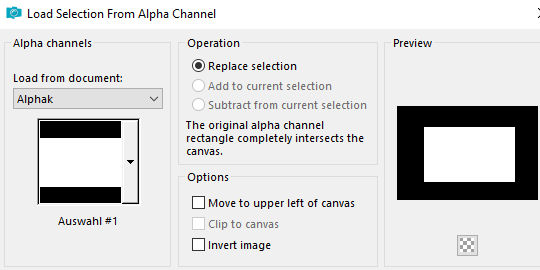
23. Selections / Load selection from Alpha Channel /
Selection 1
24. Copy your misted landscape tube
25. Paste as a new layer
26. Position in the selection
27. Selections / Invert
28. Press Delete
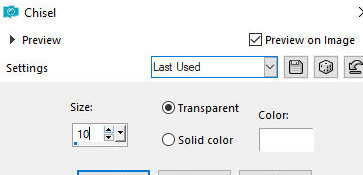
29. Effects / 3D Effects / Chisel
29b. Layers / Arrange / Bring to top
30. Select none
31. Activate the Copy of Raster 1 layer
32. Add a new layer
33. Paint with the background color
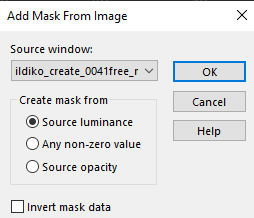
34. Layers / New Mask Layer / From Image / Mask
[ildiko_create_0041free_mask]
35. Layers / Duplicate
36. Merge Group
37. Drop shadow: 1 1 80 1 black
38. Effects / Edge Effects / Enhance
39. Activate the top layer
40. Copy the tube [deko1]
41. Paste as a new layer
42. Drop shadow: 1 1 80 5 black
43. Copy the tube [deko2]
44. Paste as a new layer
45. Position below left as per the model
46. Border: 2px / black
47. Copy / paste as a new layer / Minimize
48. Selections / Select all
49. Border: 45px/white
50. Selections / Invert
51. Copy the minimized image and paste it into the
selection
52. Effects / Plugins / Unlimited 2 / Graphic Plus /
Quick Tile II
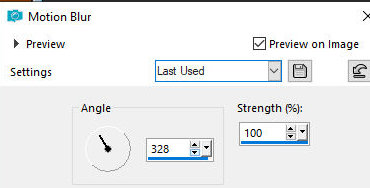
53. Adjust / Blur / Motion Blur
54. Effects / Plugins / Alf's Border
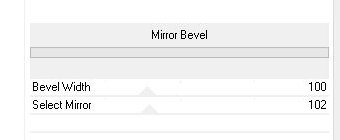
FX / Mirror Bevel
55. Effects / Plugins / AAA Frames /
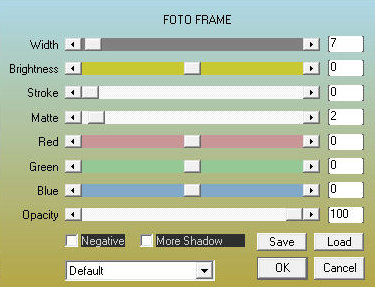
Photo Frame
55b. Effects / plugins / AAA Frames / Foto Frame
56. Effects / 3D Effects / Inner Bevel
57. Selections / Invert
58. Drop shadow: 0 0 80 40 black
59. Select none
60. Copy the main tube
61. Paste as a new layer
62. Adjust the size
63. Position as per model
64. Apply a drop shadow of your choice
65. Copy the text [text]
66. Paste as a new layer
67. Position as per model
68. Borders:
5px / background color
1px / foreground color
69. Resize as desired
70. Adjust / Sharpness / Unsharp Mask
71. Add signatures
72. Merge all
73. Save as jpeg |