|

This tutorial is from Grafica Pergioco who I thank for
letting me translate their tutorials.

Original here

Tubes

Material

Many thanks to the creators of
these materials
Plugins
VM Extravaganza
Toadies / What are you
Xenofex 2 / Constellation
You can find these plugins on the websites of:
Renée
Cloclo
You can also find this tutorial translated into these languages:
(Click on the flag)


SCRIPT
Notes:
> Open the material / Duplicate (shift+d) / Close the originals
> Change the blend mode of the layers to match their colors.
> In older versions of PSP, Mirror Horizontal=Mirror / Mirror Vertical=Flip /
Pick tool=deformation
> Open the masks in psp and
minimize
>Adjust the size of the tubes according to your images
*
1
Open a new transparent image measuring 800x600px
Choose two colors from your misted - a dark color for the foreground
and a light color for the background
Prepare a Linear gradient
Paint the image with this gradient
2
Effects - Plugins - Unlimited 2 - VM Extravaganza - Color Fusion
Effects - Edge Effects - enhance
Effects - plugins - Unlimited 2 - VM Extravaganza - James Bondage -
default
Layers - Duplicate
Image - Mirror - Mirror Vertical
Layers - Properties - Blend mode: Overlay
merge down
3
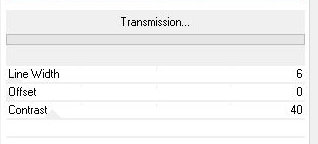
Effects - Plugins - Unlimited 2 - VM Extravaganza - Ray Transmission
- default
Add new layer
Paint with the background color
Effects - Plugins - Unlimited 2 - VM Extravaganza - Transmission -
default
4
Effects - Edge Effects - Enhance
Layers - Duplicate
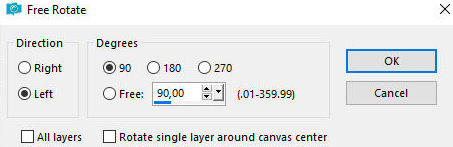
Image - Free rotate [left/90]
Merge visible
Adjust - Blur - Radial Blur
Copy the tube [fiore] and paste as
a new layer
Do not move
Image - Resize: 80% - all layers unchecked
Layers - Properties - blend mode: Luminance (L)
Copy the misted landscape tube - paste as a new layer
Leave it positioned in the center
Image - Resize: 80% - all layers unchecked
Merge down
Effects - Edge Effects - Enhance
Copy the tube [GGChristmasBow_005] and paste as a new layer
Position it to the left according to the model
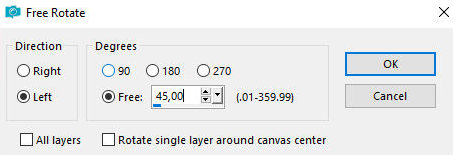
Image - Free Rotate [left/45]
Layers - Properties - blend Mode:
Hard Light
Drop Shadow: 1 1 100 1
Repeat with negative V and H
Effects - Illumination Effects - Lights
Layers - Duplicate
Image - Mirror - Mirror Horizontal
Copy the tube [natività] - paste as a new layer
Position it at the bottom left according to the model
Merge all
Image - Add borders - 1px - foreground color
Image - Add borders - 3px - background color
Image - Add borders - 1px - foreground color
5
Copy (it will stay in memory)
Image - Add borders - 20px - white
Select this 30px border with the Magic Wand - tolerance/feather=0
Paste the image that is in memory into the selection
Selections - Promote selection to layer
Select none
Effects - plugins - Toadies - What are you? - default
Effects - Edge Effects - Enhance -
2 times
Selections - Select all
Selections - Modify - Contract 20
Drop shadow: 4 4 100 10 foreground
color
Repeat with negative V and H
Select none
Place the signatures
If you don't want to place animation, save as jpeg
ANIMATION
Triple the background layer
Rename it as S1, S2 and S3
Close the layers S2 and S3 (click on the eye)
Activate the layer S1
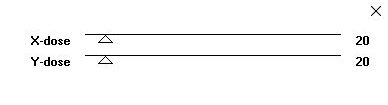
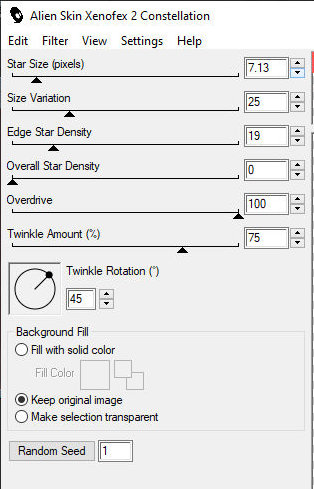
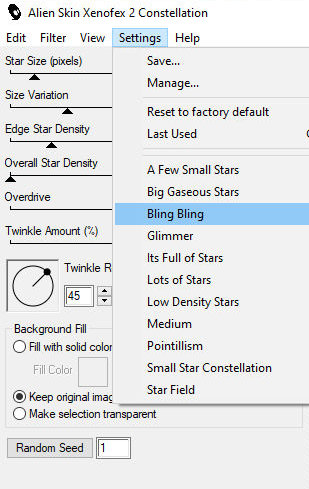
Effects - Plugins - Xenofex 2 - Constellation
Close the layer S1
Open and activate the layer S2
Apply Xenofex 2 with the same configuration, just click on Random
Seed
Close the layer S2
Open and activate the layer S3
Apply Xenofex 2 with the same configuration, just click on Random
Seed
Note: If you don't want the stars on the main tube, copy and paste
again, trying to center it well
Close layers S2 and S3
Open and activate layer S1
Edit - Copy special - copy merged
Open Animation Shop (AS)
Edit - Paste - as new animation
Return to PSP
Close layer S1 and open layer S2
Edit - Copy special - copy merged
Return to AS
Edit - Paste - after current frame
Return to PSP
Close layer S2 and open layer S3
Edit - copy special - copy merged
Return to AS
Edit - Paste - After current frame
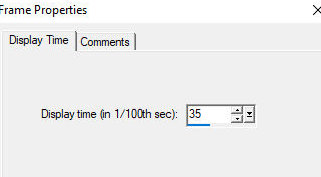
Click on the first frame
Edit - Select all
Animaton - Frame Properties - Display=35
File - Save us - locate the path
where you will save the animation - name the file - save - click
Next 3 times - Finish
*
Thank you Irene for testing my
translations


|