|

This tutorial is from Grafica Pergioco who I thank for
letting me translate their tutorials.

Original here

Tubes

Material

Many thanks to the creators of
these materials
Plugins
Unlimited 2 /Paper texture /Cotton
Paper, Fine
Flaming pearl / flexify 2
Alien Skin xenofex 2
You can find these plugins on the websites of:
Renée
Cloclo
You can also find this tutorial translated into these languages:
(Click on the flag)


SCRIPT
Notes:
> Open the material / Duplicate (shift+d) / Close the originals
> Change the blend mode of the layers to match their colors.
> In older versions of PSP, Mirror Horizontal=Mirror / Mirror Vertical=Flip /
Pick tool=deformation
>> Open the mask [Narah_Abstract011] in psp and
minimize
>> you will need a character tube and a .jpg image of a sunset
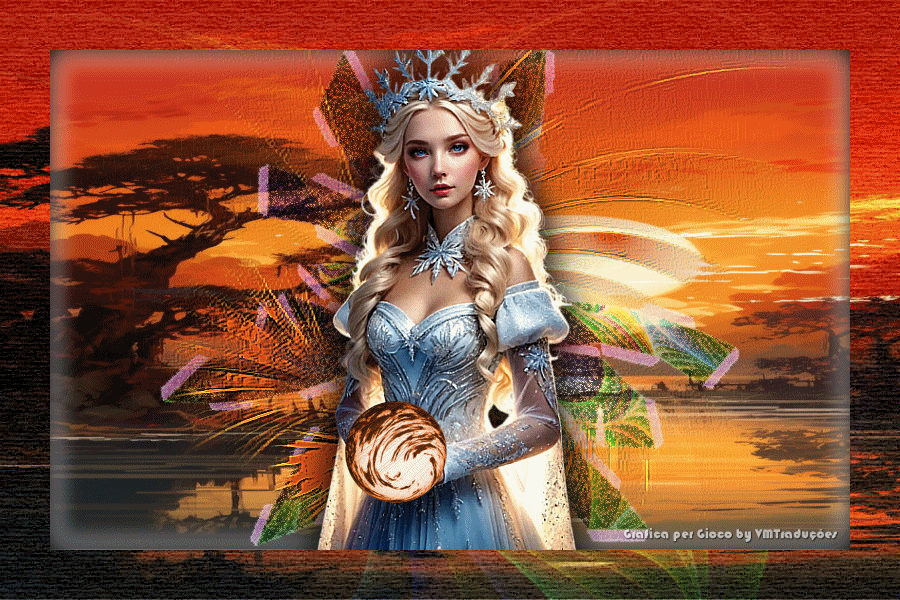
Step 1
Open a new transparent image measuring 800x500px
Selections / Select all
Copy the sunset image and paste it into the selection
Select none
Add a new layer
Selections / Select all
Copy the fractal tube [surrealist] and paste it into the selection
Select none
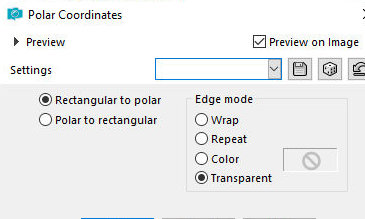
Effects / distortion Effects / Polar Coordinates
Image / Mirror / Mirror Vertical
Step 2
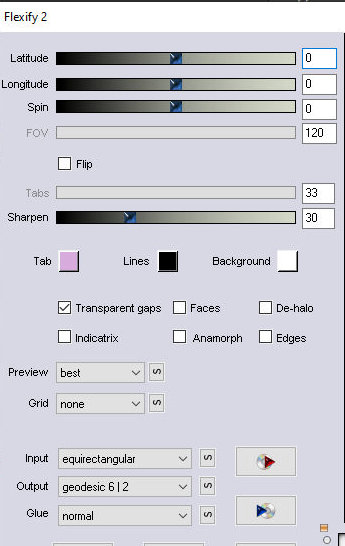
Effects / Plugins / Flaming Pear / Flexify2 (the format is
different for each application)
Layers / Properties / blend mode: hard Light /
Opacity=70%
Add a new layer
Paint with a dark color from the image
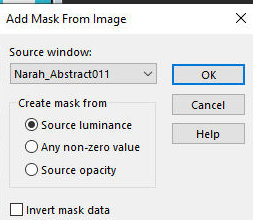
Layers / New mask Layer / From Image / Mask [Narah_Abstract011]
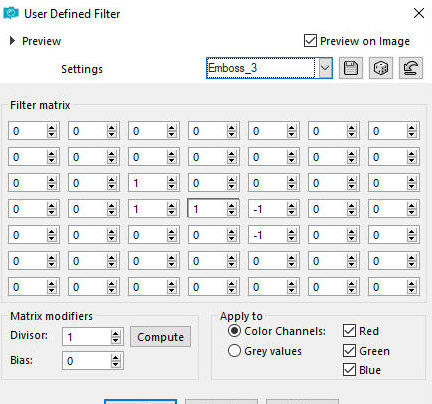
Effects / User Defined Filter / Emboss 3 - Apply 2
times
Merge Group
Effects / Edge Effects / enhance More
Step 3
Copy the character tube and paste it as a new layer
Adjust the size according to your image
Add a Drop shadow of your choice
Repeat this Drop Shadow with negative V and H
Copy the [flamminglunarcel] tube and paste it as a new layer (there
is another option in the material, it is up to you which one to use)
(optional) colorize it using a method of your choice
Image / Resize: 50% - all layers unchecked
Position the image in the character tube's hands or in another
location as you prefer
Step 4
Activate the Raster 1 layer
Selections / Select all
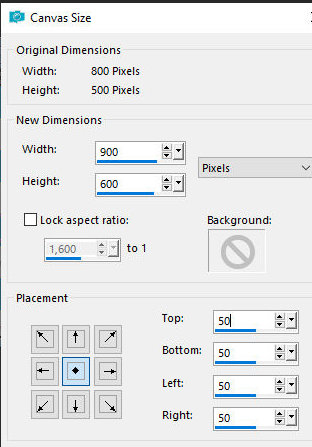
Image / Canvas size: 900x600 - 50 - 50 - 50- 50
Add a new layer
Selections / invert
Copy the sunset image and paste it into the selection
Add a new layer
Copy the fractal tube and paste into the selection
Layers / Properties / blend mode; overlay / opcity=50%
Merge down
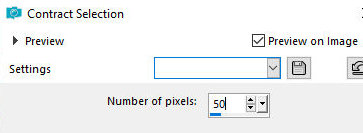
Selections / Select all
Selections / modify / Contract=50
Selections / invert
Apply a Drop shadow of your choice
Repeat the Drop Shadow with negative V and H
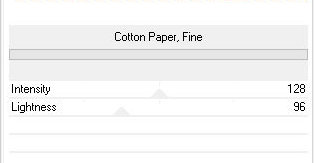
Effects / plugins / Unlimited 2 / Paper Texture / Cotton paper,
Fines - default
Select none
Insert the signature
IF YOU DON'T WANT TO ADD THE ANIMATION, SAVE AS JPEG AT THIS POINT
Step 5 - For the animation
Activate the fractal layer - Raster 2
Layers / duplicate
Rename the two fractal layers to F1 and F2
Activate the F1 layer
Selections / Select all
Selections / Float / Selections / Defloat
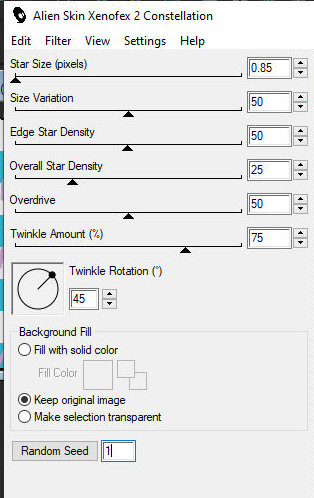
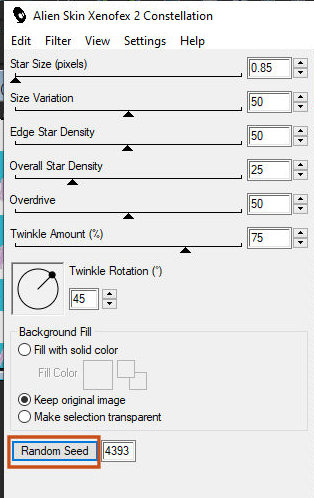
Effects / Plugins / Eye Candy Xenofex 2 / Constellation
Activate the F2 layer
Effects / Plugins / Eye Candy Xenofex 2 / Constellation same
configuration but click on Random Seed
Select none
Step 6
Activate the Globe layer
Layers / Duplicate
Rename the two globe layers to G1 and G2
Activate the G1 layer
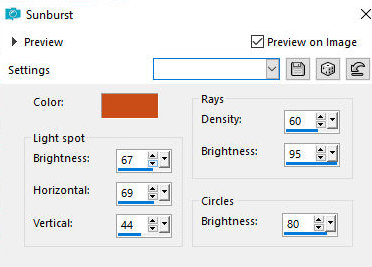
Effects / Illumination Effects / Sunburst
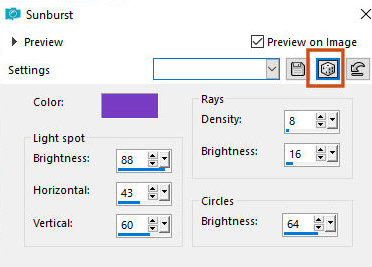
Activate the G2 layer
Effects / Illumination Effects / Sunburst - Click on the dice icon (Random)
Step 7 - AS
Close layers F2 and G2 (click on the eye)
Edit / Copy Special / Copy Merged
In Animation Shop (AS):
Edit / paste / as new animation
In PSP:
Close layers F1 and G1
Open layers F2 and G2
Edit / Copy Special / Copy Merged
In AS:
Edit / Paste / after current frame
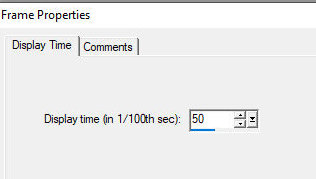
Selections / Select all
Animation / Frame Properties / Display=50
See the animation: View Animation
Save: File / Save as / Locate the folder / Name the file / save /
Click next 3 times / finish
*
Thank you Irene for testing my translations


|