|
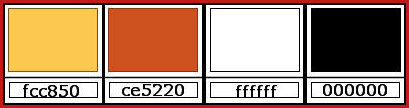
1. Set the color #fcc850 to the
foreground and the color #ce5220 to the background.
2. Prepare this Radial gradient.
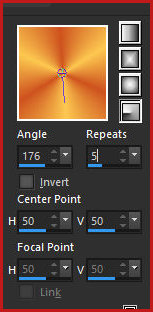
3. Open a new image measuring
900x600px.
4. Paint with the gradient.
5. Effects / Image Effects / Seamless Tiling.

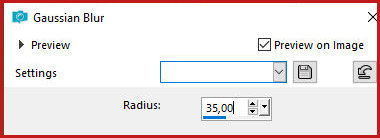
6. Adjust / Blur / Gaussian Blur :35.
7. Add a new layer.
8. Selections / Select all.
9. Copy the image [98-4].
10. Paste into the selection.
11. Select none.
12. Layers / Properties / Blend Mode; Luminance/Opacity:
54%
13. Merge visible
14. Layers/Duplicate
15.Adjust/Sharpness/sharpen More
16. Layers/Duplicate
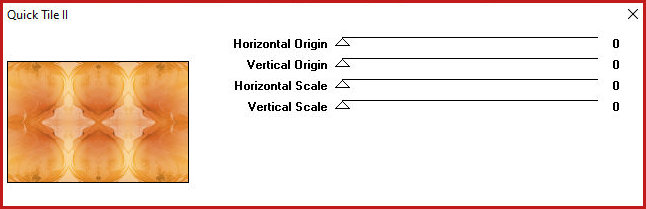
17. Effects / plugins / Graphic Plus / Quick Tile II -
default
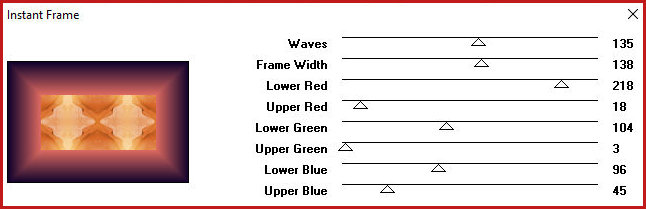
18. Effects / Plugins / Graphic Plus /
Instant Frame
19. Layers / Properties / Blend Mode:
Luminance (L)
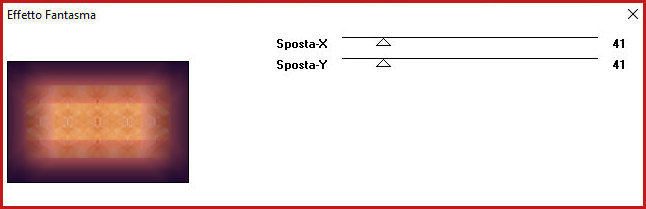
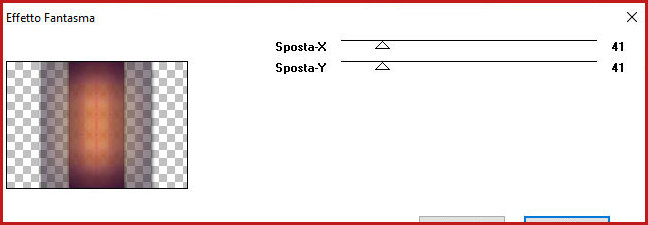
20. Effects / Plugins / It@lian Editors Effects /
Effetto Fantasma
21. Layers/Duplicate
22. Image/resize: 70% - all layers unchecked
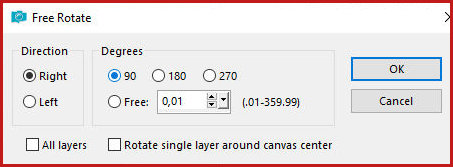
23. Image / Free Rotate - right/90
24. Drop shadow: 10 10 40 5 black
25. Repeat the Drop shadow in negative: -10 -10 40 5
black
26. Layers/Duplicate
27. Effects / Plugins / It@lian editors Effects -
Effetto Fantasma
28. Activate the Copy (3) of merged
layer
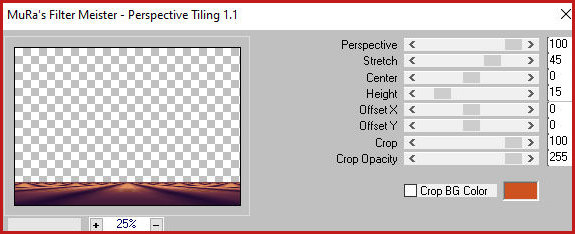
29. Effects / Plugins / Mura's Meister / Perspective
Tiling
30. Layers / Properties / blend mode:
Luminance
31. Drop Shadow: -5 0 60 12 black
32. Activate the Copy (2) of merged layer
33. Layers / Properties / blend Mode: Luminance (L) /
Opacity: 74%
34. Activate the Copy of merged layer
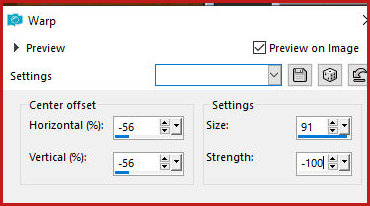
35. Effects / Distortion Effects / Warp
36. Activate the top layer
37. Merge down
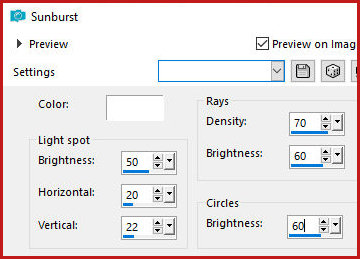
38. Effects / Illumination Effects / Sunburst
39. Layers / Properties / blend Mode:
Luminance / Opacity: 85%
40. Activate the background layer
41. Layers/Duplicate
42. Effects / Plugins / Nik Software / Color Effec Pro
3.0 / Bi-color filters - default
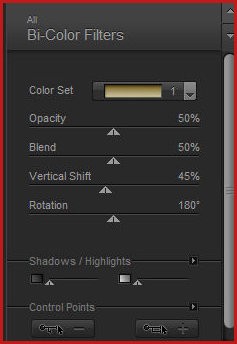
43. Layers / Properties / Blend mode:
Hard Light
44. Activate the top layer
46. Effects / Edge Effects / Enhance More
47. Layers/Properties/opacity: 58%
48. Add new layer
49. Paint with white color
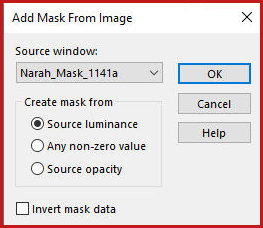
50. Layers / New mask Layer / From Image / Mask
[Narah_Mask_1141a]
51. Merge Group
52. Effects / Image Effects / Offset -13/0

53. Copy tube [1211-02072025]
54. Paste as new layer
55. Remember to erase the watermark
56. Image / Mirror / Mirror Horizontal
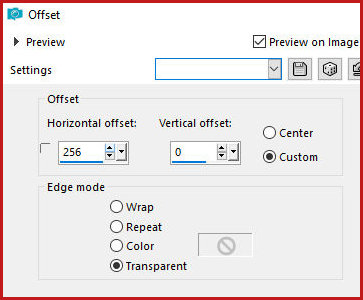
57. Effects / Image Effects / Offset 256/0
57b. Drop Shadow: 0 -8 40 15 black
58. Copy the tube [leny-deco]
59. Paste as new layer
60. Effects / Image Effects / offset 27/40

61. Copy the tube [Riet1211-text shine
02072025]
62. Paste as a new layer
63. Position as you see fit
64. Layers / Arrange / Move Down
65. Copy the tube [leny-dingen44a]
66. Paste as a new layer
67. Position as per the model
68. Drop Shadow as before
69. Merge All
70. Borders:
1px / black
25px / white
1px / black
5px / #fcc850
1px / black
25px / white
1px / black
71. Copy the image [rand]
72. Paste as a new layer
73. No need to move
74. Add signatures
75. Merge all
76. Save as jpeg
|