|
Este tutorial é de Denise D a quem agradeço por me deixar traduzir seus tutoriais.
Material
Muito obrigado aos criadores destes materiais
Mehdi - Simple - AP 01 [Innovations] - Unlimited 2 - Mura's Meister - Mura's Seamless - Carolaine and Sensibility
ROTEIRO
* A - Clique duas vezes no preset [D.D.Easter2025] para instalar no plugin B - Você precisará de 1 tube principal, 2 tubes decorativos e um tube corner. Se quiser usar os meus tubes, clique aqui
1. Cores originais: Foreground: #8CB6C2 - Background: #FAEDBA
2. Abra o Canal Alpha [ Easter2025 Alpha Channel] - Duplique (shift+d) - Feche o original 3. Prepare este gradiente Sunburst:
3a. Pinte a imagem com este gradiente 4. Adicione nova layer 5. Pinte esta layer com o gradiente 6. Effects - Plugins - Mehdi - Sorting tiles
7. Effects - Plugins - Simple - Blintz
8. Effects - Reflection Effects - Rotating Mirror
9. Selections - Load selection from alpha channel - Selection #1
10. Selections - Promote selection to layer 11. Effects - Texture Effects - Weave
12. Select none 13. Effects - Plugins - Eye Candy 4000 - ShadowLab
14. Repita o ShadowLab comDirection=135 15. Image - Resize: 50% - all layers desmarcado 16. Edit - Cut(esta opção corta a imagem e salva na memória) 17. Cole como nova layer 18. Minimize, usaremos depois 19. Ative a layer Raster 1 20. Selections - Load selection from alpha channel - Selection #2
21. Selections - Promote selection to layer 22. Effects - Plugins - AP 01[Innovations] SilverLining
23. Select none 24. Effects - Reflection Effects - Rotating Mirror - igual anterior
25. Effects - Plugins - Unlimited 2 - Graphic Plus - Emboss
26. Layers - Duplicate 27. Image - Mirror - Mirror Vertical 28. Effects - Distortion Effects - Polar Coordinates - Rectangular to Polar - Transparent
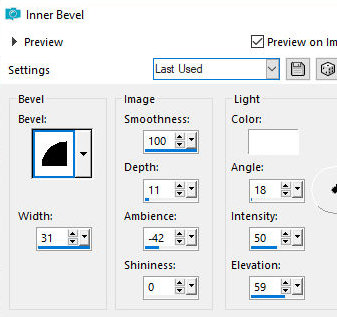
29. Objects - Align - Vertical center 30. Effects - 3D Effects - Inner Bevel
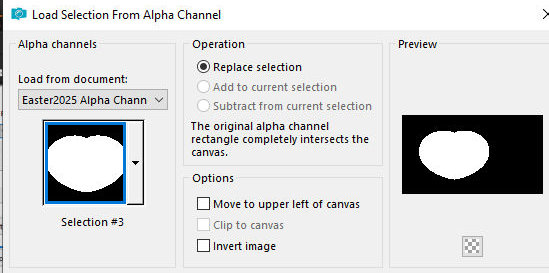
31. Adicione nova layer 32. Layers - Arrange - Move Down 33. Selections - Load selection from alpha channel - Selection #3
34. Pinte a seleção com a cor do background 35. Adicione nova layer 36. Pinte a layer com o gradiente 37. Effects - Plugins - Unlimited 2 - Noise Filters - Add Noise (monochromatic)
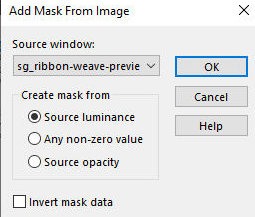
38. Layers - New Mask Layer - From Image - Mask [sg_ribbon-weave-preview]
39. Effects - Edge Effects - Enhance 40. Merge Group 41. Effects - Plugins - Mura's Seamless - Emboss at Alpha
42. Select none 43. Merge Down 44. Ative a layer Copy of Promoted Layer 45. Drop Shadow: 0 0 50 10 preto 46. Feche a layer Raster 1 e a layer do Alpha Channel 47. Merge Visible 48. Abra a layer Raster 1 e duplique 49. Abra a layer do Alpha channel 50. Ative a layer Raster 1 51. Effects - Plugins - Unlimited 2 - BKG Designer sf10 III - SpyroZag
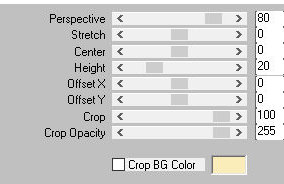
52. Effects - Plugins - Mura's Meister - Perspective Tiling
53. Effects - Edge Effects - Enhance 54. Ative a layer Raster 1 55. Effects - Plugins - Carolaine and Sensibility - CS_Halloween_2
56. Ative a layer Superior 57. Maximize a imagem copiada no item 18 58. Copie e cole como nova layer 59. Selections - Select all 60. Selections - Float / Selections - defloat 61. Adicione nova layer 62. Pinte a seleção com a cor do background 63. Selections - Modify - Contract=10
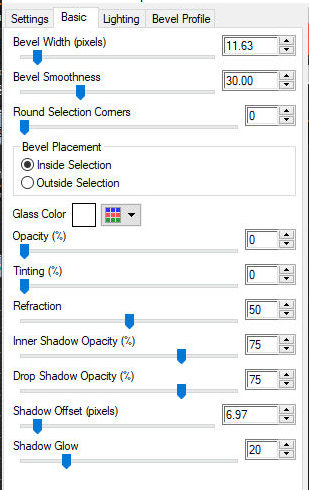
64. Pressione Delete no teclado 65. Adicione nova layer 66. Copie o seu tube de flores(ou outro) 67. Cole na seleção 68. Select none 69. Merge Down - aplique 2 vezes 70. Effects - Plugins - Eye Candy 5: Impact - Glass - Preset [D.D.Easter2025]
71. Effects - Plugins - FM Tile Tools - Saturation Emboss
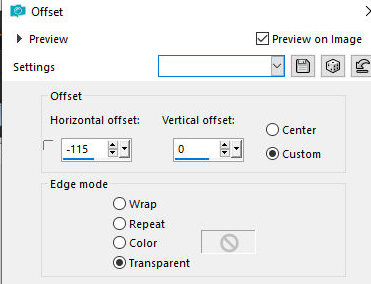
72. Objects - Align - Top 73. Objects - Align - Left 74. Layers - Duplicate 75. Image - Resize: 75% - all layers desmarcado 76. Effects - Image Effects - Offset [-115/0]
77. Layers - Duplicate 78. Image - Resize: 75% - All layers desmarcado 79. Effects - Image Effects - Offset [-115/0] igual
80. Merge down - Aplique 2 vezes 81. Layers - Duplicate 82. Effecs - Reflection Effects - Rotating Mirror - igual anterior
83. Copie texto [Easter Greetings Vertical] ou outro que estão material e cole como nova layer(caso queira outro texto, no material tem instruções de como fazer) 84. Effects - Image Effects - Offset [-175/-18]
85. Layers - Duplicate 86. Effects - Distortion Effects - Wind
87. Layers - Arrange - Move down 88. Effects - Edge Effects - Enhance 89. Copie o tube Principal e cole como nova layer 90. Ajuste o tamanho 91. Poisicione à direita conforme o modelo 92. Drop Shadow de sua escolha 93. Copie um dos tubes decorativos e cole como nova layer 93. Posicione à esquerda conforme o modelo 94. Selections - Select all 95. Image - Add borders - 5px - cor do foreground 96. Effects - 3D effects - Cutout
97. Select none 98. Image - Add borders - 5px - cor do background 99. Image - Add borders - 5px - cor do foreground 100. Selections - Select all 101. Copie (ficará na memória) 102. Image - Add borders - 50px - branco 103. Selections - Invert 104. Cole na seleção a imagem copiada acima 105. Adjust - Blur - Gaussian Blur=10
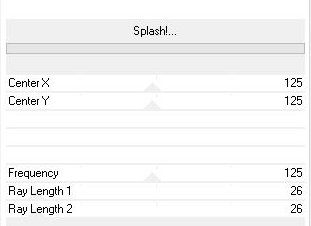
106. Effects - Plugins - Unlimited 2 - BKG Designer sf10 III - Splash
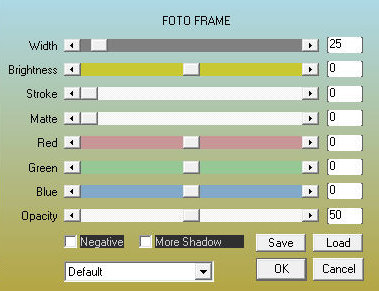
107. Effects - Plugins - AAA Frames - Foto Frame
108. Select none 109. Image - Add borders -2px - cor do foreground 110. Copie o tube corner e cole como nova layer 111. Posicione no canto esquerdo 112. Effects - Plugins - Simple - Top Left Mirror
113. Copie a assinaturas (signature) de Denise e cole como nova layer 114. Posicione como preferir 115. Cloque sua assinatura 116. Merge all 117. Image - Resize: 1000px (width) 118. (Opcional) Effects - Plugins - AAA Filters - Custom - Landscape 119. Salve como jpeg *
|