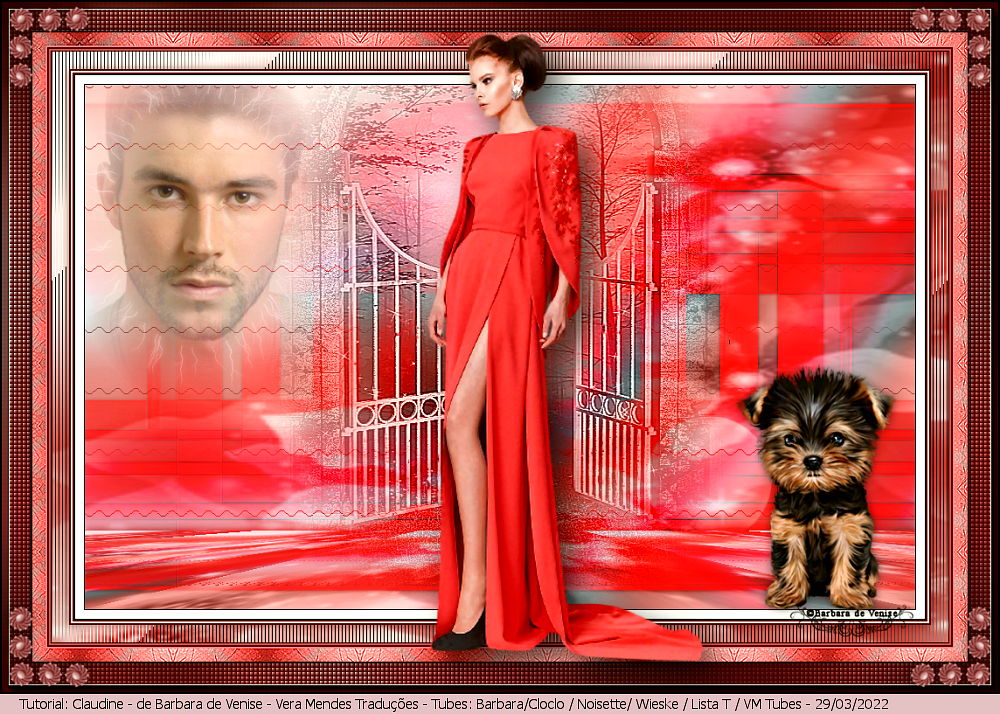
|

This tutorial is from Barbara de Venise who I thank for
letting me translate their tutorials.

Original here
Tubes

Material

Many thanks to the creators of
these materials
Plugins
mehdi / Wavy Lab 1.1
Axion / Flare Effects / Simple flare 2 (ins)
Mura's Meister / Perspective Tiling
Alien skin Xenofex 2 / electrictify
Unlimited 2 / Tramages / Tow The Line
Graphic Plus / Cross Shadow
AAA Frame / Foto Frame
You can find these plugins on the websites of:
Renée
Cloclo
You can also find this tutorial translated into these languages:
(Click on the flag)


SCRIPT
Notes:
> Open the material / Duplicate (shift+d) / Close the originals
> Change the blend mode of the layers to match their colors.
> In older versions of PSP, Mirror Horizontal=Mirror / Mirror Vertical=Flip /
Pick tool=deformation
> Open the masks in psp and
minimize
>Adjust the size of the tubes according to your images
*
1.
Put color 1 in the foreground and color 2 in the background
Open a new transparent image with 950 x 600px
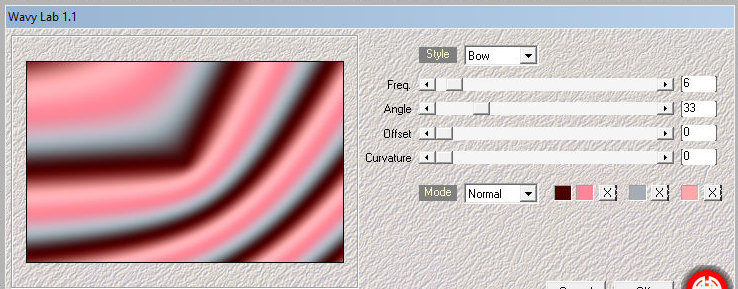
Effects / Plugins / mehdi / Wavy Lab 1.1
Color sequence: 2-1-3-default
print
Adjust / sharpness / Sharpen
2.
Add a new layer
Selections / Select all
Copy the image [image monique] and paste into the selection
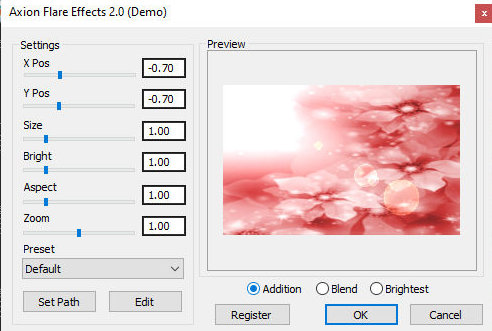
Effects / Plugins / Axion / Flare Effects / Simple flare 2 (ins)
print
obs.: When using this plugin, it opens a window asking to access
a file. You must go to the Plugins folder where it is saved and
select the Simple Flare 2 (ins) option
select none
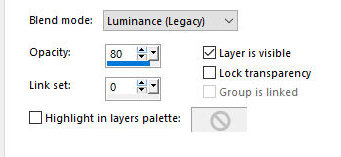
Layers / Properties / blend Mode: Luminance (L) / Opacity: 80%
print
3.
Add new layer
paint with color 6
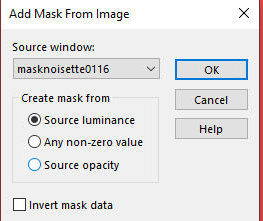
Layers / New mask Layer/ From Image / Mask [masknoisette0116]
print
Effects / edge effects / Enhance
Merge Group
Drop shadow: 0 0 35 5 black
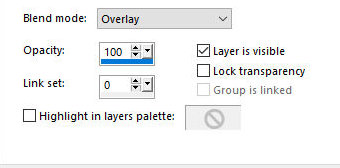
Layers / Properties / Blend Mode: Overlay
print
Layers / Duplicate
Image / Mirror / Horizontal Mirror
Merge down
Activate layer Raster 2
Merge down
Layers / Duplicate
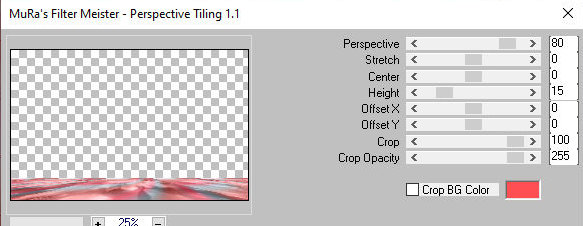
Effects / plugins / Mura's Meister / Perspective Tiling
prints
Drop shadow: 0 0 55 15 color 5
4.
Activate the top layer
Copy the tube [portail] and paste it in your image as a new
layer
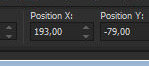
Activate the Pick Tool and configure: x=193 y=-79 / Press M
print
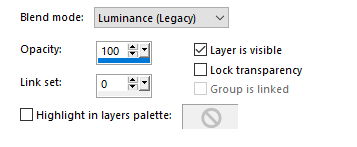
Layers / Porperties / Blend Mode: Luminance (L)
print
Adjust / Sharpness / Sharpen More
Copy the tube [visage] and paste it in your image as a new layer
Activate the Pick Tool and configure: x=-40 y=-55 / Press M
print
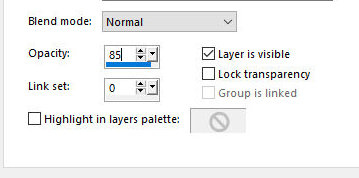
Layers / Properties / Opacity: 85%
print
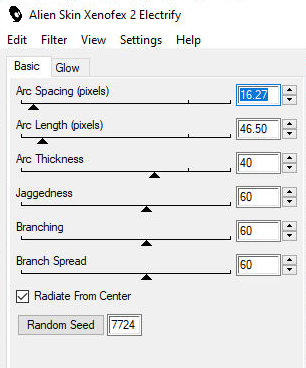
Effects / Plugins / Alien skin Xenofex 2 / electrify
print
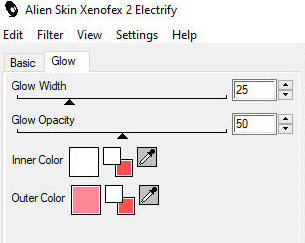
Click on the Glow tab and configure according to the print,
using color 1
print
Activate the [background] layer
Copy and paste as new image
Minimize this new image for later use (save just in case as .pspimage)
5.
Image / Add borders / 1px / color 5
Image / Add borders / 10px / color 4
Image / Add borders / 1px / color 5
Image / Add borders / 2px / color 2
Image / Add borders / 2px / color 4
Image / Add borders / 2px / color 2
Selections / Select All
Image / Add borders / 20px / color 4
Selections / Invert
Copy the image [image monique] and paste into the selection
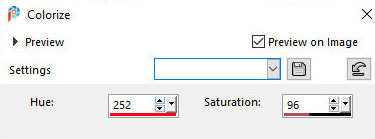
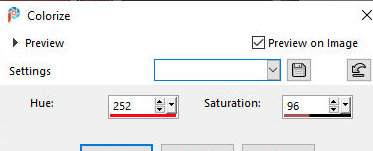
Adjust / hue and saturation / colorize
print
6.
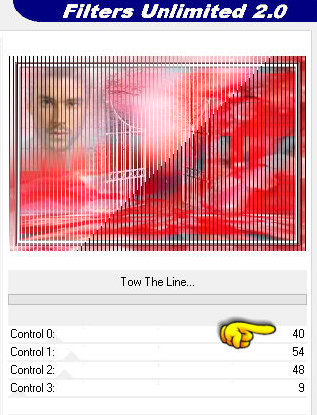
Effects / plugins / Unlimited 2 / Tramages / Tow The Line
print
Selections / Invert
Drop Shadow: 0 0 55 15 color 2
Selections / Select all
Image / Add borders / 1px / color 5
Image / Add borders / 2px / color 6
Image / Add borders / 2px / color 2
Image / Add borders / 2px / color 1
Selections / Select All
Image / Add borders / 15px / color 4
Selections / Invert
Copy the image [image monique] and paste into the selection
Adjust / Hue And Saturation / colorize the same as before
print
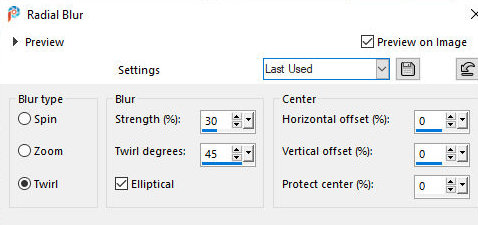
Adjust / Blur / Radial Blur
print
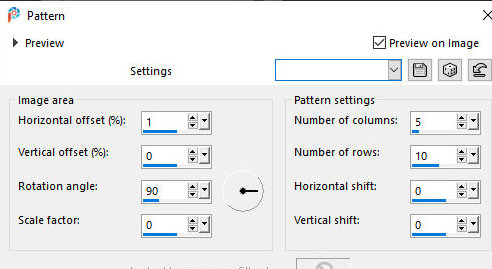
Effects / Reflection Effects / Pattern
print
Effects / Edge Effects / Enhance
select none
7.
Image / Add borders / 1px / color 5
Selections / Select all
Image / Add borders / 35px / color 4
Selections / Invert
Activate the reserved image in item 4
Copy and paste into selection
Adjust / blur / Radial Blur - same as above
print
8.
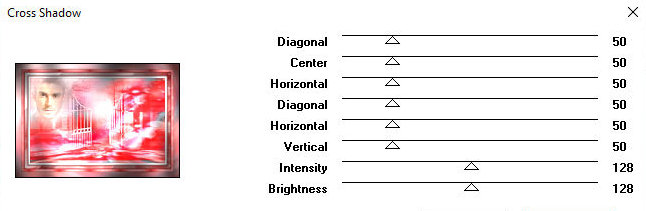
Effects / Plugins / Graphic Plus / Cross Shadow / Default
print
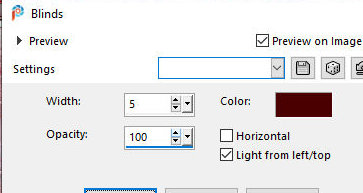
Effects / Texture Effects / Blinds
print
Repeat Blinds with Horizontal checked
print
Effects / Plugins / AAa Frame / Photo Frame
print
Selections / Invert
Drop Shadow: 0 0 55 15 color 5
select none
9.
Copy the female tube [cloclo1] and paste it in your image as a
new layer
Image / Resize: 85% - 2 times (for the tutorial tube)
position according to the model
Drop Shadow of your choice
Copy the dog's tube [chien cloclo] and paste it in your image as
a new layer
Position to the right according to the model
Drop shadow: 0 0 55 15 color 5
Copy the tube [coin] and paste it in your image as a new layer
no need to move
Put your signature
Put Barbara's watermark
Merge all
Image / Add borders / 1px / color 5
image / Resize: 1000px width - all layers checked
Adjust / Sharpness / Sharpen
save as jpeg
*

|