|
Este tutorial é de Virginia a quem agradeço por me deixar traduzir seus tutoriais.
Material
Muito obrigado aos criadores destes materiais
AAA Frames - Eye Candy 5: impact - AP[Lines] - Graphic Plus - Unlimited 2
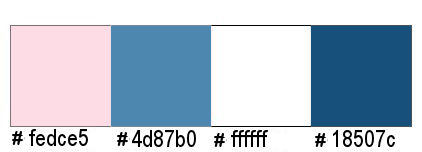
ROTEIRO > Abra as masks no psp e minimize >Ajuste o tamanho dos tubes de acordo com suas imagens * >>Salve as seleções na pasta Selections do PSP >>Salve a textura [a-cmv.bmp] na pasta Textures do PSP Cores: Foreground: #fedce5 - #4d87b0 >>>
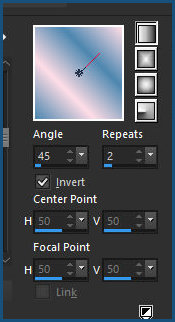
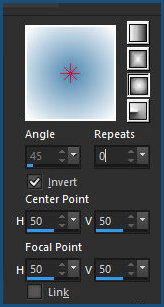
Prepare um gradiente Linear: >>>45 2 x
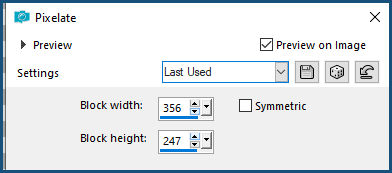
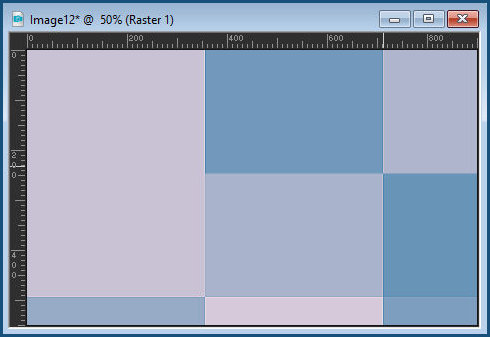
Abra uma nova imagem transparente medindo 900x550px Pinte com o gradiente Effects - Edge Effects - Enhance Effects - Distortion Effects - Pixelate >>>356 247 des
Effects - Edge Effects - Enhance RESULTADO 1 >>>
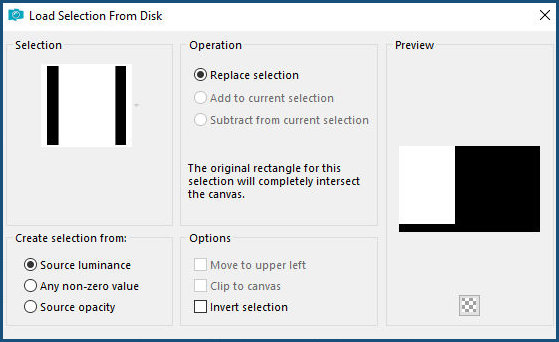
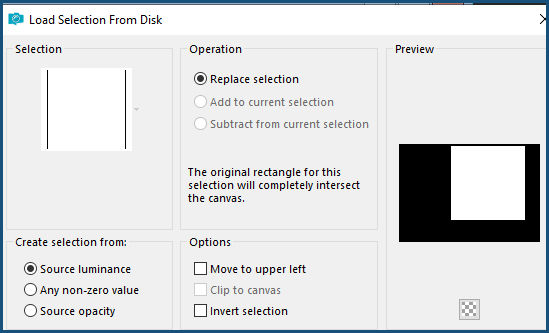
Selections - Load selection from disk - Selection [sel01_sasha] >>>
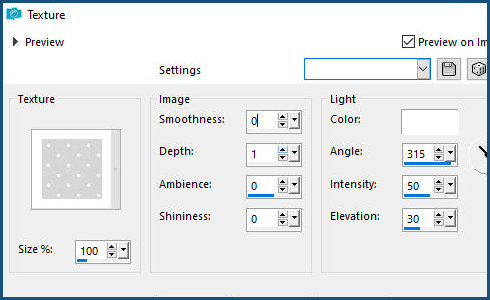
Selections - Promote selection to layer Mantenha a seleção Effects - Texture Effects - Texture - [a-cmv.bmp] >>>100 0 1 0 0 br 315 50 30
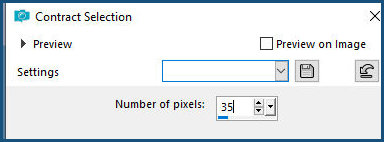
Selections - Modify - Contract: 35 >>>
Adicione nova layer Pinte com a cor do background Effects - plugins - unlimited 2 - Graphic Plus - Cross Shadow - default >>>default
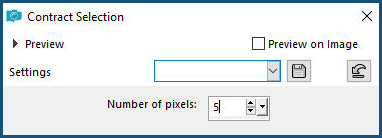
Mantenha a seleção Selections - Modify - Contract: 5 >>>
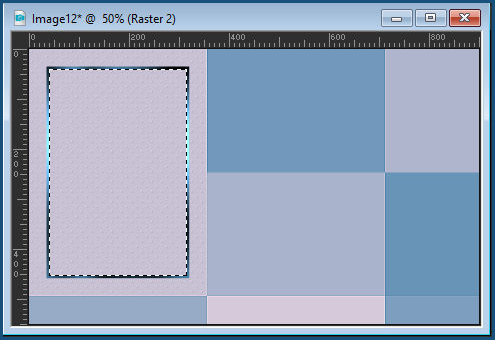
Pressione Delete no teclado Mantenha a Seleção RESULTADO 2 >>>
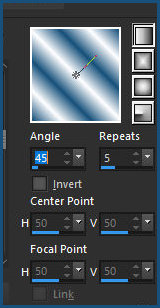
Coloque a cor #ffffff no foreground Prepare um gradiente Sunburst >>> 45 0 x 50/50 50/50
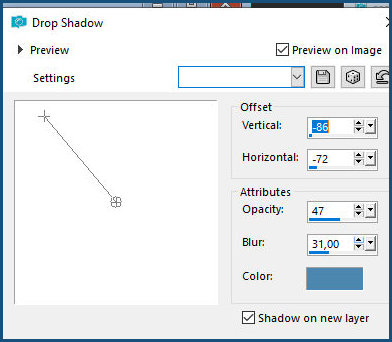
Adicione nova layer Pinte com o gradiente Mantenha a seleção Adicione nova layer Copie o tube paisagem [landscape-winter-02-lemondedebea] Cole na seleção Adjust - Sharpness - Sharpen Select none Merge down - Aplique duas vezes Drop Shadow: 0 0 50 20 preto Ative a layer Raster 2 Drop Shadow: -86 -72 47 31,00 - SHADOW ON NEW LAYER MARCADO >>>
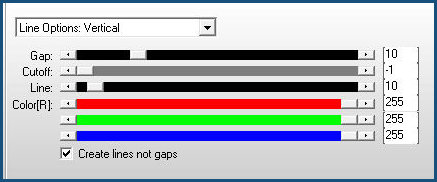
Permaneça na layer Raster 2 Shadow 1 Effects - Plugins - AP[Lines] - Lines - SilverLining - Line Options: Vertical >>>10 -1 10 255 255 255 >>>
Ative a layer abaixo - Promoted Selection Drop shadow: 2 0 60 30 preto (shadow on new layer desmarcado) Ative a layer Raster 1 Selections - Load selection from disk - Selection [sel_02_sasha] >>>
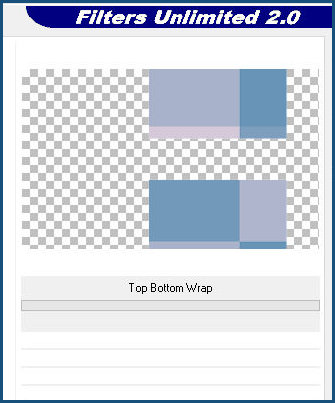
Selections - Promote selection to layer Select none Image - Resize: 80% - all layers desmarcado Effects - Plugins - Simple - Top Bottom Wrap >>>
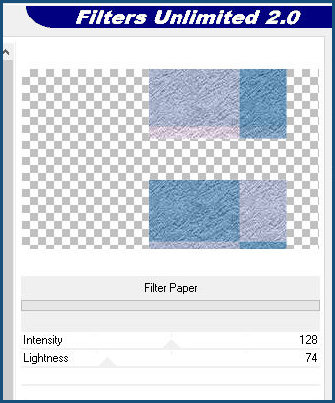
Effects - Plugins - Unlimited 2 - Paper Textures - Filter Paper - default >>> 128 74
Layers - Properties - blend Mode: Overlay Drop shadow: 3 -2 40 20 preto RESULTADO 3 >>>
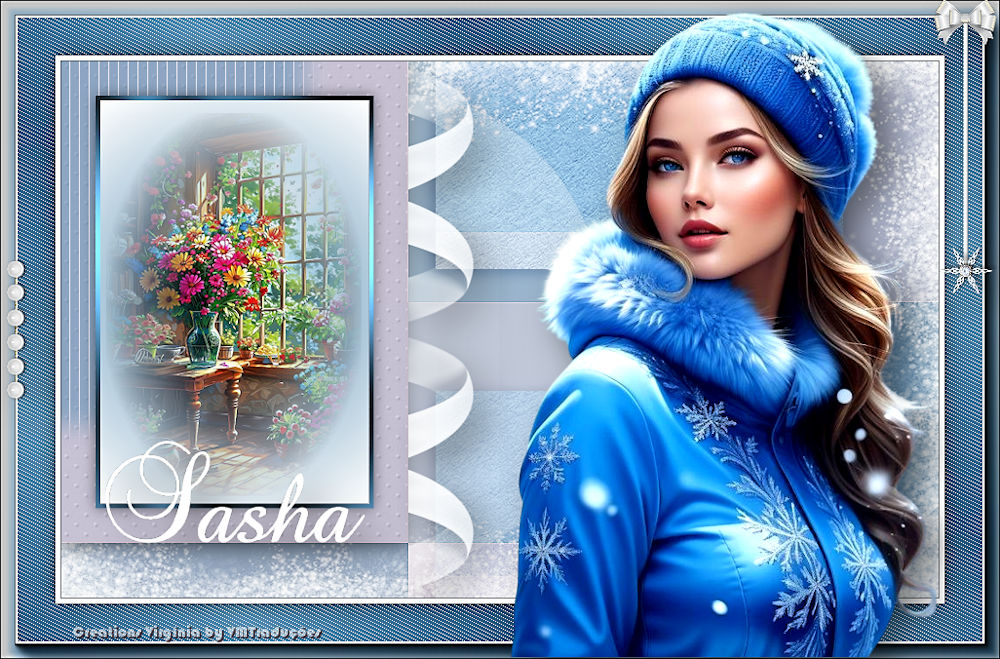
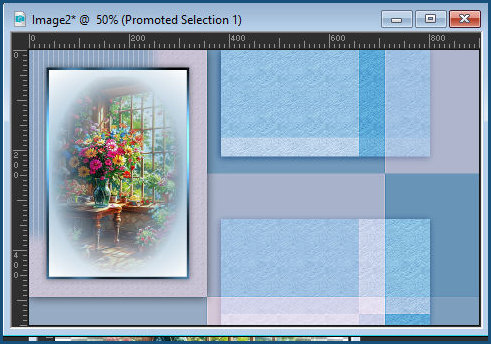
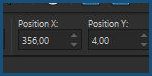
Ative a layer de fundo - Raster 1 Selections - Select all Adicione nova layer Copie o tube[fond river 24] Cole na seleção Adjust - Sharpness - Sharpen Select none Ative a layer superior - Raster 2 Copie o tube [deco_01_sasha] Cole como nova layer Ative a Pick Tool e configure: X=356 - Y=4 - Pressione a letra M >>>
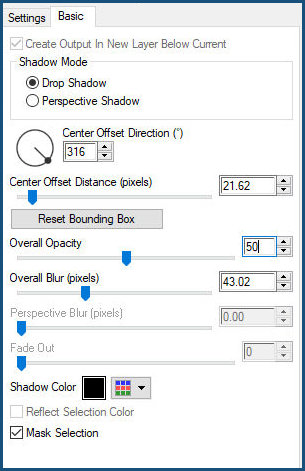
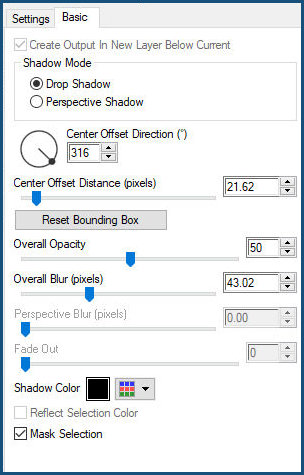
Permaneça na layer Effects - Plugins - Eye Candy 5: Impact - Perspective Shadow - Preset [Drop shadow, Blurry] >>> ds 316 21.62 50 43.02 xmask
Layers - Properties - Opacity: 90% Copie o tube [deco_02_sasha] Cole como nova layer Effects - Image Effects - Offset - [8/0] >>>
Layers - Arrange - Move Down Merge all Coloque a cor #18507c no foreground Image - Add borders - 1px - cor do foreground Image - Add borders - 5px - branco Image - Add borders - 1px - cor do foreground Prepare um gradiente Linear >>>45 5 des
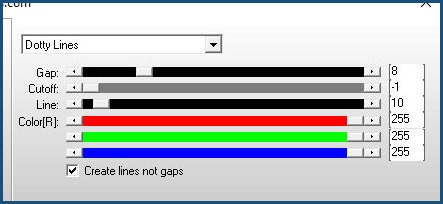
Image - Add borders - 50px - branco Selecione esta borda com a Magic Wand - Tolerance/feather=0 Pinte a seleção com o gradiente Mantenha a seleção Effects - Plugins - AP[Lines] - Lines SilverLining - Dotty Lines >>>8 -1 10 255 255 255
Selections - Invert Drop shadow: 0 0 60 30 preto Select none Coloque a cor #ffffff no background A configuração do gradiente continua a mesma só mudando a cor do background >>>
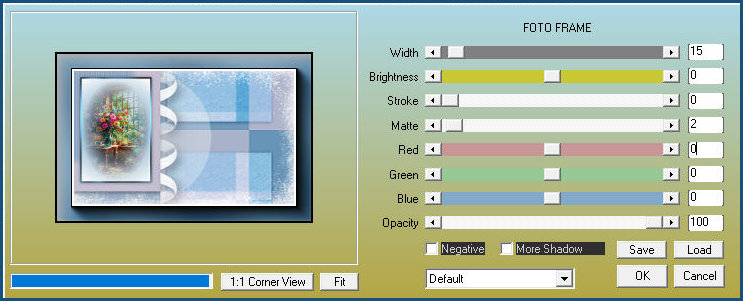
Image - Add borders - 1px - branco Image - Add borders - 5px - cor do background Selecione essa borda de 5px com a Magic Wand Pinte a seleção com a cor do background Select none Effects - Plugins - AAA Frames - Foto Frame >>>15 0 0 2 0 0 0 100
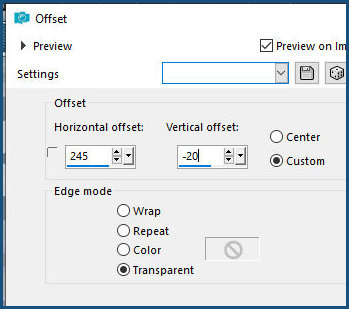
Copie o tube principal [CV_femme_tutoriel_sasha] Cole como nova layer Image - Resize> 78% - all layers desmarcado Effects - Image - Offset [245/-20] >>>
Effects - Plugins - Eye Candy 5: impact - Perspective shadow - igual anterior >>>
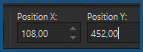
Copie o tube [texte_sasha_vir] Cole como nova layer Ative a Pick Tool e configure: X=108 - Y=452 - Pressione a letra M >>>
Effects - Plugins - Eye Candy 5: Impact - Perspective Shadow - igual anterior >>>
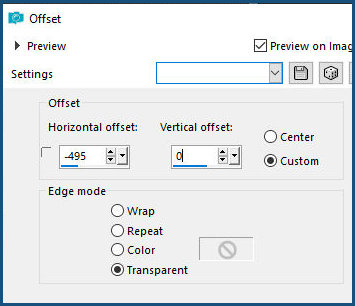
Você pode colorizar o texto usando a Color Change e pintando com a cor do foreground ou do background ou outra cor que queira Copie o tube [deco_03_sasha] Cole como nova layer Effects - Image Effects - Offset [-495/0] >>>
Effects - Plugins - Eye Candy 5: impact - Perspective Shadow - igual anterior >>>
Copie o tube [deco_04_sasha] Cole como nova layer Ative a Pick Tool e configure: [958/0] - Pressione a letra M >>>
Effects - plugins - Eye Candy 5: Impact - Perspective Shadow - igual anterior >>>
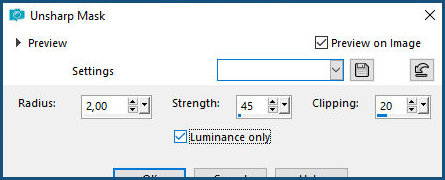
Coloque as assinaturas Image - Add borders - 1px - cor do background Image - Resize: 950px (width) Adjust - Sharpness - Unsharp Mask >>>2 45 20 x
Salve como jpeg *
|