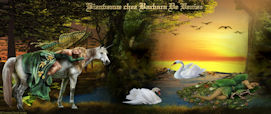
| Etapa 1
Salve a seleção [barbara1b] na pasta
Selections do PSP
Cores Originais: Foreground: Cor 1 -
Background: Cor 2
Abra uma nova imagem transparente
medindo 1000x750px
Etapa 2
Selections / Select all
Copie a imagem [Fond_Barbara]
Cole na seleção
Etapa 3
Effects / plugins / Unlimited 2 /
Paper Textures / Japanese Paper

Etapa 4
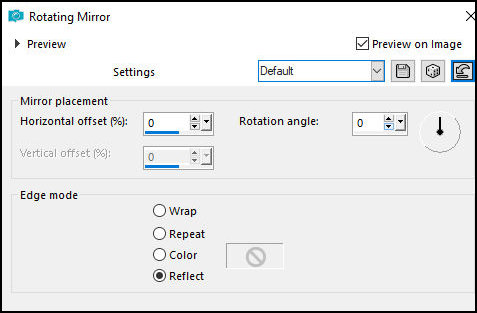
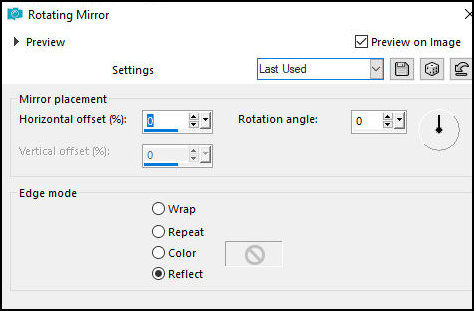
Effects / Reflection Effects /
Rotating Mirror
Select none
Layers / Duplicate
Image / Mirror / MIrror Vertical
Layers / Properties / Opacity=50%
Merge down
Etapa 5
Adicione nova layer
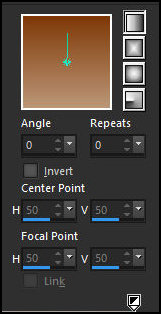
Pinte com este gradiente Linear
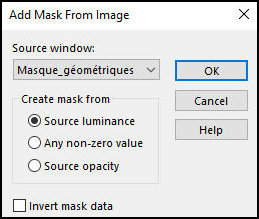
Etapa6
Layers / New Mask Layer / From Image /
Mask [Masque_géométriques]
Merge Group
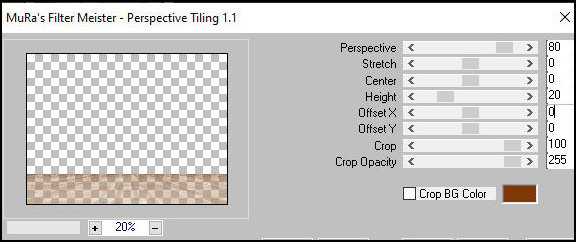
Layers / Duplicate
Effects / Plugins / Mura's Meister /
Perspective tiling
Effects / plugins / Mura's Seamless /
Emboss at Alpha - default

Effects / ReflectionEffects / Rotating
Mirror
Drop shadow: 0 0 20
60 cor 2
Etapa 7
Adicione nova layer
Selections / Load selection from disk
/ Selection [Barbara 1]
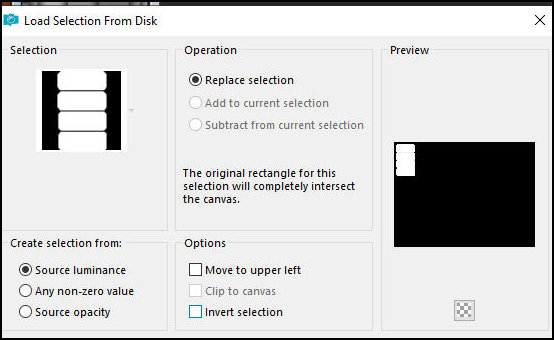
Copie a imagem [image Automne]
Cole na seleção
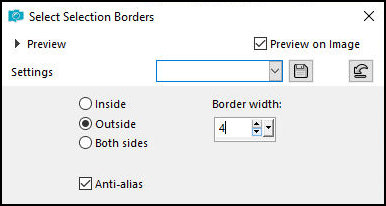
Etapa 8
Selections / Modify / Select selection
borders
Etapa 9
Pinte a seleção com este gradiente
Radial

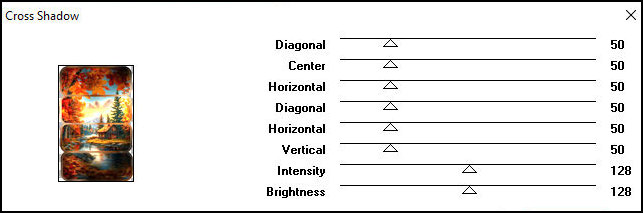
Effects / Plugins / Graphic Plus /
Cross Shadow - Default
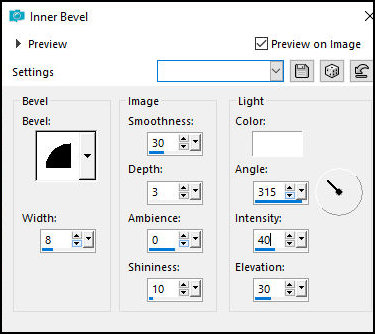
Effects / 3D Effects / Inner Bevel
Etapa 10
Select none
Drop Shadow: 2 2 20
40 preto
Layers / Duplicate
Image / Mirror / Mirror horizontal
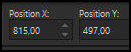
Ative a Pick Tool e configure: X=815 -
Y=497 - Pressione M
Merge Down
Etapa 11
Copie o tube misted paisagem [paysage
barbara]
Cole como nova layer
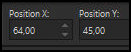
Ative a Pick Tool e configure: X=64 -
Y=45 - Pressione M
Adjust / Sharpness / Sharpen
Copie o tube [nuage du net]
Cole como nova layer
Layers / Properties / Opacity=80
Etapa 12
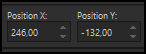
Ative a Pick Tool e configure: X=246 -
Y=-132 - Pressione M
Copie o tube [filette cloclo]
Cole como nova layer
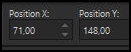
Ative a Pick Tool e configure: X=71 -
Y=148 - Pressione M
Etapa 13
Drop shadow igual anterir
Copie o tube [biche]
Cole como nova layer
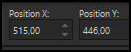
Ative a Pick tool e configure: X=515 -
Y=446 - Pressione M
Drop Shadow igual anterior
Etapa 14
Copie o tube [déco 2]
Cole como nova layer
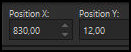
Ative a Pick tool e configure; X=830 -
Y=12 - Pressione M
Merge all
Duplique a imagem (shift+d) e minimize
Retorne para sua imagem de trabalho
Etapa 15
Bordas:
1px / cor 1
3px / cor 2
3px / cor 1
Selections / Select all
Borda: 15px / qualquer cor
Selections / Invert
Pinte com o gradiente Radial
Effects / Plugins / Graphic Plus /
Cross shadow - default

Etapa 16
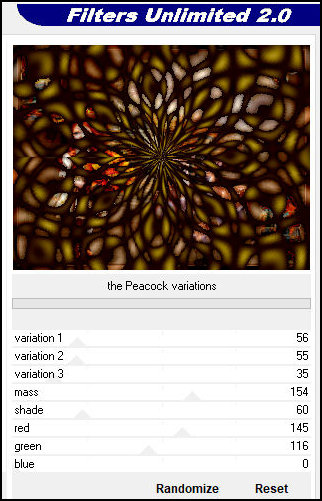
Effects / Plugins / Unlimited 2 / Kang
2 / The Peacok Variations
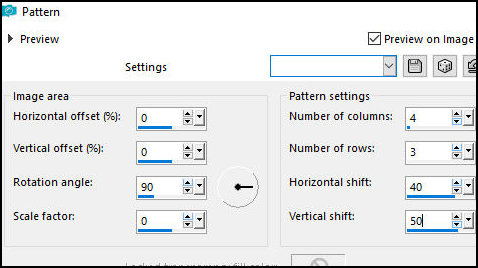
Effects / Reflection Effects / Pattern
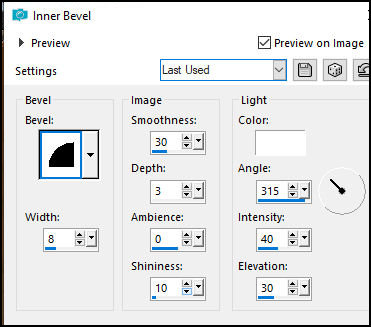
Effects / 3D Effects / Inner Bevel -
igual anterior
Select none
Etapa 17
Bordas:
1px / cor 1
3px / cor 2
3px / cor 1
Selections / Select all
Borda: 40px / qualquer cor
Selections / Invert
Copie a imagem minimizada
anteriormente
Cole na seleção
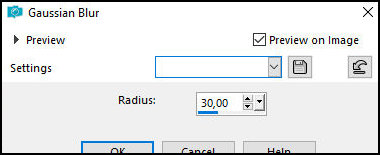
Adjust / blur / Gaussian Blur: 30
Effects / Plugins / Unlimited 2 /
Paper Textures / Canvas Fine - Default

Adjust / Sharpness / Sharpen More
Etap 18
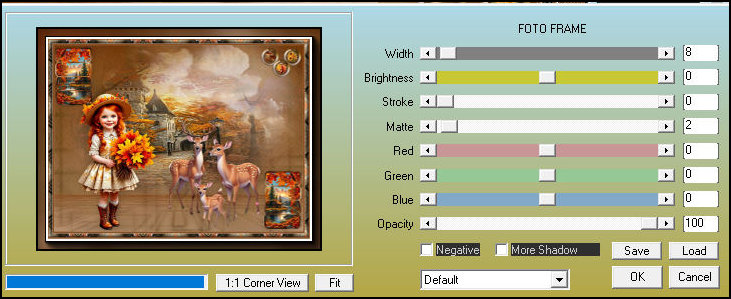
Effects / Plugins / AAA Frames / Foto
Frame
Selections / Invert
Drop Shadow; 5 5 80
40 preto
Select none
Copie o tube [coins]
Cole como nova laye
Não precisa mover
Coloque as assinaturas
Merge all
Imag e/ Resize: 1000px(width)
Salve como jpeg
|